Fun DIY cat stuff ideas for pet lovers use making, crafting, upcycling, and construction skills to create functional objects that serve a cat’s specific behavioral needs — the scratching drive, the climbing instinct, the hunting motivation, the resting preference, the hiding tendency — while integrating into the home’s interior aesthetic as considered design objects rather than afterthought pet products. This article gives you exactly 13 ideas spanning cat furniture builds, handmade toys, personalized accessories, enrichment installations, and the specific material and construction decisions that distinguish a DIY cat object of genuine quality from one that lasts a weekend before collapsing or being ignored.
DIY cat stuff done well is not a craft project that happens to involve a cat — it is the specific application of making skill to a welfare brief that takes the cat’s behavioral biology seriously, producing objects that the cat uses voluntarily and repeatedly because they accurately serve the cat’s instinctive preferences rather than the maker’s assumptions about what a cat might enjoy. Here are 13 ideas worth making.
Why Fun DIY Cat Stuff Ideas Work for Pet Lovers
The behavioral case for owner-made cat enrichment objects rests on a specific and well-documented welfare principle: domestic cats in indoor environments consistently demonstrate higher rates of stress-related behaviors (over-grooming, repetitive vocalization, inappropriate elimination, aggression) when their environment provides insufficient opportunity for the four primary behavioral drives — predatory play (hunting behavior expressed through chase, stalk, pounce, bat, and bite sequences), territory (the ability to mark, patrol, and claim space including elevated territory), scratching (both nail maintenance and scent marking using the interdigital glands), and hiding/denning (access to enclosed, small-aperture spaces that provide sensory buffering and psychological security). Commercial cat products address these drives with varying effectiveness; owner-made products can address them with greater specificity when the maker has observed their cat’s particular behavioral preferences and built to those preferences rather than to a generalized feline behavior average.
The practical advantage of DIY cat products — beyond the cost saving that is typically significant — is the ability to specify materials, dimensions, and construction details for the specific cat. A DIY scratching post built to the actual height at which the owner has observed their cat scratching (cats prefer to scratch at full stretch, which varies by body length) will be used more consistently than a commercial post of standard height that may not match the cat’s specific stretch preference. A DIY cat bed built to the observed temperature preference (cats who sleep in the warmest available spot require different bedding materials than cats who seek cool, ventilated surfaces) and the observed enclosure preference (cats who sleep in enclosed spaces versus cats who prefer open surfaces) will be occupied more reliably than a commercial bed of averaged dimensions and standard filling.
Style at a Glance
| Element | Cat Welfare Function | DIY Design Edge |
|---|---|---|
| Philosophy | Serve the specific cat’s behavioral drives | Material and dimension chosen for the individual cat |
| Key Drives | Predatory play, territory, scratching, hiding | Observation before building |
| Materials | Sisal, cardboard, fleece, catnip, natural timber | Non-toxic, durable, washable |
13 Fun DIY Cat Stuff Ideas for Pet Lovers
1. Sisal-Wrapped Scratching Post — The Essential Build
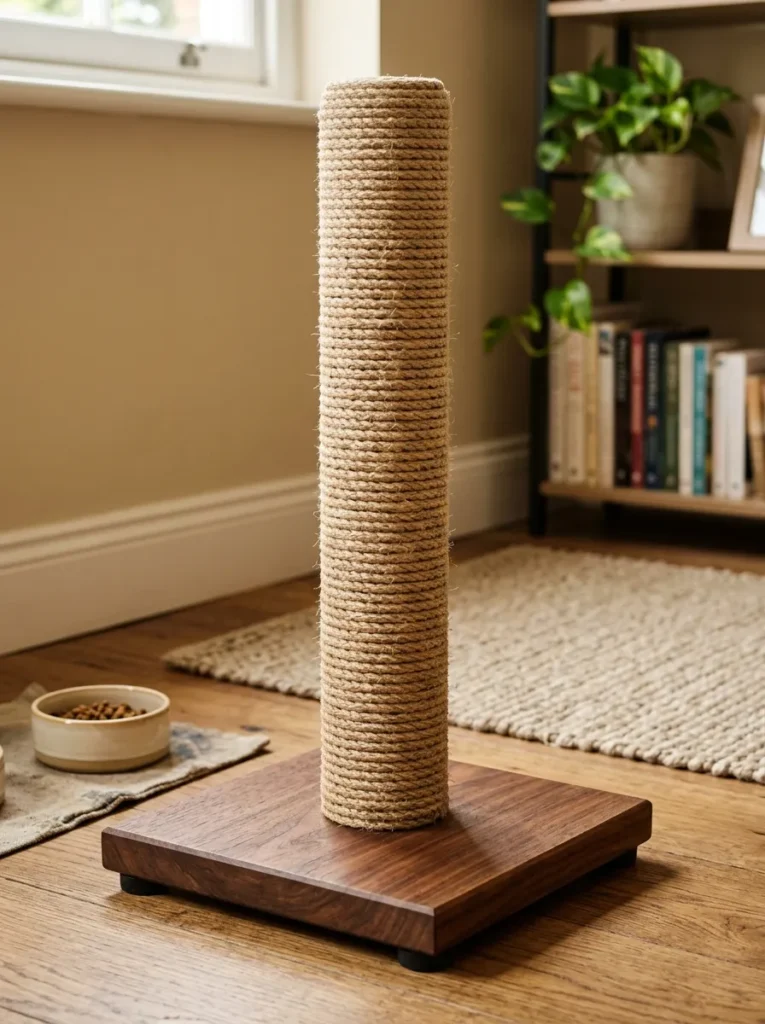
Vibe: The sisal scratching post feels like a piece of furniture that takes its function seriously — the solid base, the tight sisal winding, and the walnut-stained base communicating a level of making investment that commercial cardboard tubes do not.
Why it works: A sisal-wrapped scratching post built at the correct height for a specific cat applies the behavioral precision principle — the most important single variable in scratching post effectiveness is height. Cats scratch at full vertical stretch to both exercise the shoulder and forelimb muscles and to deposit scent from the interdigital glands at the highest possible point (the height of the scent mark communicates the cat’s size and status). A post that is too short prevents the cat from stretching fully and will be rejected in favor of the furniture that allows full stretch. Measure the cat’s stretched length from floor to the tip of the forepaws when the cat is observed stretching against a door frame or wall — this measurement is the minimum effective post height.
Construction: Cut the post from a 10cm diameter newel post or a 10cm × 10cm square timber section. Cut the base from 25mm thick plywood or solid timber at 30×30cm minimum. Screw the post to the base using two 80mm coach screws driven from below. Attach rubber non-slip feet at each corner of the base underside. Beginning at the base, wrap 6mm natural sisal rope tightly in continuous coils upward, applying a bead of wood glue to the post surface every 10cm to secure the rope against the post. Tie off at the top and apply a final sisal cap (a small disc of sisal wound into a cap shape and glued to the post top).
Non-toxic sisal specification: Use natural, untreated sisal rope only — rope treated with preservatives, dyes, or fire retardants is not appropriate for a cat scratching post because the cat will ingest small rope fibers during scratching.
Budget: Materials: $25–60. Making time: 2–3 hours.
Quick Win: A single 1m length of 6mm natural sisal rope hot-glued tightly around an existing toilet roll tube produces a horizontal scratching element that can be placed on the floor or mounted to a board — taking 15 minutes and costing under $2.
Shop The Look
| Product |
|---|
| Natural sisal rope 6mm untreated |
| Timber newel post 10cm diameter |
| Plywood base 25mm thick |
| Rubber non-slip feet set |
| Wood glue PVA adhesive |
Also view: 14 Modern Cat Window Enclosure Ideas for Happy Cats
2. Cardboard Box Maze — The Zero-Cost Enrichment
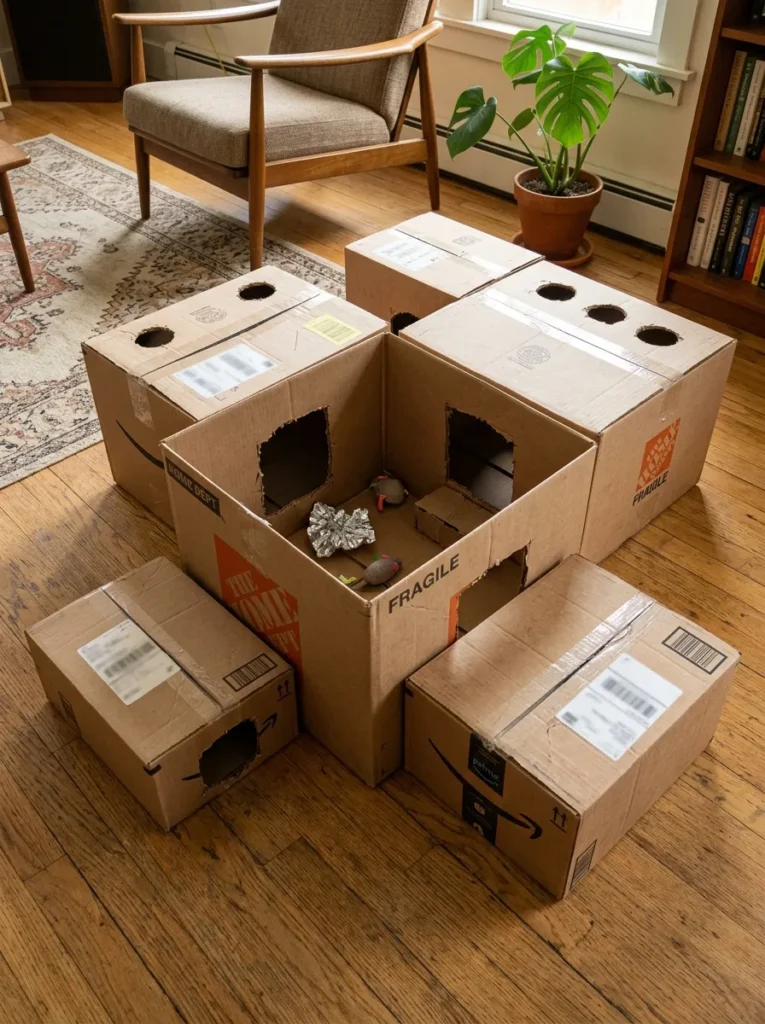
Vibe: The cardboard box maze feels like the most resourceful possible cat enrichment — the assembled delivery boxes creating a complex multi-room territory from materials that would otherwise be recycled.
Why it works: A connected cardboard box maze applies the territory and hiding enrichment principle — a maze of interconnected boxes provides cats with multiple simultaneous enrichment experiences: the hiding behavior (each individual box is a den that provides the visual isolation and enclosure that cats seek for security), the exploration behavior (a system of connected spaces with varied hole positions requires physical problem-solving to navigate), and the prey-monitoring behavior (the circular top ports allow the cat to observe the room while remaining partially concealed — the “bird-watching” position that cats prefer for prey observation). The zero material cost (using delivery boxes that the household would otherwise discard) makes this the most accessible enrichment installation in this list and one that can be refreshed and reconfigured whenever the cat habituates to the current layout.
Construction: Arrange the boxes in the desired layout before cutting any holes. Mark each connecting hole with a pencil on the box face where it will connect with the adjacent box. Cut holes with a sharp box cutter or utility knife. Stack boxes where height variation is desired (a small box inside a large box with a hole in the large box’s side wall and the small box positioned against the hole creates a step-up element). Scatter catnip, crinkle paper, and small toy mice inside the boxes as discovery incentives.
Budget: Zero if using delivery boxes. Alternatively: $0–5 for a set of assembled boxes.
Making time: 30–60 minutes depending on the maze complexity.
Shop The Look
| Product |
|---|
| Box cutter sharp utility |
| Catnip dried enrichment |
| Crinkle mylar toy material |
| Small toy mouse set |
| Duct tape box reinforcement |
3. Fleece Cat Teaser Toy — The Wand and Strip Set
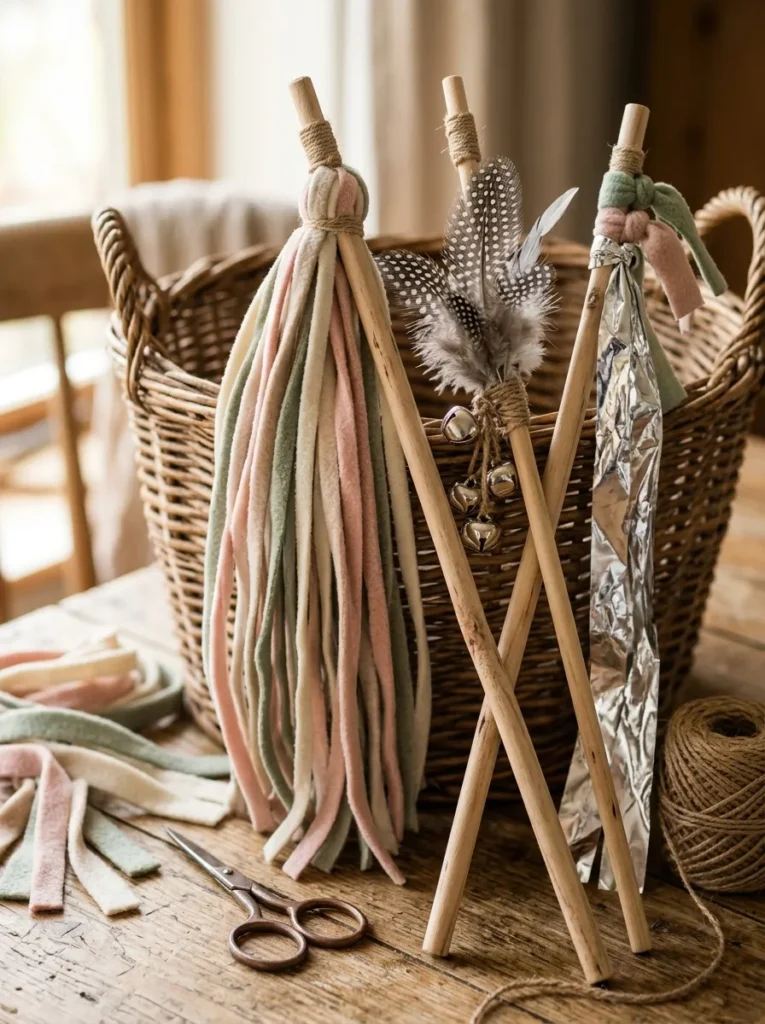
Vibe: The handmade fleece wand set feels like the most thoughtful version of a cat toy — the handmade quality and the varied strip materials creating wand toys with the specific movement and texture that commercial alternatives rarely achieve.
Why it works: A handmade fleece wand teaser toy applies the predatory sequence enrichment principle — interactive wand toys are the most behaviorally valuable category of cat toy because they allow the complete predatory sequence (stalk, chase, pounce, grab, bite, kick) to be expressed in a single play session. The wand’s flexible attachment (the fleece strips or feathers at the end of the dowel move unpredictably and at varied heights) creates the specific movement pattern of a live prey animal that triggers the fullest behavioral engagement from even a lazy or senior cat. Handmade wand toys allow the maker to vary the attachment materials (fleece strips for visual interest and silent movement, feathers for realistic prey movement, crinkle mylar for auditory stimulation, small bells for additional sensory engagement) to maintain novelty across play sessions.
Construction: The wand is a 40–50cm wooden dowel (smooth, no splinters). Tie a 50–60cm length of thin natural twine or strong thread to one end. Attach the chosen play material to the end of the twine: cut 6–8 strips of fleece fabric (2cm wide, 30cm long) and knot the bundle at the twine end; or tie a bundle of natural feathers (from a craft supplier — ensure feathers are not treated with dyes or preservatives that a cat could ingest); or tie a strip of crinkle mylar (the thin metallic film available from craft suppliers) 15cm wide and 40cm long.
Making time: 10–15 minutes per wand.
Shop The Look
| Product |
|---|
| Natural fleece fabric yard |
| Wooden dowel 40cm smooth |
| Natural craft feather set |
| Crinkle mylar film sheet |
| Small craft bell set |
4. Cat Window Perch — The Observation Station
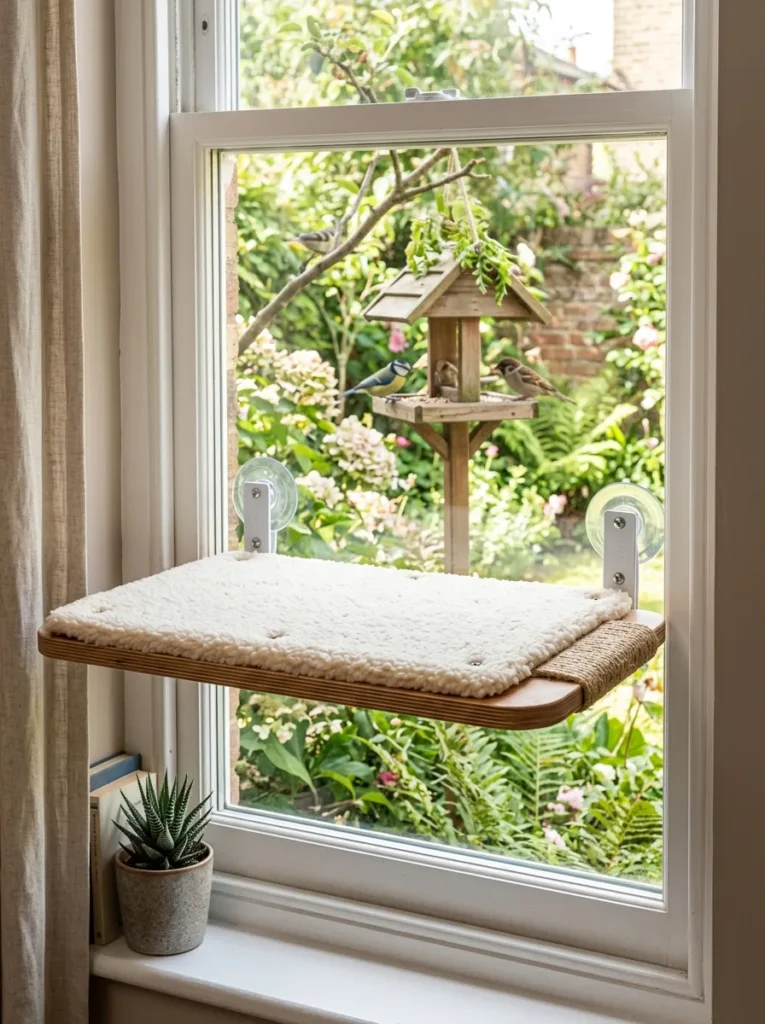
Vibe: The window perch feels like the best possible seat in the house, designed for someone who genuinely appreciates a garden view — the combination of warm sherpa surface, height, and direct bird-feeder visibility creating the cat’s optimal observation position.
Why it works: A cat window perch with an external bird feeder applies the combined enrichment principle — a window perch provides the elevated territory and sun-bathing opportunity that cats seek for general wellbeing; positioning it at eye level to an external bird feeder adds the specific cognitive and sensory enrichment of bird watching (tracking moving targets, processing varied bird vocalizations through the glass, monitoring the approach and departure of different bird species) that significantly extends the enrichment value of the perch. Research on indoor cat enrichment consistently identifies a window perch with external bird or wildlife activity as the highest-value single enrichment addition available for an indoor cat.
Construction options: The simplest window perch uses suction cup shelf mounts ($20–40 for a set rated for 10–15kg) that grip the window glass without any drilling or permanent installation. The perch platform (18mm plywood at 40×30cm, sanded smooth and painted or varnished to match the window frame) rests on the suction cup brackets. For a heavier or more permanent installation, screw L-brackets into the window frame or adjacent wall.
Budget: Suction cup mount system: $20–40. Plywood and sherpa pad: $15–30. Total: $35–70.
Making time: 30–60 minutes.
Shop The Look
| Product |
|---|
| Suction cup cat shelf mount set |
| Plywood 18mm shelf cut 40x30cm |
| Sherpa faux sheepskin pad removable |
| External window bird feeder suction |
| Sisal rope small scratch element |
5. Catnip-Stuffed Fabric Toy Mouse — The Sewing Project
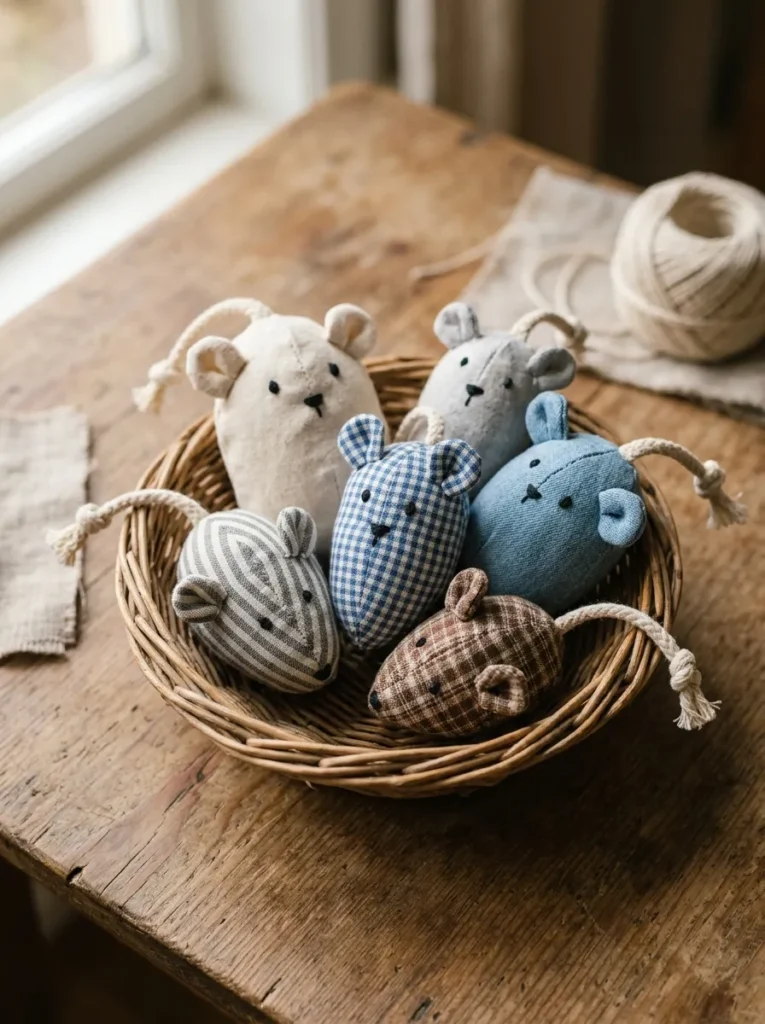
Vibe: The handmade catnip mice feel like toys made by someone who knows exactly what makes a toy worth hunting — the varied fabric patterns, the knotted tails, and the catnip stuffing creating the most genuinely prey-like toy available at any price.
Why it works: Handmade catnip fabric mice apply the prey-form enrichment principle — the mouse is the domestic cat’s primary natural prey animal, and a fabric toy that approximates the mouse’s specific attributes (small size fitting in the mouth, rounded body, distinct head-and-body form, long flexible tail, fresh catnip scent that triggers predatory excitement) produces more behavioral engagement than most commercial toy categories because it satisfies the predatory sequence at multiple stages: the tail triggers the chase response, the body size triggers the bite-and-kick response, and the catnip scent triggers the final capture response.
Construction: Cut two identical mouse-body pieces from the chosen fabric using a simple teardrop template (longer and wider at the back, coming to a point at the nose). Sew the two pieces right sides together with a 0.5cm seam allowance, leaving a 2cm turning gap at the back. Turn right side out, fill with a mixture of catnip and polyfill (catnip should constitute approximately 30–40% of the total fill for adequate scent intensity), slip-stitch the turning gap closed. Add ears (two small circles, hemmed and slightly gathered at the base) by sewing them into the head seam before turning the body right side out. Knot a 15cm length of cotton cord and insert it through a small hole at the mouse’s back end, securing with a knot inside.
Catnip specification: Use dried Nepeta cataria (the specific catnip species that produces the active compound nepetalactone) from a reputable pet or herbal supplier. Fresh catnip can be substituted during the growing season.
Making time: 15–20 minutes per mouse after the first.
Shop The Look
| Product |
|---|
| Natural cotton fabric set varied |
| Dried catnip Nepeta cataria |
| Polyfill stuffing blend |
| Cotton cord tail 2mm |
| Black embroidery thread nose eyes |
6. Cat Tunnel — The Cardboard Tube Installation
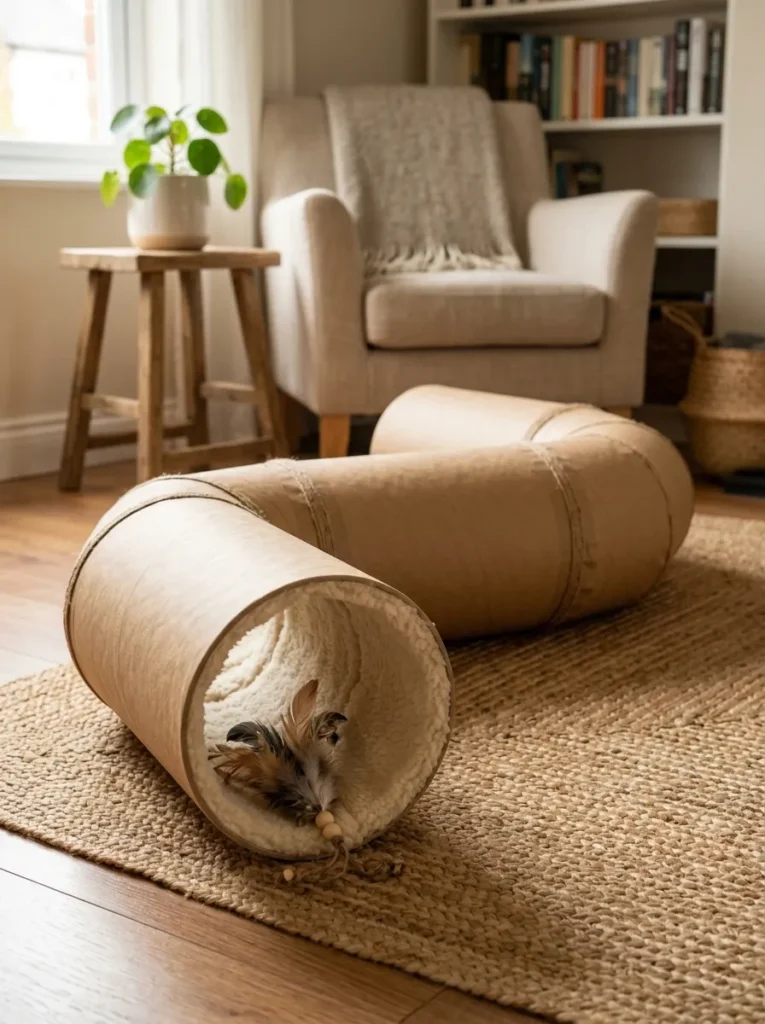
Vibe: The cardboard tube tunnel feels like a functional design installation that the room accepted because its exterior reads as intentional — the covered, curved tube arrangement creating a cat tunnel that does not read as packaging material left on the floor.
Why it works: A cardboard tube tunnel system applies the exploration and play enrichment principle — cats are strongly motivated to investigate and move through tunnels, a behavior that replicates the exploration of burrows, drainage systems, and undergrowth paths in the outdoor environment. Large-diameter carpet roll tubes (available free from carpet retailers who discard them after the roll is exhausted) provide the correct scale for most domestic cat sizes — the 30cm diameter allows most cats to turn around within the tube. The fleece lining softens the interior surface and provides the scent absorption surface that the cat marks during use, establishing the tunnel as owned territory.
Covering options: The exterior can be covered in kraft paper (applied with wallpaper paste and allowed to dry before painting) or in a fabric such as hessian or a neutral-toned heavy cotton that coordinates with the room’s palette, making the tunnel read as a designed element rather than packaging.
Budget: Carpet roll tubes: free. Fleece lining: $8–15. Covering material: $5–15. Total: $13–30.
Making time: 2–3 hours.
Shop The Look
| Product |
|---|
| Carpet roll tube free from retailer |
| Natural fleece fabric tube lining |
| Kraft paper exterior cover |
| Wallpaper paste tube cover |
| Feather toy entry invitation |
7. Hanging Cat Hammock — The Between-Furniture Swing

Vibe: The cat hammock feels like the furniture was designed to work together to provide a cat rest zone — the hammock suspended between the bookshelf and sofa reading as a considered domestic detail rather than an added pet accessory.
Why it works: A between-furniture cat hammock applies the dead zone activation and elevated rest principle — the floor space between two adjacent pieces of furniture is frequently unused by both humans and cats (too narrow for comfortable human use, insufficiently elevated for the cat’s territorial preference). A hammock suspended in this zone at approximately 30cm height converts dead space into the specific rest position that many cats prefer: slightly elevated (sufficient for the sense of territorial security), enclosed on three sides (by the surrounding furniture), and accessible from a single direction (limiting exposure to approach). The removable fleece pad is the key comfort specification — it provides washable softness at the hammock’s rest surface and allows easy hygiene maintenance.
Load rating: The hammock attachments (hooks screwed into the furniture side panels) must be rated for the combined weight of the hammock fabric and the cat. Use 6mm eye hooks in pre-drilled pilot holes (to prevent splitting the furniture timber) and verify that the furniture panels into which the hooks are screwed are structurally solid timber rather than thin veneer or hollow board construction.
Budget: Canvas fabric: $5–15. Grommets and rope: $8–15. Total: $13–30.
Making time: 30–45 minutes.
Shop The Look
| Product |
|---|
| Heavy canvas fabric natural 50x35cm |
| Metal grommet kit set |
| Natural rope 6mm hammock |
| Eye hook set 6mm screw |
| Fleece pad removable washable |
8. Crinkle Bag Cat Toy — The Sensory Object
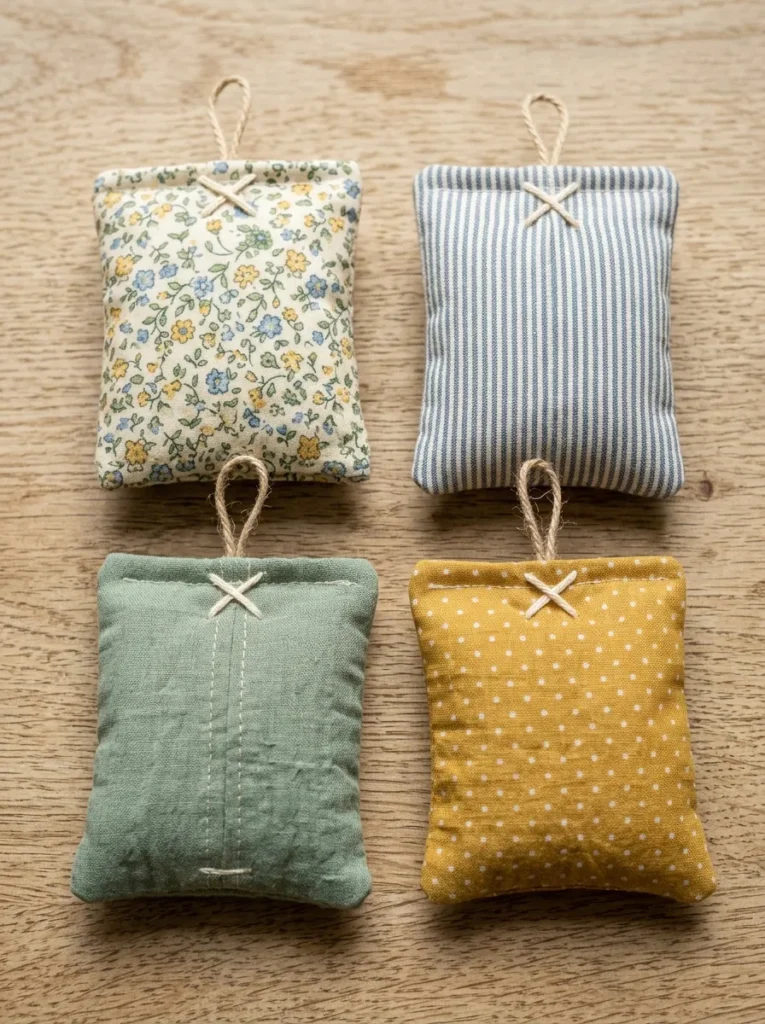
Vibe: The crinkle bag toys feel like sensory objects made with genuine knowledge of what makes a cat toy genuinely engaging — the combination of the auditory crinkle, the catnip scent, and the tossable soft form addressing three primary play motivations simultaneously.
Why it works: A crinkle pouch cat toy applies the multi-sensory stimulation principle — the most engaging cat toys provide simultaneous stimulation across multiple sensory channels: visual (the movement of the toy), auditory (the sound the toy makes during handling), olfactory (the scent of catnip or prey-referencing materials), and tactile (the texture of the toy surface under the cat’s paw and mouth). The crinkle pouch specifically addresses auditory and olfactory stimulation simultaneously — the mylar lining creates the distinctive crinkle sound that triggers curiosity and investigative behavior in most cats (the sound resembles small animal movement in dry vegetation), while the catnip filling adds the olfactory arousal that intensifies predatory play behavior.
Construction: Cut two rectangles of cotton fabric at 10×12cm each. Cut one rectangle of mylar film (from a crinkle bag or craft mylar sheet) at 9×11cm. Place the fabric pieces right sides together with the mylar piece between them. Sew around the perimeter with a 1cm seam allowance, leaving a 3cm turning gap. Turn right side out, fill with a small amount of dried catnip through the turning gap, and slip-stitch the gap closed. The crinkle sound comes from the mylar layer between the outer fabric layers.
Making time: 10–15 minutes per pouch.
Shop The Look
| Product |
|---|
| Natural cotton fabric small print |
| Crinkle mylar film craft sheet |
| Dried catnip Nepeta cataria |
| Hand sewing needle fabric |
| Cotton loop trim small |
9. DIY Cat Scratcher Pad — The Horizontal Surface
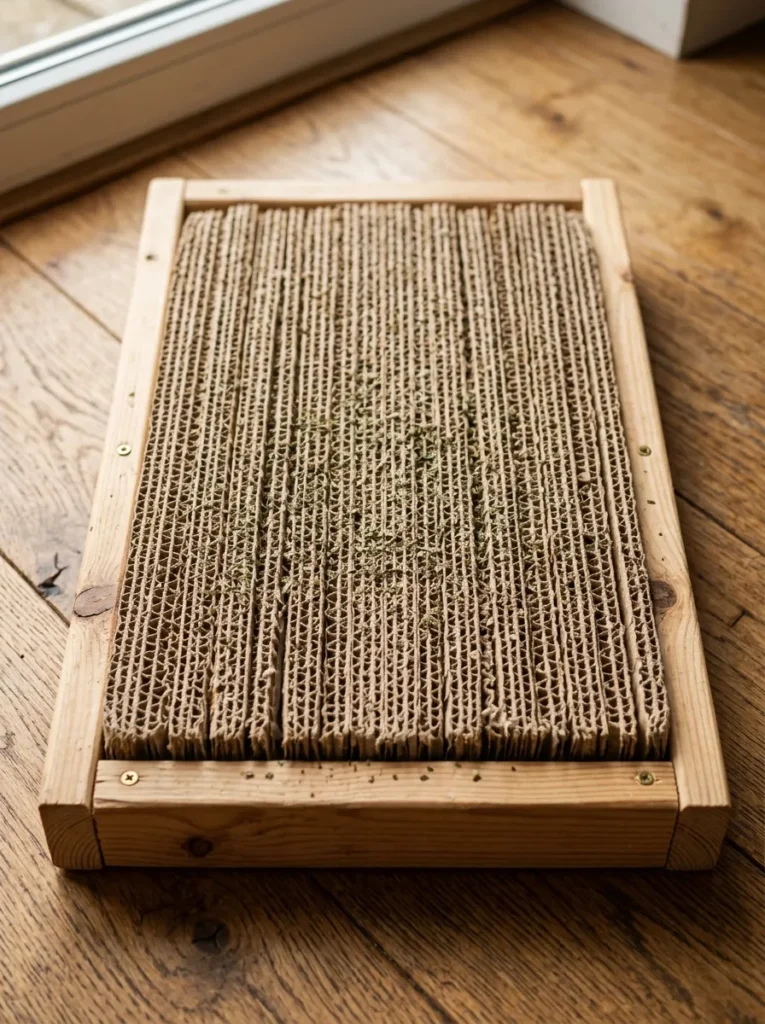
Vibe: The horizontal corrugated scratcher feels like the most satisfying surface a cat could encounter at floor level — the exposed corrugation edges providing the specific scratch resistance and texture that makes corrugated cardboard the most consistently preferred scratching material.
Why it works: A horizontal corrugated cardboard scratcher pad applies the substrate preference matching principle — while many cats prefer vertical scratching surfaces for the full-stretch marking behavior described in Idea 1, many cats (particularly cats with lower body weight and cats who are observed scratching at carpet level rather than against vertical surfaces) prefer horizontal scratching surfaces. The horizontal scratcher provides the scratch resistance the nail requires, the specific texture of corrugated cardboard that many cats find more satisfying than sisal, carpet, or fabric alternatives, and the option to rest within the scratcher’s recessed surface (the compressed cardboard layers create a slight depression that many cats find as attractive as a rest surface as a scratch surface).
Construction: Cut old cardboard boxes into strips 4cm wide and the scratcher’s intended length (40cm). Stack the strips standing on their narrow 4cm edge (the corrugation running vertically in the stack) until the stack is 25cm wide. Apply PVA glue between each layer. Compress the stack firmly using clamps or heavy weights and allow to cure for 24 hours. Build a simple timber frame from 4×2cm timber to contain the compressed stack. Sprinkle catnip into the corrugation channels as an attractant.
Budget: Zero material cost if using recycled cardboard boxes. Total: $0–15 for timber frame.
Making time: 30 minutes active construction plus 24 hours curing.
Shop The Look
| Product |
|---|
| Cardboard box recycled material |
| PVA glue cardboard adhesive |
| Timber frame 4×2cm lengths |
| Clamps cardboard compression |
| Dried catnip channel attractant |
10. Cat Enrichment Puzzle Feeder — The Cognitive Toy
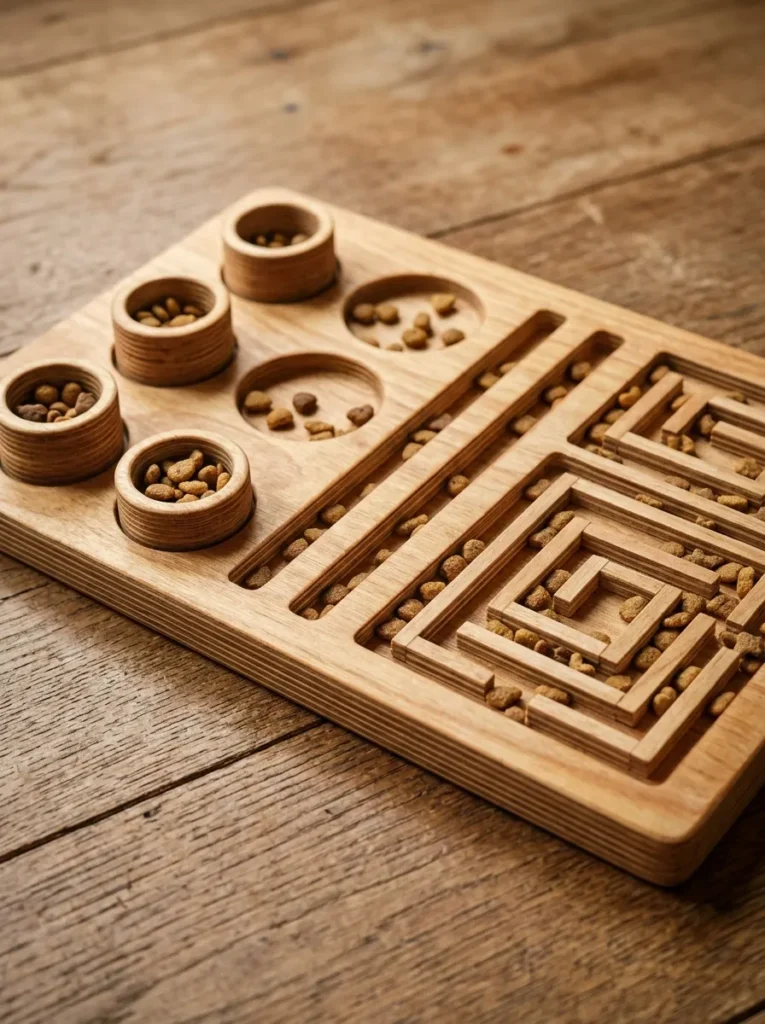
Vibe: The puzzle feeder feels like a cat’s daily meal given the respect of a genuine cognitive challenge — the varied cavity types requiring different paw techniques and creating the problem-solving engagement that routine bowl feeding eliminates.
Why it works: A DIY wooden puzzle feeder applies the cognitive enrichment feeding principle — cats evolved to spend 40–60% of their waking hours engaged in hunting behavior, and the bowl feeding that replaces this behavioral investment eliminates the primary source of cognitive engagement from the indoor cat’s daily routine. A puzzle feeder that requires the cat to investigate, reach into, and extract food from varied cavity types (deep holes that require the cat to dip a paw and hook food upward, shallow depressions that require gentle pawing, narrow channels that require linear paw movements) reintroduces the problem-solving and motor skill engagement of hunting behavior at feeding time, reducing boredom-related stress behaviors and extending the behavioral investment of each meal from seconds to several minutes.
Construction: Sand the plywood board smooth to 240 grit. Route or drill the cavities using an appropriate tool: cylindrical holes using a 30mm spade bit, shallow depressions using a 50mm forstner bit at shallow depth, slot channels using a router or oscillating tool. For the maze section, glue short 10mm high timber strips into a small grid pattern. Finish all surfaces with food-safe hardwood oil (not varnish, which is not food-safe). Verify all cavity depths and widths are appropriate for the specific cat’s paw size.
Budget: Plywood: $5–10. Tools (if not already owned): variable. Finishing oil: $8–15. Total: $13–25 in materials.
Making time: 2–3 hours including finishing and curing.
Shop The Look
| Product |
|---|
| Plywood 12mm sheet 20×30cm |
| Food-safe hardwood oil finish |
| Forstner bit set varied size |
| Spade bit 30mm hole drill |
| Sandpaper 120 240 grit set |
11. Personalized Cat Food Station — The Elevated Bowl Setup
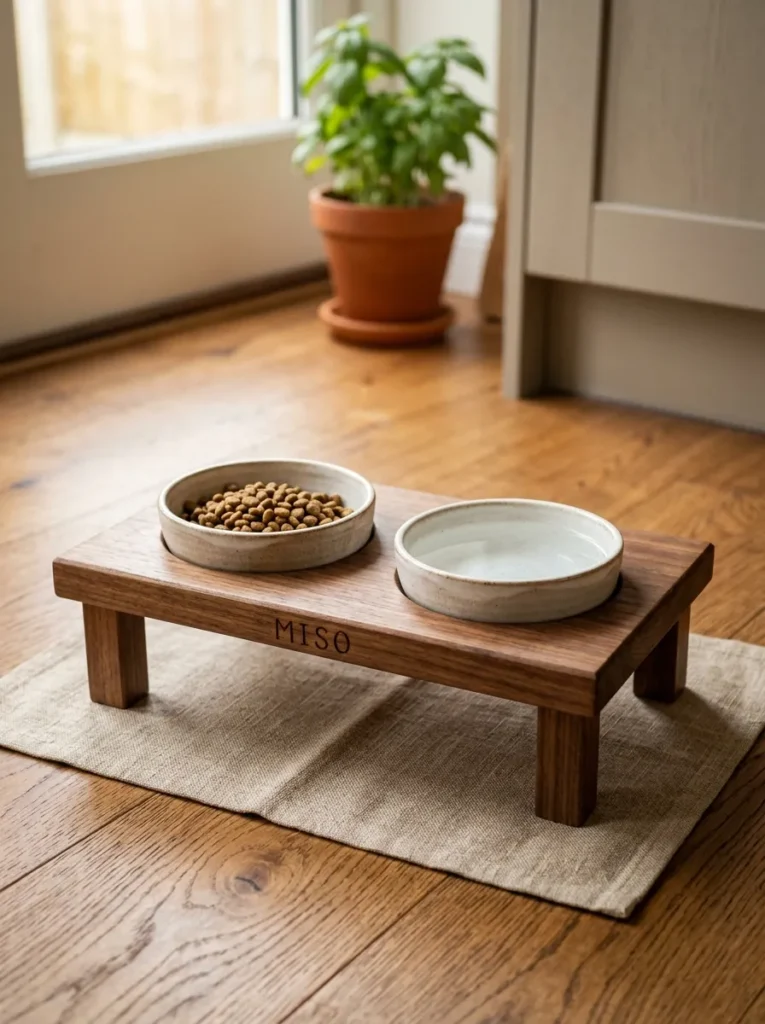
Vibe: The elevated cat food station feels like a piece of domestic furniture made specifically for this specific cat — the walnut finish, the cat’s name on the front face, and the matching ceramic bowls creating a feeding station of genuine domestic quality.
Why it works: An elevated cat food station applies the ergonomic and personalization principle — elevated feeding (with bowls raised 10–15cm above floor level) is documented as reducing the neck strain that some cats experience when eating from floor-level bowls, particularly beneficial for older cats and cats with arthritis in the cervical spine. The 10cm elevation is the most consistently recommended ergonomic height for standard domestic cat feeding. The personalization element (the cat’s name on the station’s front face) converts a functional object into a specifically personal one — the name communicates that this specific station was made for this specific cat, which is the quality that distinguishes DIY pet objects from commercial equivalents.
Construction: Cut the platform board from 18mm plywood at 30×20cm. Cut four legs from 4×4cm timber at 10cm length. Drill two 12cm diameter holes in the platform top (use a hole saw bit at the correct diameter to match the chosen bowls — test-fit before drilling). Attach the legs to the platform underside using wood glue and 40mm screws. Sand smooth to 240 grit. Apply walnut wood stain and finish with a food-safe hardwood oil. Burn or paint the cat’s name on the front face between the legs.
Budget: Materials: $20–40. Making time: 1.5–2 hours.
Shop The Look
| Product |
|---|
| Plywood 18mm platform board |
| Timber 4×4cm leg length |
| Hole saw bit 12cm ceramic fit |
| Walnut wood stain exterior |
| White ceramic bowl set matching |
12. Catnip Garden Pot — The Indoor Growing Project
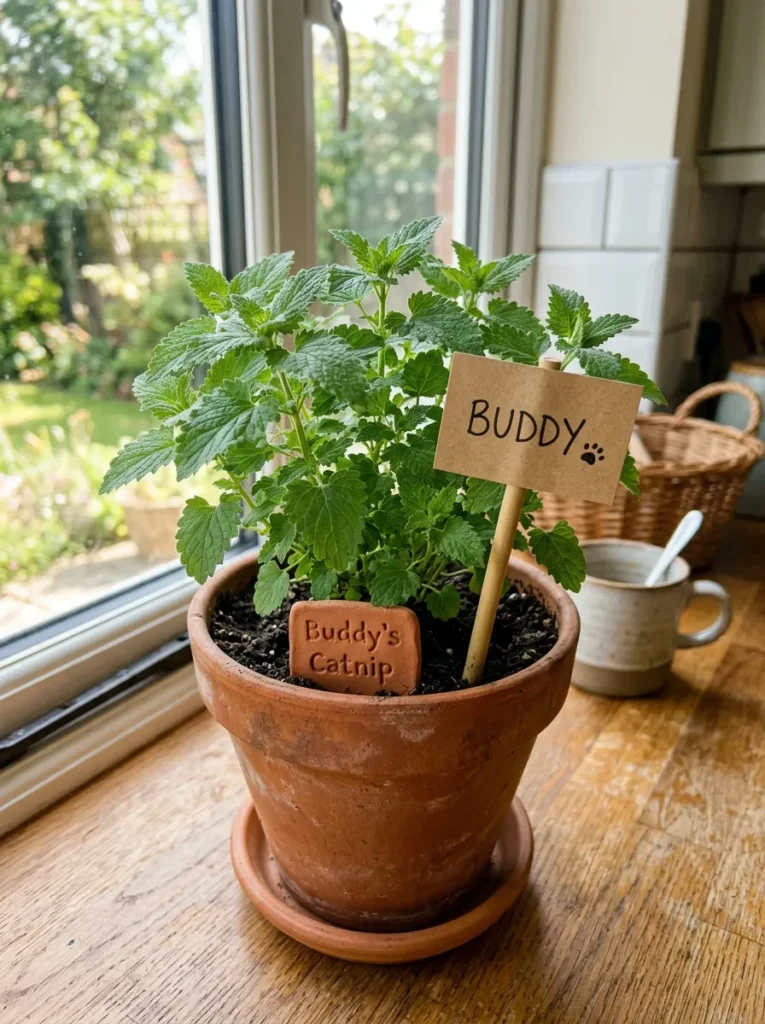
Vibe: The growing catnip pot feels like the most natural possible cat enrichment — a living plant that the cat can approach, smell, and nibble at its own volition, the windowsill position providing the sun that makes the plant’s aromatic compounds most potent.
Why it works: A growing catnip pot applies the continuous olfactory enrichment principle — dried catnip provides nepetalactone (the compound that triggers the rolling, rubbing, and playful behavior in the approximately 50–70% of cats that carry the genetic receptor sensitivity) but the live plant provides a continuously replenishing source of this compound at varying concentrations as the plant grows, is touched, and is grazed. A live catnip plant growing in a terracotta pot on a windowsill provides self-regulating enrichment: the cat approaches and interacts with the plant when motivated, the plant recovers between interactions, and the household benefits from the visual and olfactory quality of a growing plant as well as the cat’s behavioral engagement.
Growing catnip: Nepeta cataria germinates readily from seed in moist potting compost at room temperature, reaching usable size in 6–8 weeks. Alternatively, established catnip plants are available from most garden centres in spring and summer. Position in the sunniest available windowsill — catnip requires at least 6 hours of bright light daily for maximum aromatic compound production. Allow the plant to recover between cat interactions by positioning it in a location the cat cannot access constantly — bring it out for supervised cat interaction sessions.
Budget: Catnip plant or seed: $3–8. Terracotta pot: $3–6. Total: $6–14.
Making time: 10 minutes to pot the plant.
Shop The Look
| Product |
|---|
| Catnip plant Nepeta cataria |
| Catnip seed indoor growing |
| Terracotta pot 15cm drainage |
| Terracotta saucer matching |
| Bamboo name stake small |
13. DIY Cat Portrait — The Personalized Wall Art
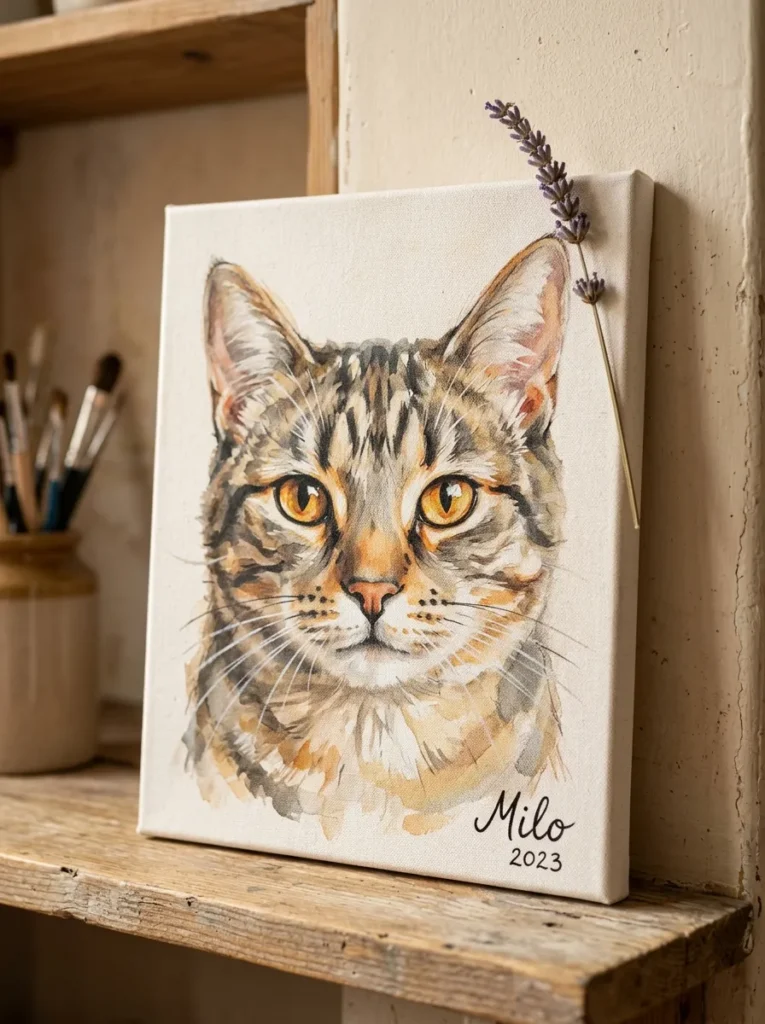
Vibe: The DIY cat portrait feels like the most personal possible form of appreciation for an individual animal — the painted face with its specific eye color and coat pattern creating an artwork that could only be made for this specific cat.
Why it works: A handmade cat portrait applies the personal art-making principle — a painting, drawing, or mixed-media artwork of a specific cat is the form of cat-related DIY that most directly expresses the specific relationship between the maker and the individual animal. Unlike toys and furniture (which serve the cat’s behavioral needs), a cat portrait serves the human owner’s emotional connection to the animal — the impulse to capture the specific quality of a beloved cat’s face (the particular amber of the eye, the specific tabby pattern of the coat, the characteristic expression) in a lasting visual record is one of the oldest impulses in domestic animal keeping, expressed across centuries in painted portraits of pets in European art history.
Accessible techniques: The loose watercolor-on-canvas technique (applying diluted acrylic paint in a wet-on-wet technique that allows colors to bloom and blend at the edges of each mark) is the most accessible oil-alternative painting technique for makers without formal painting training: dilute acrylic paint to watercolor consistency with water, dampen the canvas surface with clean water, apply the diluted paint and allow it to bloom and spread naturally. Reference photographs of the cat provide the specific detail (the eye color, the coat pattern, the muzzle proportions) that the painting captures. The looseness and slight imprecision of the wet technique is an aesthetic quality rather than a failure — it is what distinguishes a handmade portrait from a printed photograph.
Making time: 2–4 hours for a complete 20×25cm portrait.
Shop The Look
| Product |
|---|
| Stretched canvas 20×25cm |
| Acrylic paint set warm cat tones |
| Round brush set paint 2-10 |
| Reference photograph cat |
| Simple timber frame optional |
How to Start Your DIY Cat Projects
The single most important first move before beginning any DIY cat project is spending one week carefully observing the specific cat’s behavioral patterns — specifically noting where the cat scratches (what surface, what height, what substrate), where the cat rests (what temperature, what level of enclosure, what height), how the cat plays (what movement triggers engagement, how long play sessions last, what toy types are abandoned versus consistently used), and where the cat eats and drinks (whether the cat appears comfortable at floor level or shows signs of neck strain). This observation week, which costs nothing and requires only attention, provides the specific behavioral brief that makes the subsequent DIY projects accurately serve the specific cat rather than the average cat. A scratching post built at the wrong height for a specific cat, a bed built at the wrong level of enclosure for a specific cat, and a puzzle feeder with cavities the wrong size for a specific cat will not be used — and an unused DIY project represents wasted materials and wasted making time.
The most common mistake in DIY cat projects is selecting projects based on what the maker finds interesting or aesthetically appealing rather than based on what the cat’s observed behavior indicates it needs. A maker who is attracted to building a complex wall-mounted cat climbing system but whose cat consistently uses only the floor and the sofa (and shows no interest in elevated positions) is building a project that addresses the average cat’s preference rather than the specific cat’s preference. The most valuable DIY cat project is always the one that addresses the specific behavioral need that the specific cat most consistently demonstrates — the cat that scratches the carpet demonstrates the need for a horizontal scratcher (Idea 9), the cat that knocks food from its bowl while eating demonstrates the need for a puzzle feeder (Idea 10), the cat that sits at the window watching the garden demonstrates the need for a window perch (Idea 4).
Three specific items under $25 that enable the widest range of DIY cat projects from this list: a roll of 6mm natural sisal rope ($8–12 for 10 metres, enabling the scratching post in Idea 1 and the sisal scratch element in Idea 4); a packet of dried catnip ($5–8 for 50g, enabling the toy mouse in Idea 5, the crinkle pouch in Idea 8, the scratcher attractant in Idea 9, and the catnip garden in Idea 12); and a sheet of heavy natural cotton canvas fabric (30×60cm, $4–8, enabling the hammock in Idea 7 and the toy mice in Idea 5). These three items combined for under $25 provide the primary material for five of the thirteen ideas in this list.
Frequently Asked Questions About DIY Cat Stuff
What materials are safe for DIY cat toys and furniture?
Safe materials for DIY cat toys and furniture share three properties: non-toxic when ingested in small quantities (cats ingest material from every object they interact with through grooming and chewing), free from small parts that can be swallowed (no beads, bells, or attachments smaller than 3cm unless secured in a manner that prevents detachment), and durable enough to remain structurally intact under regular cat use (a toy that disintegrates during play creates both safety hazards and behavioral frustration). Specifically safe materials include: natural sisal rope (untreated, no dye or preservative), natural cotton fabric, natural wool, natural fleece, food-safe finished timber, ceramic, natural cork, natural feathers (from craft suppliers, not wild-collected), dried herbs (catnip, valerian, silver vine — all verified non-toxic). Materials to avoid: synthetic dyed rope (dyes can be toxic if ingested), treated or preserved timber with oil-based finishes (use food-safe hardwood oil only for any surface the cat contacts), hot glue if accessible (can be ingested and cause intestinal obstruction), and any plastic that can be chewed into small pieces.
How do you encourage a cat to use a new DIY toy or furniture piece?
Introducing a cat to a new DIY object requires the same graduated positive association technique used for any new environmental element. For scratching furniture: sprinkle dried catnip on the scratch surface and use a wand toy to guide the cat into the correct scratch position (gently placing the cat’s forepaws on the scratch surface while encouraging with play). For new beds or resting surfaces: place a worn item of the owner’s clothing (carrying the owner’s familiar scent) on the new surface — cats are significantly more likely to investigate and adopt a surface that carries familiar scent. For puzzle feeders: start at the lowest difficulty level (food in the shallow depressions only, not in the deep holes) and gradually increase the difficulty as the cat masters each level. For tunnels and boxes: scatter treats and catnip inside and allow the cat to discover the tunnel independently rather than placing the cat inside.
How do you make DIY cat toys safe for cats that chew aggressively?
Aggressive chewers require specific construction attention to every attachment point and every material component. For toy mice: ensure the tail is knotted both inside and outside the body (so it cannot be pulled out and swallowed), use heavy canvas rather than light cotton (which can be torn apart more easily), and use embroidered features rather than glued-on parts. For wand toys: use a round wooden dowel rather than a thin stick or wire, and replace the attachment material at the first sign of fraying or loosening rather than waiting until it detaches. For puzzle feeders: ensure all routed cavities are smooth-edged (sand after routing with 240-grit sandpaper), and use a food-safe oil finish rather than varnish, which can flake. For any cat that removes and swallows parts from toys despite reasonable precautions, supervised play only is the appropriate protocol.
What is the most important DIY cat project for a new kitten?
The most important DIY project for a new kitten’s arrival is establishing appropriate scratching surfaces (Idea 1 or Idea 9) before the kitten begins to scratch — directing scratching behavior to appropriate surfaces from the beginning of the kitten’s residence is significantly easier than redirecting an established scratching habit from inappropriate surfaces. The second most important is a cardboard box hide (a variation of Idea 2, using a single appropriately-sized cardboard box with one entry hole and placed in a quiet, low-traffic location) that provides the enclosed security space that a kitten requires when first arriving in a new environment — a kitten that has an appropriate hide available during the stressful transition period acclimatizes to the new home significantly faster than one that lacks a secure retreat.
How long do DIY cat scratching posts last?
A well-constructed sisal-wrapped scratching post (using a solid timber core, tightly-wound untreated sisal rope, and a stable heavy base as described in Idea 1) typically lasts 2–5 years depending on the cat’s scratching frequency and the sisal’s specific quality. The sisal rope will show significant wear (fraying and matting at the most-used height) before the structural post is affected — the sisal can be replaced by unwinding the old rope and re-wrapping the post with new sisal, extending the post’s useful life indefinitely. The most common cause of premature scratching post failure in DIY construction is an insufficiently heavy base — a post that wobbles during scratching will be abandoned, and the cat will return to the furniture instead. Ensure the base is at minimum 30×30cm and made from 25mm plywood or solid timber.
Ready to Make Your Cat’s Day?
These 13 ideas move through every dimension of what genuine cat enrichment making can be — from the foundational welfare provision of the sisal scratching post built at the correct height for the specific cat, through the zero-cost ingenuity of the cardboard box maze and the horizontal corrugated scratcher, to the behavioral precision of the wand toy set and the catnip mouse, to the cognitive engagement of the puzzle feeder and the continuous natural enrichment of the growing catnip pot, to the personal domestic quality of the elevated food station with the cat’s name and the painted portrait on the wall above it. Starting with the observation week — seven days of watching the specific cat’s scratching location and height, resting preference, play engagement pattern, and feeding behavior before building anything — is the beginning that makes every subsequent project accurately serve the actual animal rather than the imagined generic cat. Observe first. Build from what you see. And let the specific pleasure of making something for a specific being who will use it and benefit from it every day be the motivation that makes DIY cat stuff genuinely worth doing.