A wooden cat house is a purpose-built outdoor shelter constructed from timber — designed to give cats a weatherproof, elevated, and secure space within your backyard. This article gives you 17 distinct wooden cat house designs that function as genuine garden architecture, not plastic pet accessories dropped into an otherwise considered outdoor space.
There is something quietly satisfying about a backyard that has thought through every inhabitant — including the cat who treats the garden as her personal territory. A wooden cat house done well disappears into the landscape. It reads as a garden feature first, a pet shelter second. The grain of the timber, the pitch of the roof, the shadow it casts on a warm afternoon — these details matter. Here are 17 ideas worth saving — and stealing.
Why Wooden Cat House Designs Work So Well
The wooden outdoor cat house sits at the intersection of functional garden architecture and the increasingly mainstream discipline of pet-inclusive landscape design. The tradition of purpose-built timber animal shelters has deep roots — from the Japanese neko-goya (cat huts) that appeared in Edo-period woodblock prints, to the Scandinavian tradition of crafting small-scale animal houses with the same joinery care as full-size buildings. What distinguishes a well-designed wooden cat house from a plastic or wire alternative is its participation in the garden’s design language: it uses the same materials, tones, and proportions as fences, raised beds, and pergolas, so it reads as belonging.
The materials that define this aesthetic are specific. Western red cedar (Thuja plicata) and treated pine are the two most practical exterior timber choices — cedar is naturally insect and rot-resistant without chemical treatment, while treated pine achieves similar durability at lower cost. Roofing options include cedar shingles, corrugated Colorbond steel in heritage tones, and standing seam copper for premium builds. Interior lining in untreated pine or birch ply provides warmth without off-gassing. The exterior palette leans into the garden: raw timber silver-grey, deep forest green paint, warm teak oil, matte black metal hardware.
The trend has genuine cultural momentum. Global searches for outdoor cat shelters grew sharply post-2020, driven by the surge in backyard renovation investment and a design community increasingly critical of the “afterthought” approach to pet infrastructure. Publications including Dezeen, Architectural Digest, and Gardenista have featured architect-designed cat houses in the $800–3,000 range, signaling that this is a category the design world now takes seriously. Simultaneously, the feral and community cat welfare movement has driven demand for weatherproof outdoor shelters at every budget level.
Small backyards can absolutely accommodate a wooden cat house — the key is proportion and placement. A house scaled to roughly 50cm wide × 50cm deep × 60cm tall sits comfortably on a garden bench, fence post platform, or freestanding post without dominating a compact space. In very small yards, wall-mounted designs that bracket directly to the fence are the highest-value option: they add zero footprint, elevate the cat to their preferred height, and become a vertical design feature on an otherwise flat fence plane.
Style at a Glance
| Element | Detail |
|---|---|
| Philosophy | Outdoor cat shelter as garden architecture — designed to belong, not to be tolerated |
| Key Materials | Western red cedar, treated pine, cedar shingles, Colorbond steel, birch ply interior |
| Color Palette | Raw silver-grey timber, deep forest green, warm teak, matte black, aged copper |
1. A-Frame Cedar Cat House with Cedar Shingle Roof
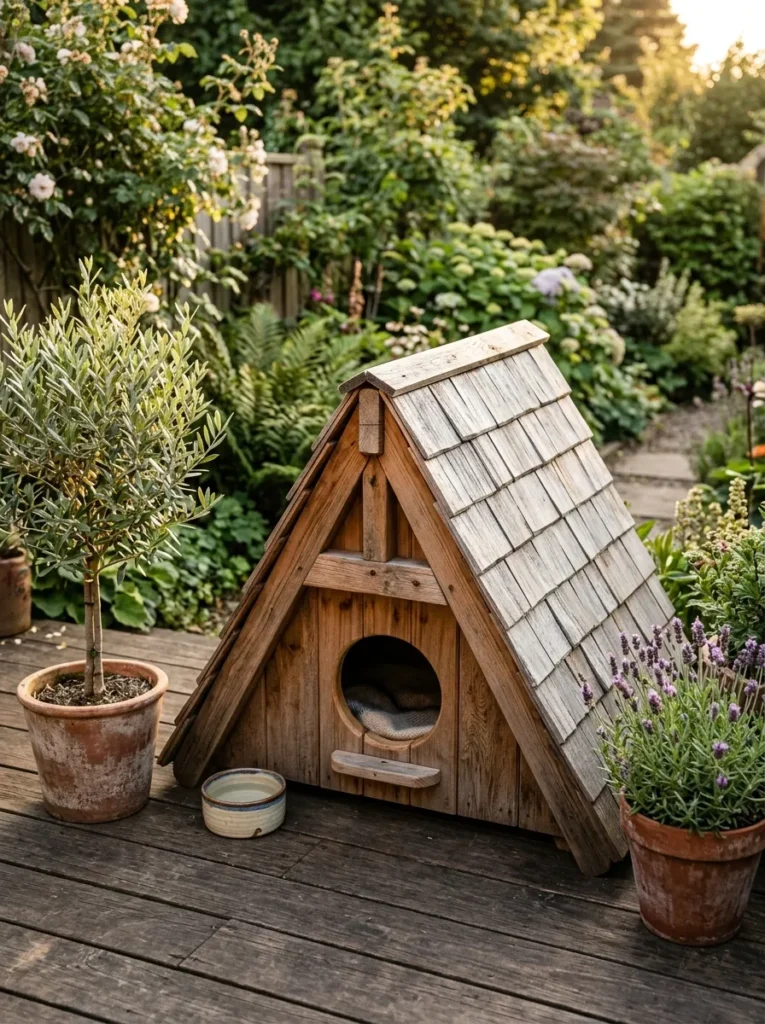
Vibe: Cabin-warm — a miniature mountain retreat that earns its place in the garden.
Why it works: The A-frame profile is structurally ideal for a cat house because the steep pitch sheds rain completely without requiring gutters or overhang engineering, and the triangular interior creates a naturally insulating dead-air space above the sleeping zone. Western red cedar is the correct timber choice here for two compounding reasons: its natural oils (thujaplicins) make it inherently resistant to rot, insects, and moisture without chemical treatment, and it weathers gracefully to a silver-grey over 2–3 seasons, which reads as intentional patina rather than neglect. Cedar shingles on the roof reinforce the material story — their overlapping texture catches light differently hour by hour, giving the structure a visual depth that flat roofing cannot match.
How to get it: Cut the A-frame sides from 19mm cedar boards with a 60-degree bevel at the ridge. The entry hole should be 15cm diameter — large enough for most domestic cats, small enough to exclude large possums. Finish with a single coat of raw linseed oil inside to slow moisture uptake on the interior surfaces.
Quick Win: Pre-cut cedar shingle packs from landscape supply stores cover roughly 1 square meter per pack — a cat house roof requires less than half a pack, making the leftover useful for a garden feature wall or raised bed edging accent.
Shop the Look
| Product |
|---|
| Western red cedar shingles pack |
| Raw linseed oil timber finish |
| Brass exterior hinge small cabinet |
| Ceramic outdoor pet water bowl |
| Terracotta planter pot medium |
Also view: 14 Small Side Yard Dog Run Ideas That Stay Green
2. Painted Shiplap Cat House with Peaked Roof
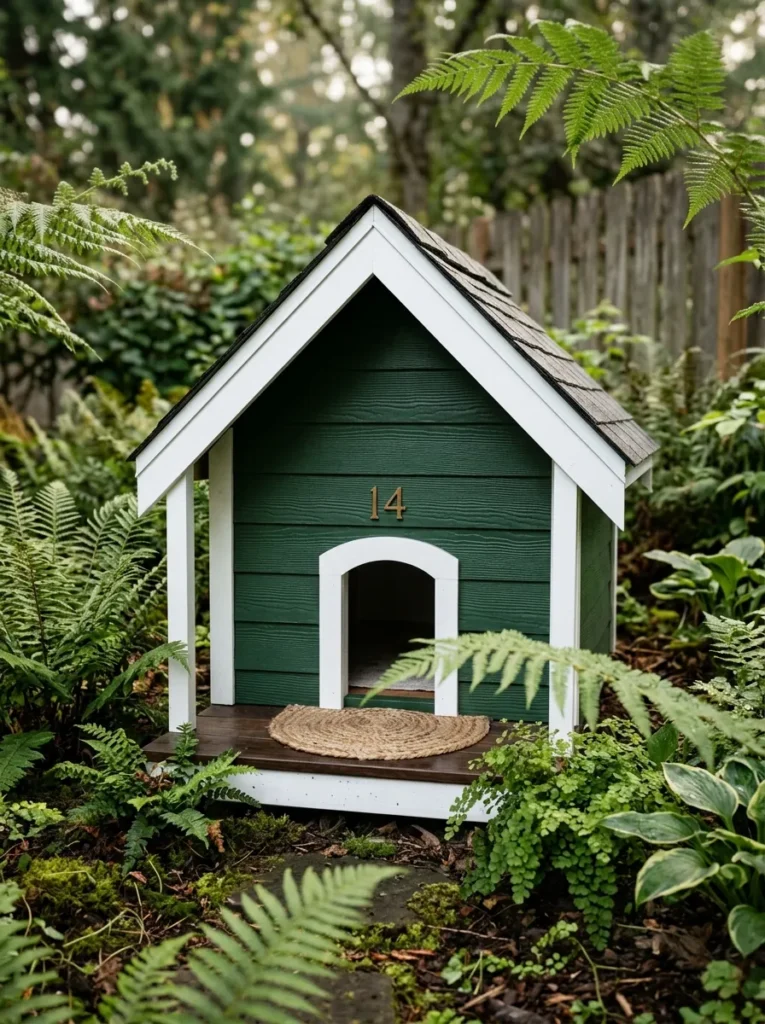
Vibe: Cottage-grounded — a garden feature that looks like it has always been there.
Why it works: Shiplap cladding on a cat house imports the most recognizable language of coastal and farmhouse garden architecture into a pet structure, which is exactly what makes it read as intentional design rather than an accessory. The horizontal shadow lines created by the shiplap profile add visual scale — a plain box at 50cm wide reads as small; a shiplap-clad box at the same dimensions reads as a scaled-down building. The small front porch platform is a behavioral design decision: cats prefer an intermediate surface between the ground and the entry hole — it allows them to pause, assess their surroundings, and then enter, rather than jumping directly from ground to opening.
How to get it: Clad with 75mm × 12mm primed pine shiplap boards, painted with a full exterior enamel in Dulux Wilderness or Farrow & Ball Calke Green. The porch platform should extend a minimum of 150mm beyond the entry hole and be wide enough for a cat to sit and turn around — approximately 300mm × 300mm.
Shop the Look
| Product |
|---|
| Primed pine shiplap cladding boards |
| Deep forest green exterior enamel paint |
| Small brass house number plaque |
| Exterior white trim paint enamel |
| Natural woven outdoor mat small |
3. Japanese Neko-Goya Style Cat House with Sliding Door
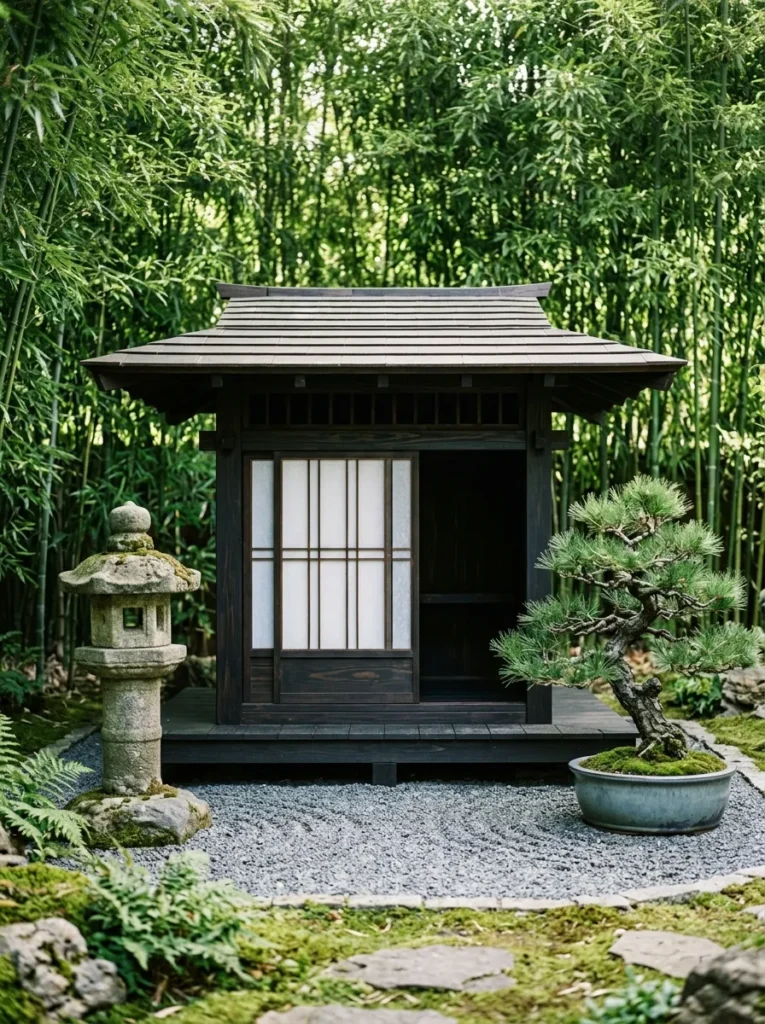
Vibe: Meditative — the garden’s quietest corner made quieter still.
Why it works: The traditional Japanese neko-goya proportion — wide eaves relative to wall height, low roof pitch, horizontal emphasis — translates directly to a small cat shelter scale without losing its cultural character. The wide eave overhang (extending 150–200mm beyond the wall plane) performs two functions: it protects the wall faces from driving rain without requiring paint or sealant refreshing as frequently, and it creates a shaded threshold zone beneath the overhang where cats gravitate in warm weather. The translucent polycarbonate sliding panel allows diffused light into the interior — warmer and less exposed than a full open entry hole — and gives the cat the option to close themselves in during storms.
How to get it: Stain the timber frame with Sikkens Cetol BL in Teak 006 — a near-black brown that absorbs into the grain rather than sitting on the surface, giving the authentic dark-timber Japanese architectural quality. Size the sliding panel groove at 6mm width to accept standard 4mm twin-wall polycarbonate sheet.
Quick Win: A sheet of 4mm twin-wall polycarbonate from a hardware store ($15–25) cut to size with a standard utility knife is all the sliding panel requires — no specialist tools or materials.
Shop the Look
| Product |
|---|
| Sikkens timber stain exterior dark teak |
| Twin wall polycarbonate sheet 4mm |
| Japanese stone garden lantern small |
| Bonsai pine tree ceramic pot |
| Fine raked gravel garden Zen |
4. Elevated Post-Mounted Cedar Cat House
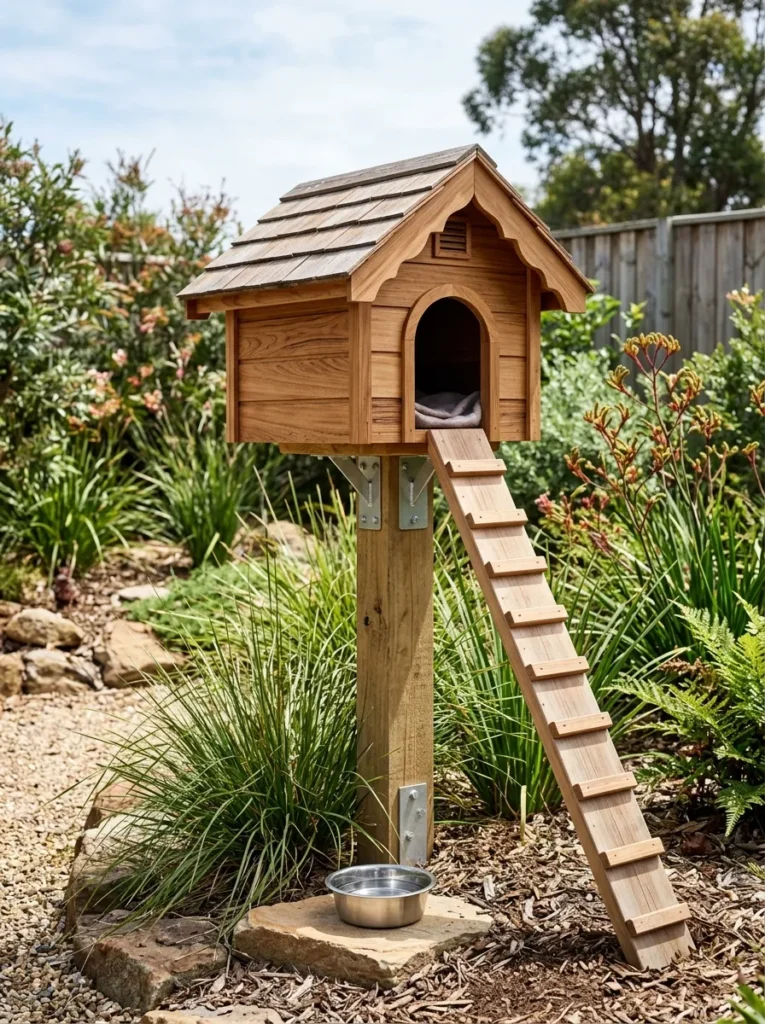
Vibe: Architectural — a cat house with the confidence of a sculpture.
Why it works: Elevation is the single most significant behavioral upgrade a cat house can have. Cats are crepuscular hunters and instinctive vertical animals — height provides safety, thermal advantage (warm air rises), and the surveillance position they seek in any space. A post-mounted house at 1.2 meters elevation places the cat at the optimal height for garden observation without requiring a fence, tree, or secondary structure. The single post mounting concentrates the visual footprint to a single point on the ground, which reads as minimal and considered in a planted garden — it doesn’t disrupt planting beds or define a territorial boundary the way a ground-level house does.
How to get it: Set a 100mm × 100mm H4-treated pine post at minimum 600mm in-ground depth (concrete-set for stability in wind). The platform mounting plate should be 300mm × 300mm — large enough to distribute the house footprint and prevent rocking. Install the ramp at 45 degrees using 25mm × 25mm timber rungs spaced at 80mm centers for confident cat footing.
Shop the Look
| Product |
|---|
| H4 treated pine post 100x100mm |
| Post mounting plate bracket steel |
| Stainless steel outdoor pet water bowl |
| Native grass lomandra established pot |
| Non-slip timber ramp tread strips |
5. Dual-Level Cat House Tower with Connecting Ramp
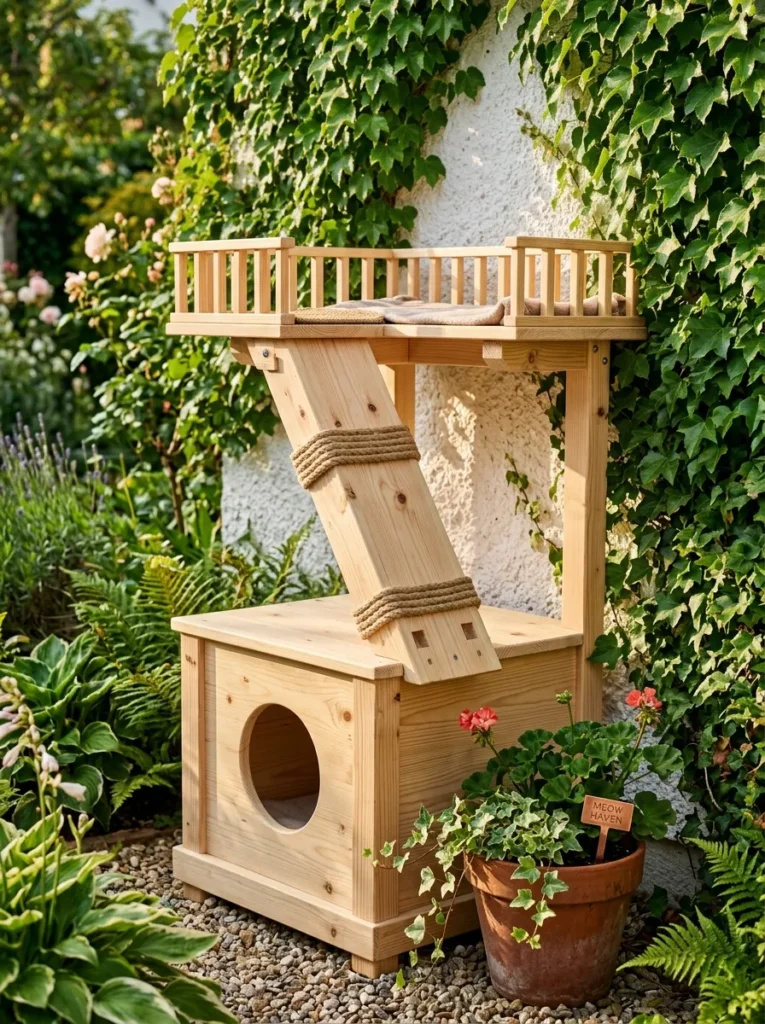
Vibe: Warm and layered — a cat structure that makes the backyard feel inhabited and alive.
Why it works: The two-level design harnesses the most fundamental feline spatial preference: vertical stratification. In multi-cat households, a dual-level tower solves the territorial access conflict that a single-entry house creates — one cat can occupy the lower level while another uses the upper platform, with the ramp as a neutral transitional zone between territories. The open upper platform (with a low timber railing rather than a fully enclosed box) functions as a sun perch and vantage point, while the enclosed lower box provides the dark, sheltered sleeping environment cats prefer at night. These two modes — open surveillance and closed shelter — cover the full behavioral spectrum of outdoor cat use.
How to get it: Build the lower sleeping box at 400mm × 400mm × 350mm internal height. The ramp should be at least 200mm wide and angled no steeper than 35 degrees. Wrap the ramp sides and post supports in 8mm natural sisal rope — it provides grip, prevents splinter contact, and adds a satisfying tactile material contrast to the smooth pine surfaces.
Quick Win: 8mm natural sisal rope from a hardware or garden store ($12–18 for a 20m roll) wraps a post or ramp completely when wound tightly — no glue required if you start and finish with a staple gun.
Shop the Look
| Product |
|---|
| Natural sisal rope 8mm 20m roll |
| Pine timber board 19mm exterior grade |
| Low profile timber railing post bracket |
| Staple gun heavy duty |
| Copper garden plant label stake |
6. Recycled Pallet Cat House with Corrugated Iron Roof
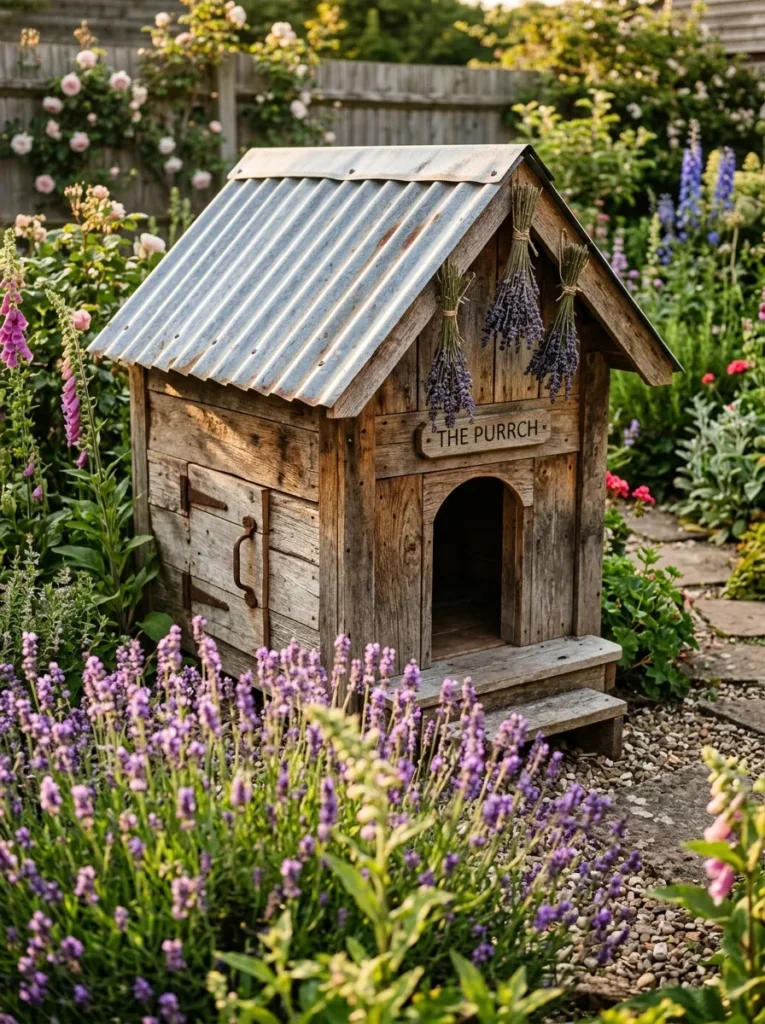
Vibe: Rustic-warm — the cat house that looks like it grew out of the garden naturally.
Why it works: Reclaimed pallet timber brings immediate visual authenticity that new-sawn timber cannot replicate — the variation in grain colour, the weathered saw marks, the irregular plank widths all read as honest material history. This is the design principle of wabi-sabi applied to pet architecture: the beauty of imperfection and age. Corrugated Zincalume iron roofing is the correct pairing because it shares the same industrial-salvage material language, is available in short lengths from any hardware store, and sheds rain with zero maintenance for 25+ years. The roof overhang of 100mm on all sides is the critical weatherproofing detail — it prevents rain ingress without requiring sealing or painting of the wall faces.
How to get it: Use heat-treated (HT-stamped) pallets only — never chemically treated (MB-stamped) pallets, which contain methyl bromide residue that is toxic to cats. Disassemble with a pallet buster tool and re-assemble with 65mm galvanised screws. The corrugated iron roof is screwed through the ridges, not the valleys, to prevent water pooling around screw holes.
Shop the Look
| Product |
|---|
| Corrugated Zincalume iron sheet small |
| Pallet buster disassembly tool |
| Galvanised screws 65mm box |
| Salvaged door handle vintage |
| Dried lavender bunch decor |
7. Scandinavian Black-Painted Cat House with White Trim
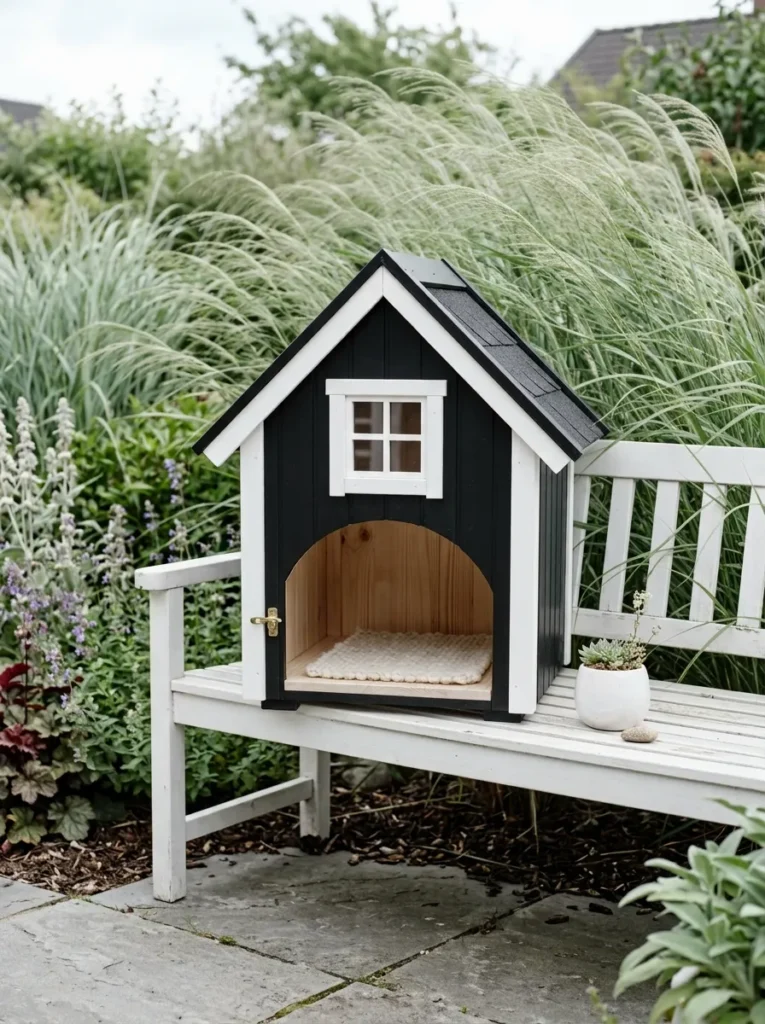
Vibe: Clean and confident — the cat house as a design statement, not an afterthought.
Why it works: Matte black exterior paint on a small timber structure does what it does on any garden element — it flattens the form into a graphic silhouette, which makes proportion and roofline more visible than color or material texture. This is why black-painted garden sheds, compost bins, and planter boxes photograph so well: the matte surface absorbs light rather than reflecting it, making the structure recede visually while the shape comes forward. The white trim applied only at the window-frame reveals and gable edge creates a precise line drawing effect — the trim becomes the detail that focuses attention on the architecture, not the pet function. The visual language is borrowed directly from Scandinavian black-painted timber farm buildings (svartbyggnad), which have been a major Pinterest aesthetic reference since 2019.
How to get it: Use a full exterior enamel rather than a standard exterior paint — enamel provides a harder, more washable surface that resists the mud and paw prints an outdoor cat house accumulates. Haymes Matte Black or Dulux Domino are both reliable choices. Apply white trim in a satin finish for the subtle sheen contrast.
Quick Win: Painting an existing basic cat house in matte black exterior enamel ($25–40 per liter) is the single highest-impact aesthetic upgrade possible — it transforms any generic timber box into a considered garden object in under two hours.
Shop the Look
| Product |
|---|
| Matte black exterior enamel paint |
| White satin exterior trim paint |
| Ornamental grass feather reed pot |
| Small white ceramic garden pot |
| Brass screw hook small exterior |
8. Trellis-Integrated Cat House with Climbing Rose
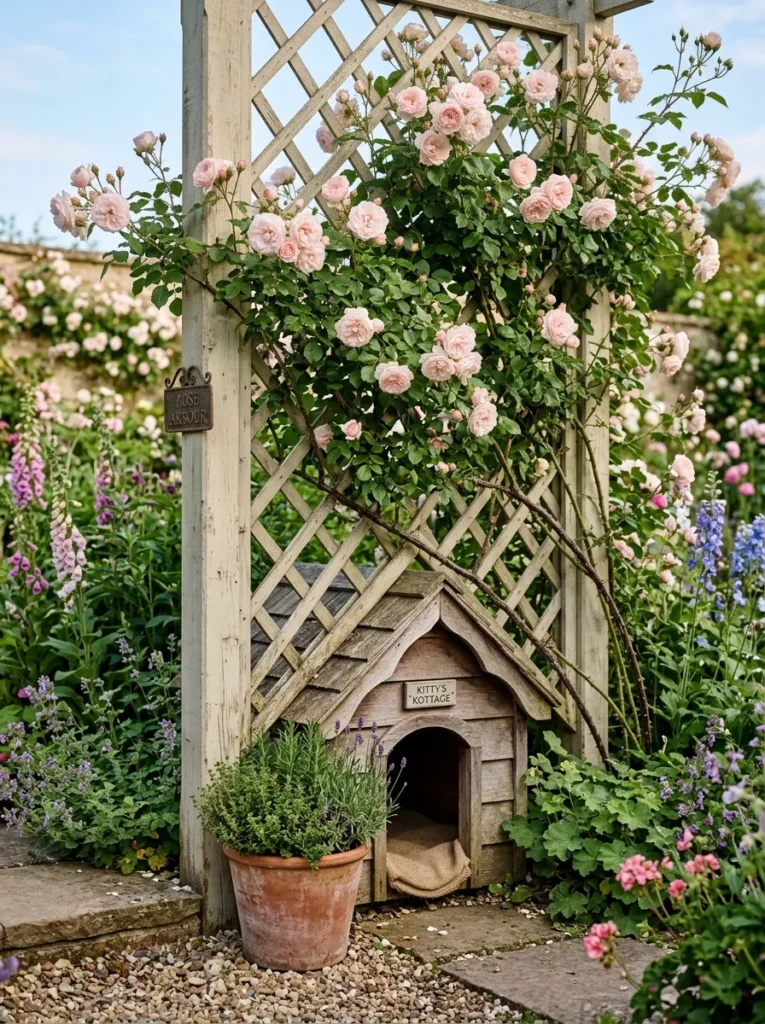
Vibe: Romantic and layered — a cat house the garden almost grew around.
Why it works: Integrating the cat house into the base of an existing trellis structure is the most space-efficient approach available for small backyards — it borrows vertical space already occupied by the trellis, adding the cat house without consuming additional garden footprint. The climbing rose above performs double duty: its thorny lower canes deter dogs and children from approaching the entry, while the flowers and fragrance above the house create a garden feature that reads independently of the pet function. The trellis frame also provides a natural attachment point for a hanging water bowl and a hook for grooming tools — the whole system becomes a self-contained cat care station within the garden.
How to get it: Build the cat house as a separate module that bolts to the base of an existing trellis using 100mm coach bolts through the rear wall. Choose a climbing rose variety with flexible lower canes — David Austin’s The Generous Gardener or Cecile Brunner both work well at trellis bases without becoming impenetrably thorny at the entry height.
Shop the Look
| Product |
|---|
| Timber garden trellis panel large |
| Climbing rose plant bare root |
| Coach bolt set 100mm galvanised |
| Iron garden tag label stake |
| Terracotta herb planter rectangular |
9. Insulated Winter Cat House with Removable Floor Panel
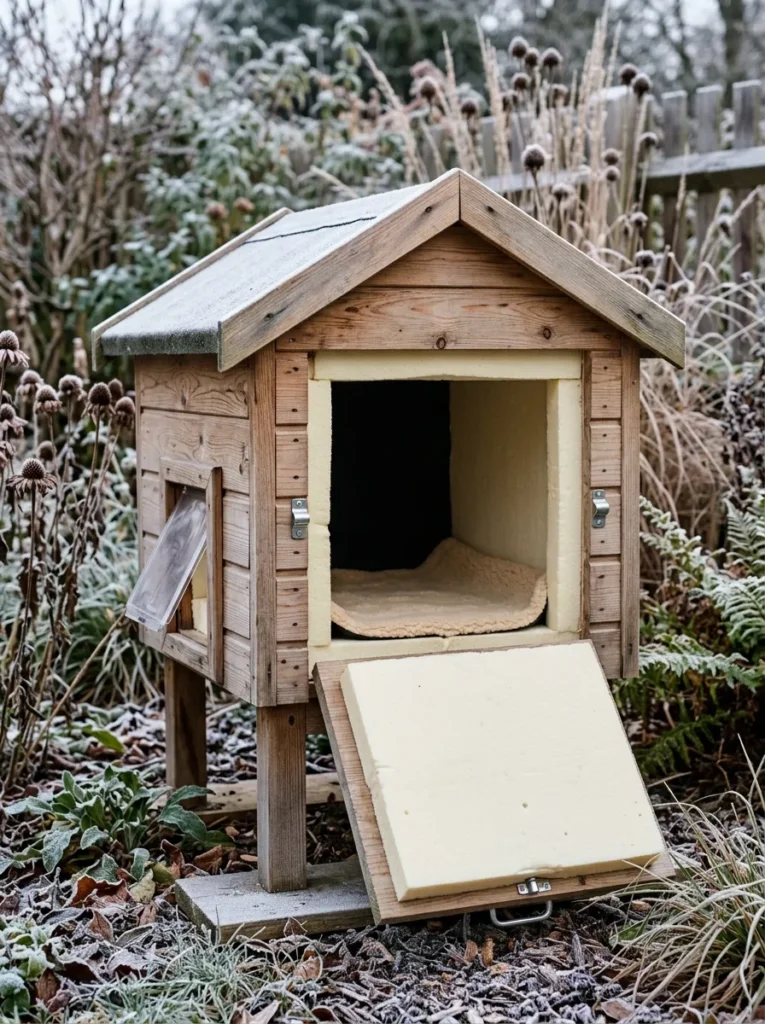
Vibe: Sheltered — the backyard equivalent of a house that’s actually warm in winter.
Why it works: The removable floor panel is the single most practical maintenance feature a cat house can have — it allows complete cleaning without disassembling the structure, which is critical because a cat house that cannot be cleaned will not be used once the cat associates it with odor. The insulation system — 25mm closed-cell foam board on all six interior surfaces (four walls, floor, ceiling) — reduces interior heat loss by approximately 70% compared to single-skin timber in cold weather. The draught-excluding flap at the entry hole (cut from a heavy rubber welcome mat in a fringe pattern) maintains the thermal envelope while allowing free cat access without requiring the cat to manipulate a door.
How to get it: Line the interior with 25mm Kingspan or Foilboard closed-cell insulation board, glued with construction adhesive directly to the interior wall faces. The removable floor panel should slide out on 12mm timber rebates on each interior side wall — no screws, no tools required for removal.
Quick Win: A single self-warming pet pad ($20–35 online) placed on the insulated floor reflects the cat’s own body heat back at them — no electricity required, no batteries, and enough thermal effect to raise interior temperature by 8–10°C above ambient on cold nights.
Shop the Look
| Product |
|---|
| Closed cell foam insulation board 25mm |
| Self-warming pet pad reflective |
| Heavy rubber door mat for entry flap |
| Construction adhesive tube |
| Stainless hinge removable panel |
10. Floating Fence-Mounted Cat House with Bracket System
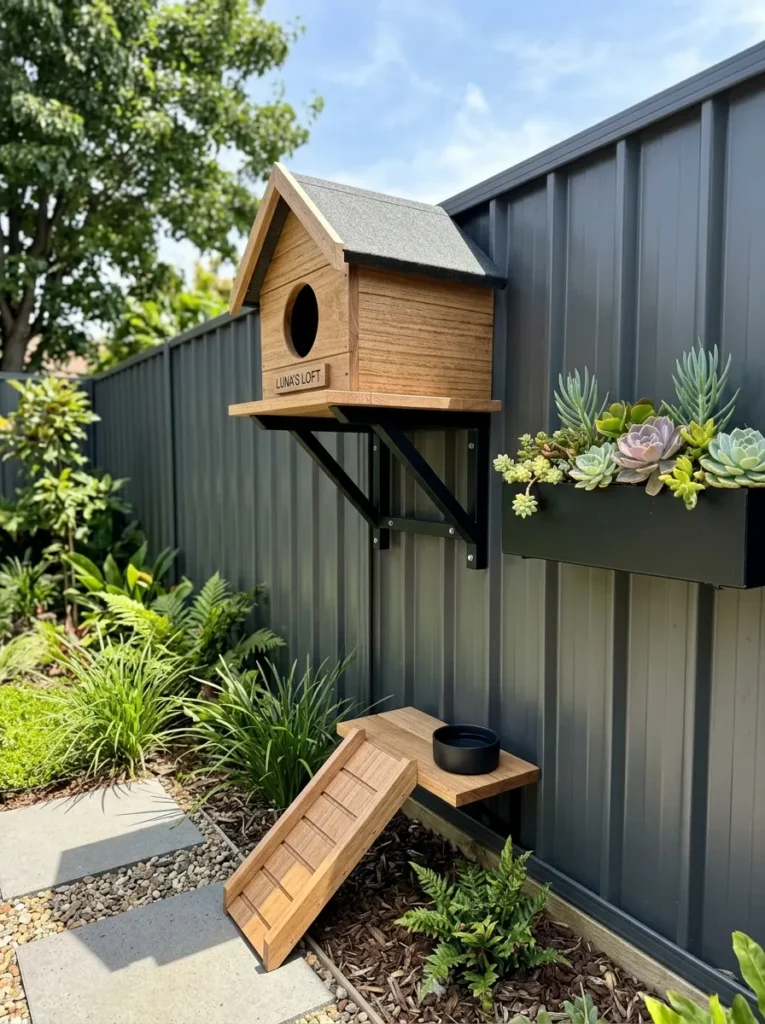
Vibe: Clean and modern — a cat house that works with the fence, not against it.
Why it works: Fence-mounting eliminates ground footprint entirely, which in a compact backyard is the difference between a workable design solution and one that consumes planting space you cannot afford to sacrifice. The floating bracket system uses the fence’s existing structural strength — a standard Colorbond or hardwood paling fence handles the 8–15kg load of a mounted cat house with no additional reinforcement. Height at 1.5 meters is behaviorally optimal: it places the cat above dog-access height (which begins to exceed most domestic dogs at 1.2 meters), at human eye level so the structure reads as a designed element rather than ground-level clutter, and below the fence top so wind loading on the house transfers cleanly to the fence structure rather than acting as a lever.
How to get it: Use powder-coated 40mm × 40mm steel angle brackets with 10mm coach bolts through the fence paling — two brackets per house, minimum. The ramp should be detachable (connected with butterfly nuts) so the house can be removed for cleaning without tools.
Shop the Look
| Product |
|---|
| Powder coated black steel angle bracket |
| Coach bolt 10mm galvanised set |
| Butterfly nut wing nut set |
| Succulent planter box wall mounted |
| Matte black outdoor pet water bowl |
11. Cat House with Living Sedum Roof
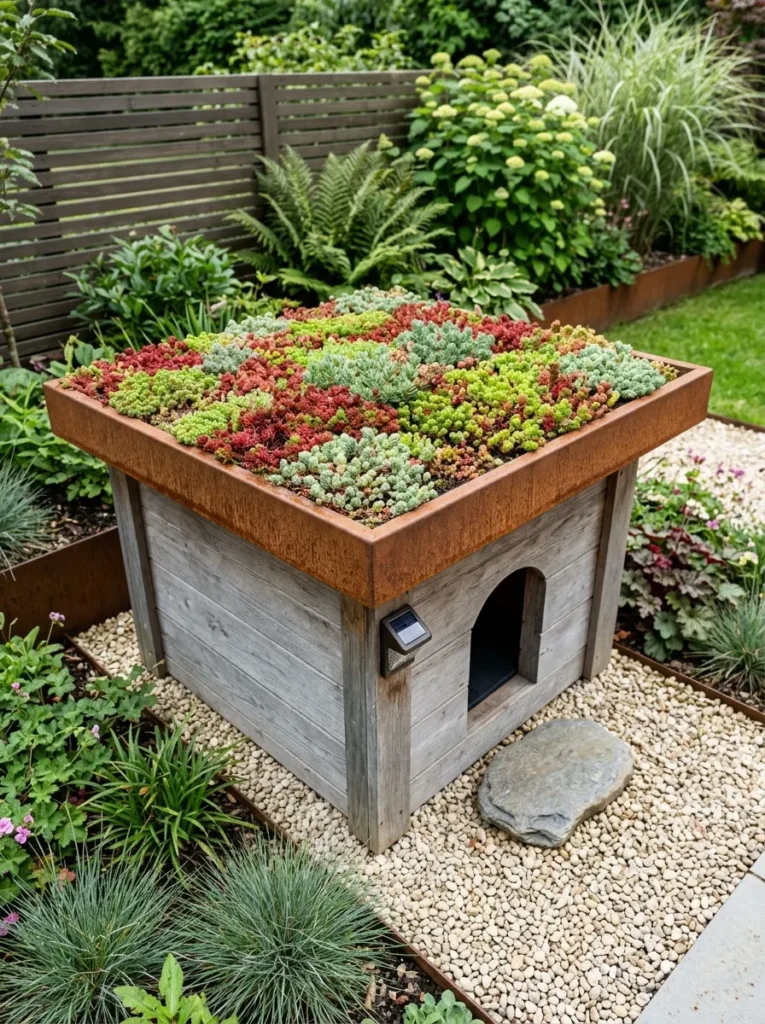
Vibe: Architectural and alive — the kind of detail that makes garden visitors stop and crouch down to look.
Why it works: A living sedum roof on a cat house does what a living roof does on any structure: it insulates the interior from temperature extremes (sedum’s root medium and water content provides 3–5 times the insulation value of bare roofing material), manages rainwater by absorbing and slowly releasing it, and integrates the structure into the garden’s plant palette in a way no painted surface can achieve. Sedum species (Sedum spurium, Sedum album, and Sedum acre are the three most reliable) are drought-tolerant once established, tolerate the shallow 50–75mm substrate depth of a small cat house roof, and provide year-round green with seasonal red and orange tints. The cor-ten edge trim contains the substrate, ages to a warm rust, and reads as the connecting material between the living roof and the garden’s hard landscaping.
How to get it: Build the roof as a flat tray with a 1:100 gradient for drainage, lined with pond liner before adding 60mm of lightweight sedum substrate (available premixed from specialist green roof suppliers). Plant sedum plugs at 100mm centers — they fill in to full coverage within one growing season.
Shop the Look
| Product |
|---|
| Sedum plug tray mixed varieties |
| Green roof substrate lightweight mix |
| Pond liner sheet EPDM |
| Cor-ten steel edge trim strip |
| Solar LED garden light waterproof |
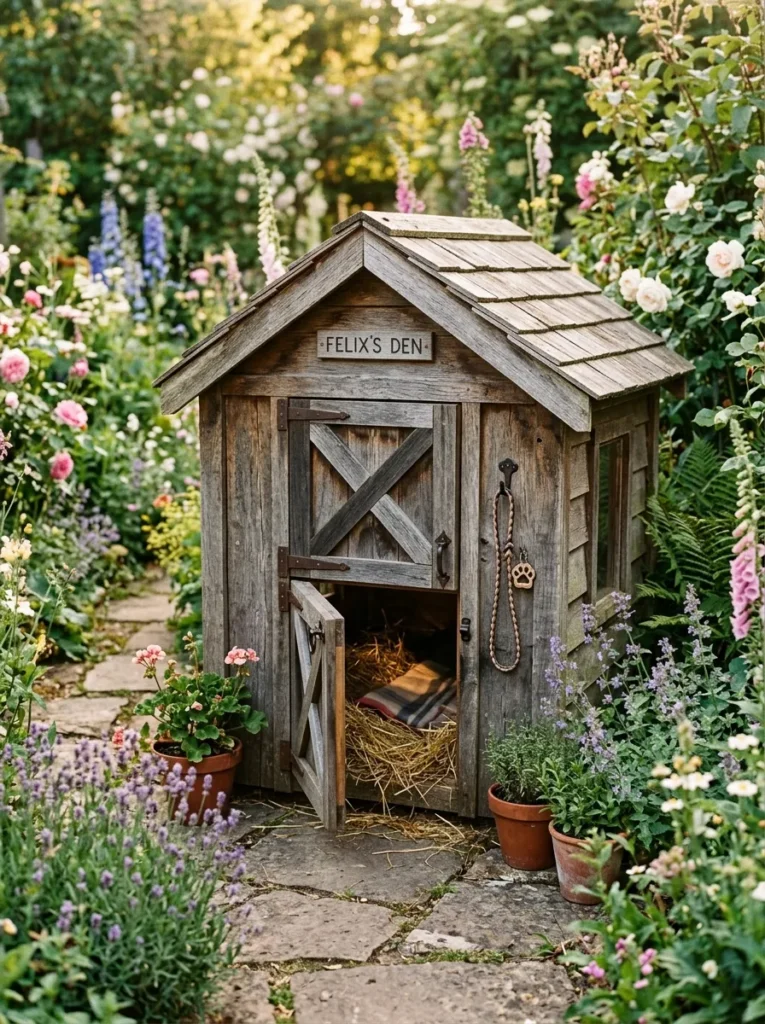
12. Timber Cat House with Chalkboard Door Panel
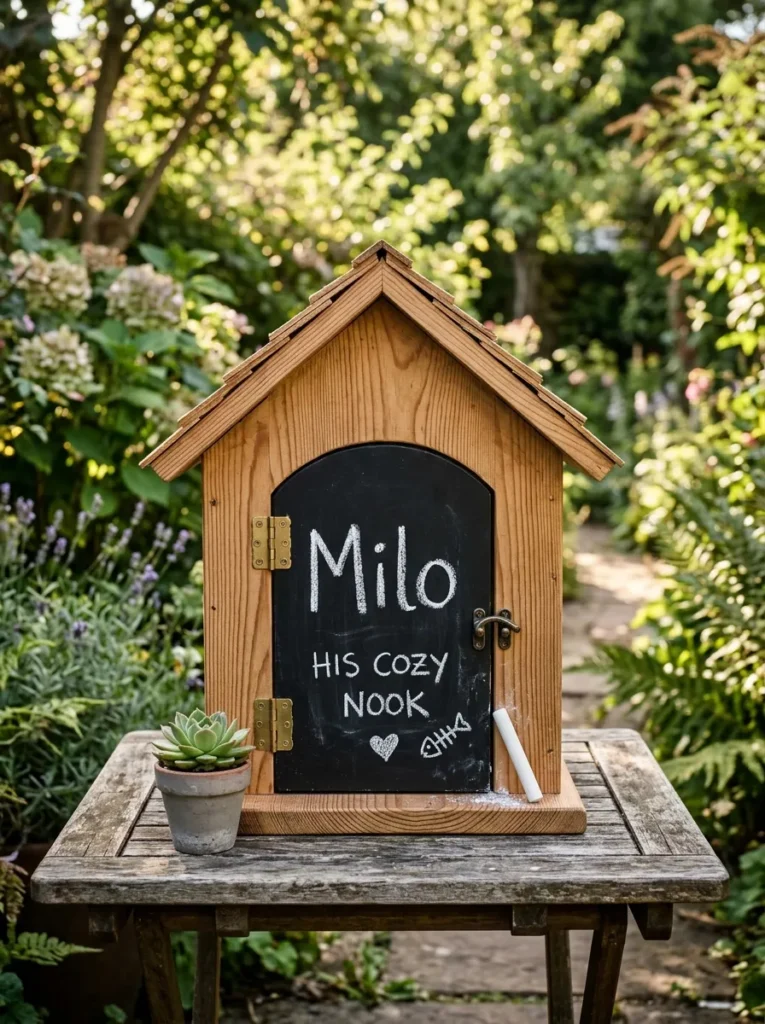
Vibe: Warm and personal — the cat house that makes visitors smile before they even notice the cat.
Why it works: The chalkboard access door panel is a small-scale application of a material contrast principle — matte black chalkboard against natural pine creates a graphic focal point that draws the eye to the entry face of the house. Practically, the hinged access door panel solves the maintenance problem of all enclosed cat houses: it provides full interior access for cleaning without requiring the house to be lifted, tilted, or partially dismantled. The chalk surface allows the owner to write the cat’s name, leave messages, or change the panel’s character seasonally — it turns a static garden object into an interactive one and is the kind of personal detail that makes a garden feel inhabited by people who pay attention.
How to get it: Paint the access door panel with two coats of Rust-Oleum Chalked Paint in Charcoal or Blackboard Paint (available at most hardware stores). Season the chalkboard surface before first use by rubbing the flat side of a chalk stick across the entire surface and wiping off — this prevents ghosting of the first writing.
Quick Win: Chalkboard paint applied to any flat panel surface costs under $20 for a small tin sufficient to cover multiple cat house doors — it is the fastest, cheapest design upgrade with the highest personality return.
Shop the Look
| Product |
|---|
| Chalkboard paint matte black |
| White chalk sticks set |
| Brass miniature cabinet hinge pair |
| Small potted succulent arrangement |
| Pine timber board 12mm |
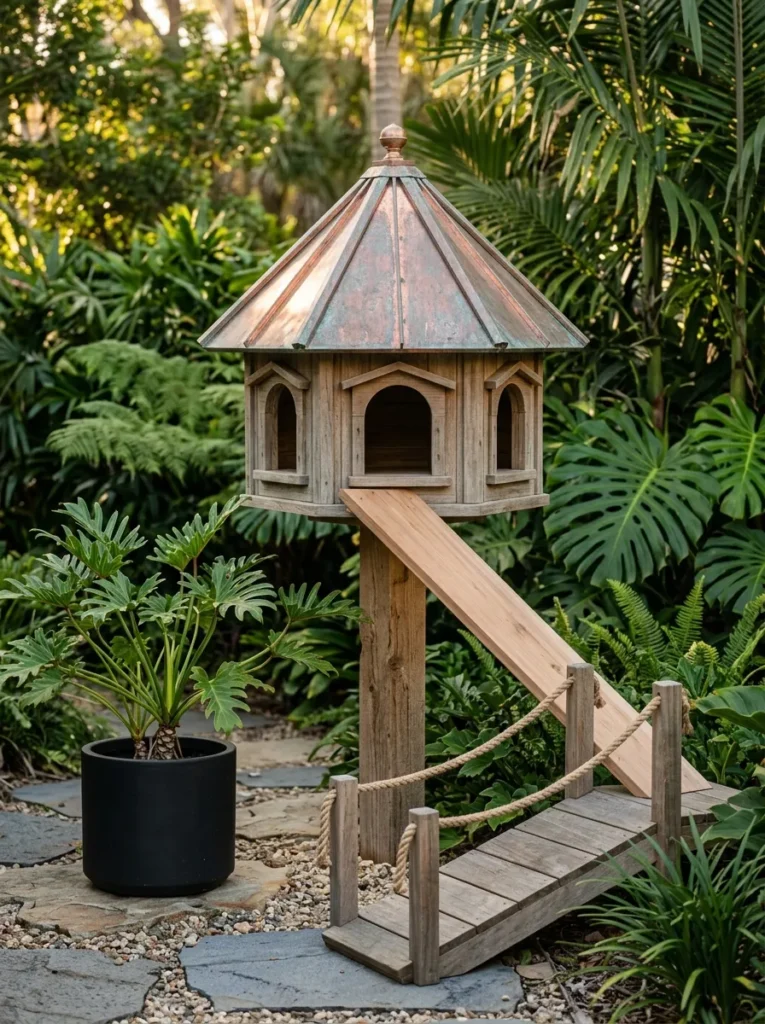
13. Hex-Shaped Wooden Cat House with Copper Roof
Vibe: Warm and distinctive — a cat house that would look at home in an architecture magazine.
Why it works: The hexagonal plan breaks the dominance of the rectangle that characterizes almost every other cat house design — it is the proportion shift that immediately signals considered design rather than carpentry utility. Structurally, a hex plan distributes roof load to six points rather than four corners, which is more stable in wind when mounted on a single post. The copper roof is the material choice that gives this design its timeline character: new copper reads as warm orange-gold; within 2–3 years in an outdoor garden environment it develops a blue-green verdigris patina that connects it to the garden’s plant palette in a way no painted surface can simulate. No two copper roofs age the same way, making each one unique.
How to get it: Cut hex sides from 19mm cedar at 60-degree bevel angles — a standard miter saw handles this exactly. Form the copper roof from 0.7mm soft copper sheet, folded over a timber former to create the six roof faces, and joined at the ridge with a copper strip soldered flat. The patina develops naturally outdoors without any chemical treatment.
Shop the Look
| Product |
|---|
| Soft copper sheet 0.7mm roll |
| Cedar timber board 19mm exterior |
| Copper strip roofing flashing |
| Philodendron tropical plant pot large |
| Rope ramp railing natural sisal |
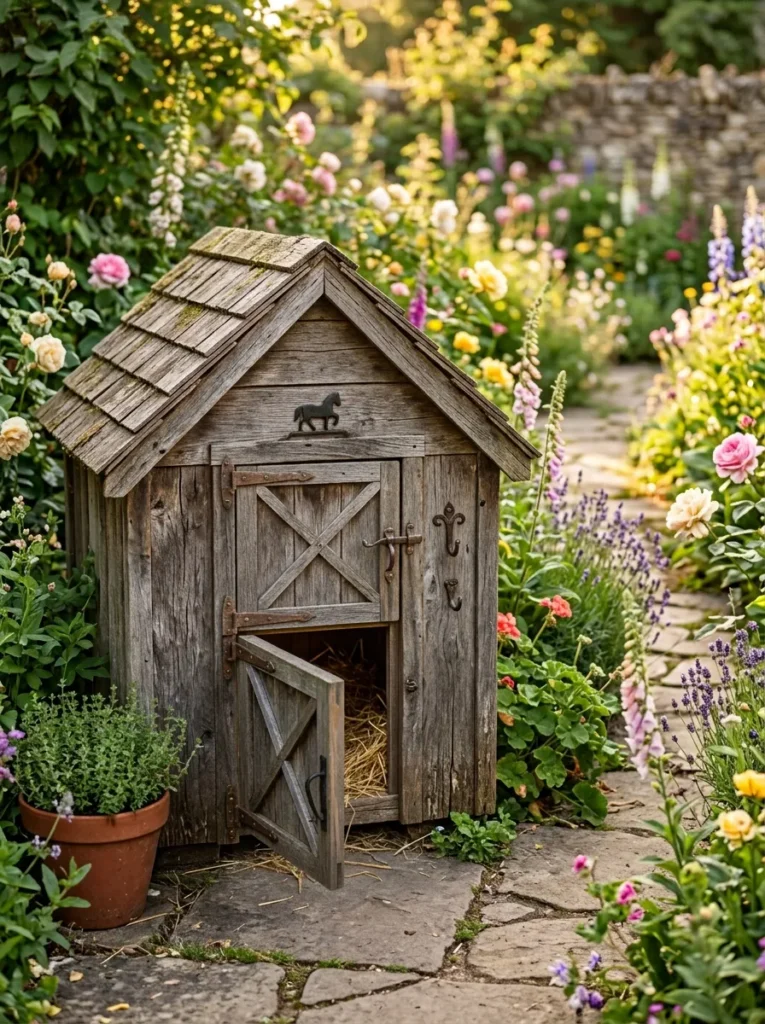
14. Barn-Style Cat House with Dutch Door Entry
Vibe: Rustic and unhurried — a cat house that looks like it belongs on a working farm.
Why it works: The Dutch door detail — split horizontally so the lower section opens for cat access while the upper section remains closed as a weather shield — is a functional design solution disguised as a charming aesthetic one. The closed upper panel prevents rain from driving horizontally into the interior on the entry face (the primary rain ingress failure point of standard entry-hole designs), while the lower opening gives the cat a full-width, full-height entry that is significantly easier to negotiate than a circular hole for older or arthritic cats. The X-brace pattern on the upper fixed panel is borrowed directly from barn and stable door joinery — it triangulates the panel against warping across seasons, which is the most common structural failure in untreated timber door panels.
How to get it: Use 19mm rough-sawn treated pine for the door panels, and build the X-brace from 25mm × 8mm flat iron strapping secured with roofing nails — not timber battens, which add visual bulk. Hang both door sections on the same piano hinge attached to the door frame for a clean, continuous pivot line.
Quick Win: The X-brace pattern can be applied to any flat timber panel using 25mm flat iron strapping cut to length with tin snips — no welding, no specialist tools, and immediate visual impact for under $10 in materials.
Shop the Look
| Product |
|---|
| Rough sawn pine board 19mm |
| Flat iron strapping 25mm roll |
| Piano hinge continuous stainless |
| Small iron door handle rustic |
| Roofing nail galvanised box |
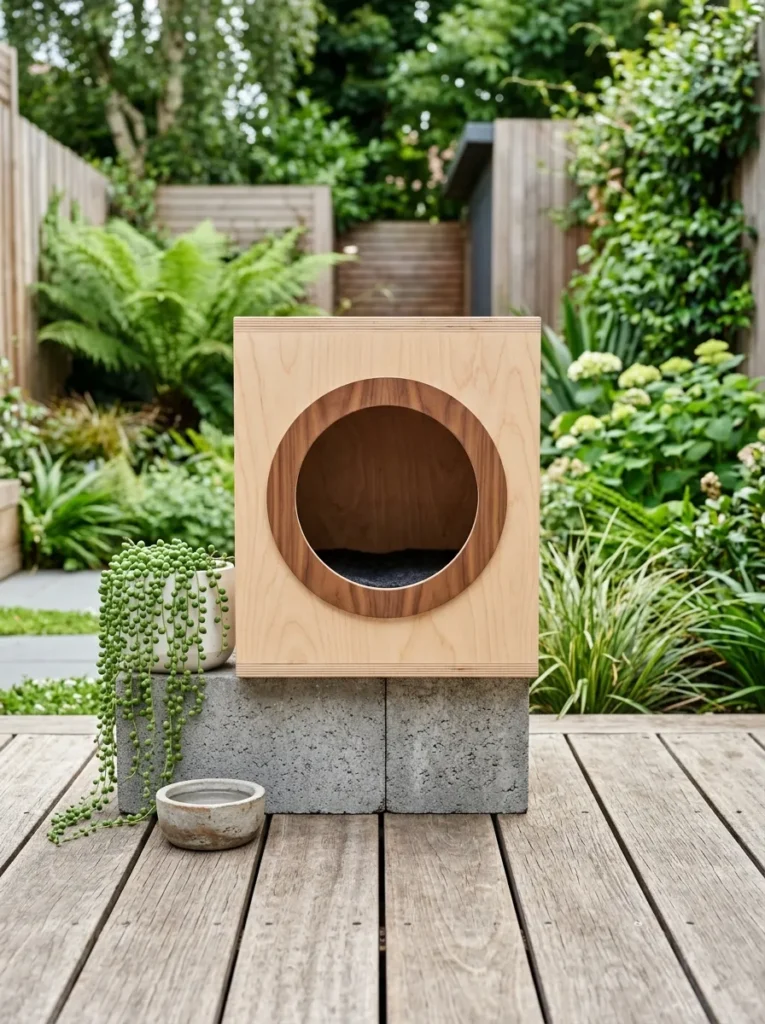
15. Minimalist Plywood Cat House with Walnut Veneer Detail
Vibe: Precise — the cat house as a furniture piece that happens to live outdoors.
Why it works: Birch plywood is the material language of contemporary furniture and interior joinery — using it for an outdoor cat house deliberately blurs the boundary between indoor furniture and garden architecture, which is the central tension that makes this design feel fresh. The walnut veneer applied as a circular surround around the entry hole is a joinery detail borrowed from mid-century furniture design — the entry becomes a featured aperture with material contrast, rather than a utilitarian hole. The concrete block plinth is the grounding element: it raises the house off the deck surface (preventing moisture wicking), adds visual weight at the base to balance the light ply body, and introduces a material that reads as architecture rather than garden furniture.
How to get it: Use 12mm exterior-grade birch ply (BB/CC grade — smooth on the entry face, rough on the interior) and seal all exterior surfaces with two coats of exterior water-based varnish in satin finish. Cut the walnut veneer surround on a scroll saw or laser cutter at a local makerspace — most offer walk-in sessions for $20–40 per hour.
Shop the Look
| Product |
|---|
| Birch plywood sheet 12mm exterior grade |
| Walnut veneer sheet self adhesive |
| Exterior satin varnish water based |
| Concrete garden block plinth |
| String of pearls succulent white pot |
16. Cat House Village — Triple Linked Shelter Design
Vibe: Abundant — a cat village that turns the backyard into a genuine feline environment.
Why it works: The linked village design solves the multi-cat household territorial problem that a single house cannot: by providing three separate sleeping compartments connected by short tunnel passages, each cat has a claimed space while retaining the option to move between shelters without exposing themselves to the open garden — a behavioral need for cats who are anxious about birds of prey or neighboring cats. The shared elevated platform creates a communal gathering zone in front of all three entries, which functions as a neutral zone where cats can be physically close without competing for a single sleeping space. The individual accent colors at each entry hole — a 10cm painted timber ring — give each house a distinct identity without disrupting the material consistency of the overall structure.
How to get it: Build the three houses as identical modules, then connect them on the shared platform with 150mm diameter PVC pipe sections (300mm long) lined in sisal — the tunnel diameter is cat-appropriate and the PVC is weatherproof and easy to keep clean. The shared platform should be a minimum 1800mm × 400mm to allow the three houses and enough platform space for cats to sit at each entry.
Quick Win: Three identical flat-pack cedar cat houses connected on a shared platform can be built in a single weekend from hardware store materials — the total materials cost for the triple system runs $180–350, significantly less than purchasing three separate commercial cat houses.
Shop the Look
| Product |
|---|
| Cedar timber boards 19mm exterior |
| PVC pipe 150mm diameter section |
| Sisal rope cat tunnel lining |
| Colored exterior paint small sample pots |
| Shared water bowl station multi-pet |
17. Repurposed Vintage Crate Cat House with Rope Perch
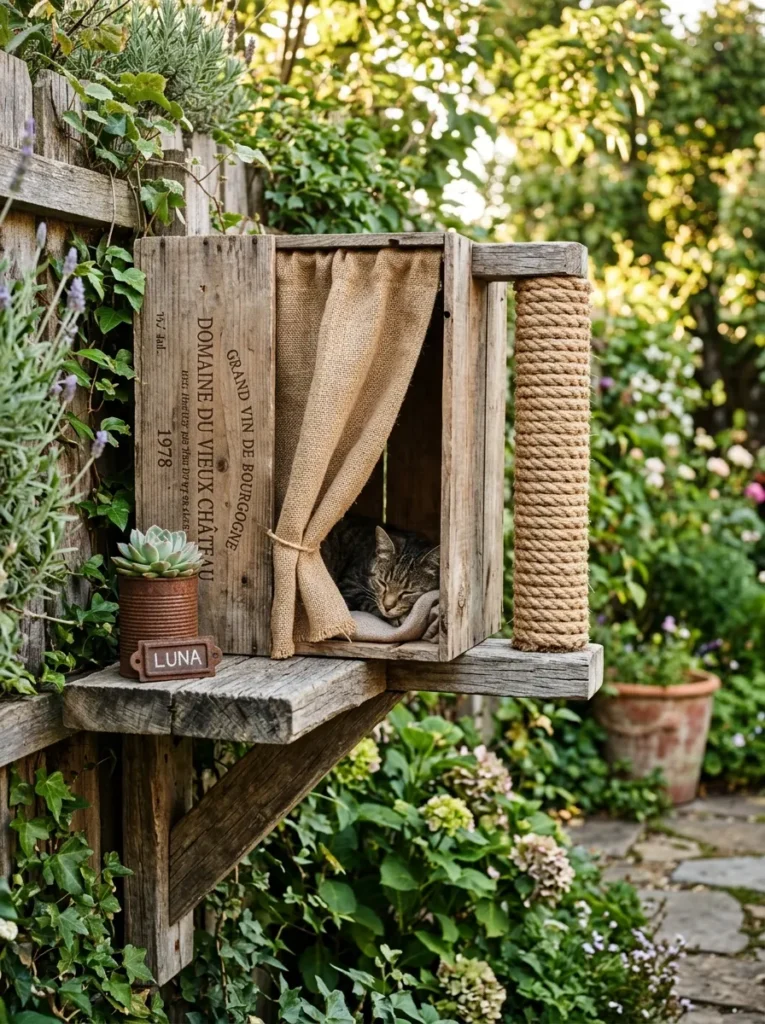
Vibe: Resourceful and warm — the cat house that costs almost nothing and looks like it cost everything.
Why it works: A repurposed timber wine crate resting on its side has the correct internal dimensions (typically 340mm wide × 240mm tall × 480mm deep) for a single sleeping cat, and the existing timber slat construction provides natural ventilation without modification. Mounting it on a wall-bracket shelf at 1.2–1.5 meters elevation achieves the same behavioral advantage as a post-mounted house at a fraction of the cost. The burlap curtain at the opening — hung on a thin tension rod — replaces the entry hole entirely, providing both darkness and draught exclusion while being completely removable for washing. The rope perch mounted at the same height beside the crate entry gives the cat a landing pad and a sun perch that keeps traffic away from the crate itself when it is in use as a sleeping shelter.
How to get it: Source timber wine crates from wine merchants, restaurant suppliers, or online marketplaces — most are given away free or sold for $5–15. Mount on a powder-coated steel shelf bracket rated for 20kg minimum. The burlap curtain is cut from a standard burlap sack to fit the crate opening and hemmed with iron-on hem tape — no sewing required.
Shop the Look
| Product |
|---|
| Vintage timber wine crate large |
| Natural burlap fabric by the yard |
| Iron-on hem tape no-sew |
| Powder coated steel shelf bracket |
| Thick hemp rope perch 30mm diameter |
How to Start Your Wooden Cat House Backyard Transformation
Your single first move is to choose your timber species — and to choose it based on your climate, not your aesthetic. In high-rainfall or coastal climates, western red cedar is non-negotiable: it is the only commonly available timber species that resists rot and insect damage without chemical treatment, which matters because a treated pine structure in a wet climate requires repainting every 2–3 years or it delaminates at the joints. In dry inland climates, treated pine is a perfectly sound and significantly cheaper choice. This one material decision determines your maintenance schedule, your finish options, and your long-term cost — make it before you choose a style.
The most common mistake is building the entry hole too large. Standard instructions suggest 15cm diameter — but many first-time builders cut 20cm or larger, assuming more is better. A large entry hole does three damaging things: it lets in driven rain during storms, allows cold air to flush the interior in winter, and removes the enclosed, den-like character that makes cats feel secure enough to use the shelter in the first place. Measure your cat’s widest point (typically the ribcage) and add 20mm — that is your entry hole diameter. For most domestic cats, 13–15cm is correct.
Three specific items under $50 that create immediate visual impact: (1) A 1-liter tin of matte black exterior enamel ($28–38 at any hardware store) painted over any plain timber box immediately converts it into a contemporary garden object. (2) A 20-meter roll of 8mm natural sisal rope ($12–18) wrapped around a post, ramp, or perch section adds material richness and tactile character that reads as hand-crafted design. (3) A pack of cedar shingles ($20–30 for a half-pack from a landscape supplier) applied to any flat roof introduces the texture and shadow play that elevates a simple structure to garden architecture.
Realistically, a single well-built wooden cat house — materials, hardware, one weekend of building — costs $80–250 depending on timber species and roofing material. A post-mounted house with a ramp and integrated perch system runs $250–500. A fully designed cat village with living sedum roof, copper flashing, and custom bracket system sits in the $800–2,500 range. Most people build a basic cedar house in a weekend, their cat claims it within 48 hours, and they spend the following season slowly upgrading the details — the rope perch, the painted door, the planted surround — into something that looks like it was always part of the garden.
Frequently Asked Questions About Wooden Cat House Designs
What is the best wood for an outdoor cat house that lasts?
Western red cedar (Thuja plicata) is the best single timber choice for outdoor cat houses because it contains natural oils that resist rot, fungal growth, and insect damage without chemical treatment. This matters for cat shelters specifically because chemically treated timbers (CCA or copper azole treated pine) off-gas compounds in enclosed spaces that may irritate cats with respiratory sensitivities. Cedar also weathers to a silver-grey that reads as intentional patina in a garden context. If budget is the primary constraint, H3 treated pine (treated for above-ground exterior use) is a safe and significantly cheaper alternative, provided the interior surfaces are lined with untreated birch ply or cedar to eliminate direct contact with the treatment chemicals.
What colors work best for a wooden cat house in a backyard?
The most successful color choices treat the cat house as part of the garden’s existing palette rather than as a standalone object. Deep forest green (Dulux Wilderness, Farrow & Ball Calke Green No. 80) integrates into planted garden contexts by connecting to the foliage tones. Matte black (Haymes Matte Black, Dulux Domino) reads as contemporary and graphic, making the roofline silhouette the primary visual feature. Raw teak oil or linseed oil finishes allow the natural timber grain to read as the design feature, connecting to fence and deck timber tones. Avoid bright primary colors — they read as children’s toy language rather than garden architecture, and they fade unevenly on exterior timber within a single season.
How much does a good wooden outdoor cat house cost?
A basic handmade cedar cat house — single sleeping box, pitched roof, entry hole — costs $80–200 in materials and a weekend of building time. A mid-range post-mounted house with ramp, rope perch, and painted finish runs $250–500. Purpose-built premium designs from specialty makers — living sedum roofs, copper flashing, custom bracket systems — sit in the $600–2,500 range. The best value starting point is the basic cedar A-frame: it can be built for under $120 in materials, weathers beautifully without maintenance, and can be upgraded over time with rope wrapping, a painted door panel, and planting around the base.
Can a wooden cat house stay outdoors all year including winter?
Yes — with two specific provisions. First, the exterior timber must be either naturally rot-resistant (cedar) or appropriately treated and sealed for permanent exterior exposure. Second, the interior must be insulated for winter use: 25mm closed-cell foam board on all six interior surfaces raises the interior temperature by 8–12°C above ambient on cold nights. An uninsulated single-skin timber box in sub-zero temperatures provides minimal thermal benefit over sleeping on the open ground. The draught-excluding entry flap — cut from heavy rubber matting — is the second most important winter modification, preventing the cold-air flushing that negates even good insulation in a house with an open entry hole.
What size should a wooden cat house be for a domestic cat?
The optimal internal dimensions for a single cat are 450mm wide × 450mm deep × 400mm tall. This provides enough room for the cat to stand, turn around, and stretch without the space being so large that the cat’s own body heat fails to warm the interior — a too-large interior in winter is as thermally ineffective as an uninsulated one. The entry hole should be 13–15cm diameter for most domestic cats. For a multi-cat household, increase the floor plan rather than building one large house: two separate sleeping spaces of the standard size are behaviorally preferable to one shared large space, because cats sleep better with a defined individual territory.
Ready to Create Your Dream Wooden Cat House Backyard?
These 17 designs span the full range of what a wooden cat house can be — from a repurposed vintage wine crate and a recycled pallet shelter to a hexagonal copper-roofed tower and a living sedum architectural piece — so whether your backyard is a small courtyard, a native garden, or a sprawling cottage space, there is a design here that fits the scale, the style, and the budget you are working with. Starting with a single simple cedar box is not a compromise — it is the right first move, because your cat will tell you through their behavior exactly where they want their shelter, what height feels safest to them, and whether they want open sun exposure or sheltered shade, all of which informs every upgrade you make afterward. Today’s specific action: go outside and identify the spot in your backyard where your cat already chooses to rest — that location, not the most photogenic corner of the garden, is where your cat house should be placed. When it is built, finished, and claimed — the cat curled inside, the garden growing around it, the timber beginning its slow weather to silver-grey — you will have added something to your outdoor space that is genuinely yours. Save the designs that matched your garden’s material palette and your cat’s behavior — those are the ones worth building.