DIY cat shelf ideas create wall-mounted climbing structures, perching stations, resting platforms, and navigable vertical routes for indoor cats using timber, MDF, floating shelf hardware, carpet, sisal, and upholstery materials — providing the elevated territory, physical exercise, and environmental enrichment that indoor cats require while integrating into the home’s interior design as considered wall features rather than afterthought pet furniture. This article gives you exactly 14 ideas spanning individual perch shelves, connected climbing systems, window-adjacent observation stations, corner configurations, and fully designed cat wall installations so every home layout, every budget, and every cat finds a DIY shelf approach that is safe, functional, and genuinely beautiful.
A cat shelf system done well is furniture designed for a species that lives vertically — a species for whom height communicates security, for whom the ability to survey a room from above is a genuine welfare need rather than a preference. It is also, when designed and finished well, a piece of interior architecture that reads as an intentional wall feature rather than a commercial cat product. Here are 14 ideas worth building.
Why DIY Cat Shelf Ideas Work for Happy Indoor Cats
The behavioral science behind cat shelving rests on a specific and well-documented welfare principle: cats are not ground-dwelling animals. As both predators and prey in their evolutionary history, cats developed an instinctive preference for elevated positions that simultaneously provide a safe vantage point from which to detect approaching threats, an advantageous position from which to survey potential prey, and a physically inaccessible refuge from conflict with other animals or stressors in the immediate environment. In multi-cat households, elevated space is territory — a cat that has access to higher elevations experiences lower stress and demonstrates fewer conflict behaviors than a cat restricted to floor-level resources. Jackson Galaxy’s “catification” framework, documented across multiple publications and the television series My Cat from Hell, specifically identifies vertical territory as the primary environmental modification that reduces inter-cat conflict and stress-related behavior problems in indoor multi-cat households.
The physical health benefits of cat shelving are equally documented: wall-mounted climbing structures that require cats to jump, stretch, balance, and descend provide the muscle activation, cardiovascular demand, proprioceptive challenge, and joint range-of-motion that flat-floor indoor environments cannot provide. The specific muscle groups engaged in jumping to and from elevated platforms (the hindlimb extensors, the core stabilizers, the forelimb landing muscles) are the muscle groups most at risk of age-related atrophy in sedentary indoor cats — providing regular voluntary use of these muscle groups through environmental enrichment is significantly more effective at maintaining muscle condition than any commercial exercise toy or human-initiated play session.
The DIY advantage in cat shelving is specifically significant: commercial cat trees and climbing structures are typically constructed from particleboard with carpet covering (neither particularly durable nor particularly aesthetically integrated with domestic interiors), freestanding (meaning they occupy floor space and cannot achieve the wall-integrated look that makes a shelf system an interior design feature), and designed to a commercial aesthetic that is rarely compatible with the homeowner’s room design. DIY cat shelves built from solid timber, quality MDF, or reclaimed wood and finished in the room’s existing materials (paint colors, upholstery fabrics, sisal) can be genuinely indistinguishable from architectural wall features at first glance, providing all the welfare benefits of commercial alternatives while integrating into the home’s design language.
The critical safety requirements for cat shelf construction are consistent across all formats: each shelf must be fixed to wall studs or masonry (not plasterboard anchors alone — a cat landing on a shelf generates impact forces significantly exceeding the cat’s resting weight, and the shelf fixing must resist this dynamic load); the shelf surface must provide adequate grip (smooth painted or lacquered surfaces are slip hazards for a landing cat — carpet, sisal, non-slip rubber, or textured fabric are the appropriate surface specifications); and the shelf dimensions must provide adequate resting area for the specific cat’s body size (a shelf that is too small for the cat to rest comfortably on will not be used voluntarily).
Style at a Glance
| Element | Welfare Function | DIY Design Edge |
|---|---|---|
| Philosophy | Vertical territory is a genuine feline welfare need | DIY allows material matching to the home’s aesthetic |
| Materials | Solid timber, MDF, plywood, sisal, carpet | Wall paint match, brass bracket, upholstered surface |
| Safety Non-Negotiables | Stud-fixed, non-slip surface, adequate resting dimensions |
14 DIY Cat Shelf Ideas for Happy Indoor Cats
1. Floating Timber Shelf System with Sisal-Wrapped Posts
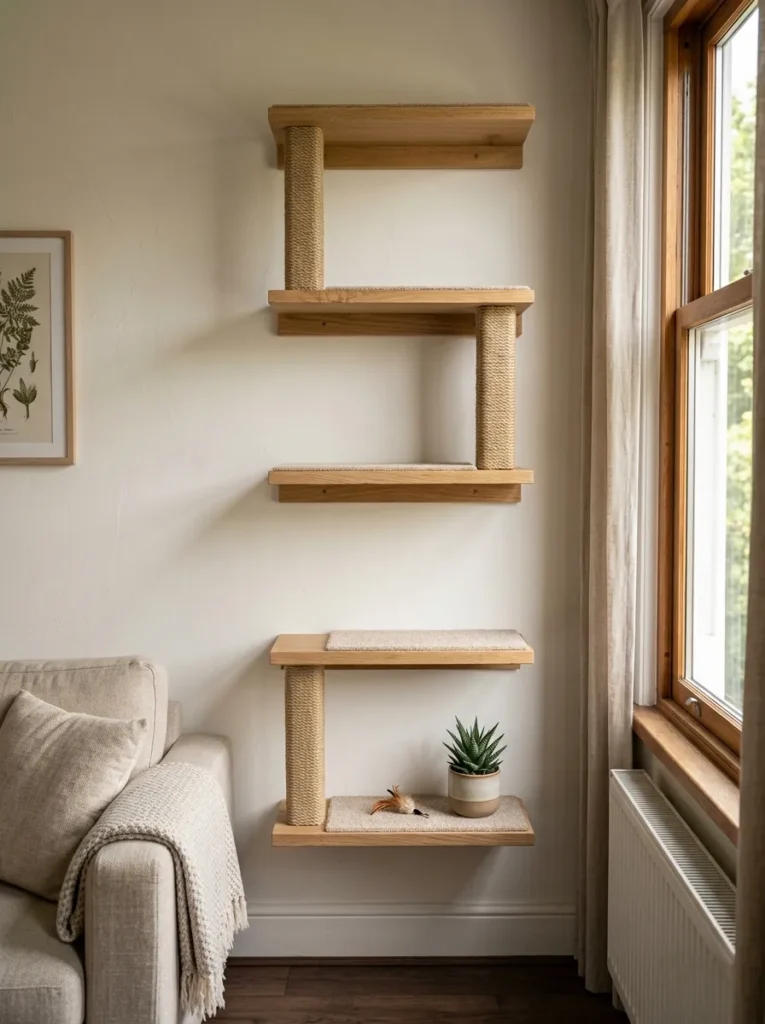
Vibe: The floating shelf system feels like built-in climbing architecture for a species that evolved to live in trees — the staggered heights creating a vertical navigation route that reads as a designed wall feature to human visitors.
Why it works: A staggered floating shelf system applies the vertical highway principle — shelves at graduated heights create a navigable vertical route that a cat can ascend and descend by jumping from one shelf to the next, providing not just individual perching positions but a continuous vertical navigation system. The 35cm vertical interval between each shelf is the optimal jump increment for most domestic cats — requiring a meaningful but achievable jump that provides exercise without being challenging enough to deter use. The sisal-wrapped posts connecting adjacent shelf levels serve a dual function: they provide intermediate grip for cats ascending between shelf levels (replacing the need for a single large jump) and serve as integrated scratch posts (eliminating the separate floor-standing scratch post that is otherwise required in the same room).
Safety: Fix each shelf to wall studs using two 80mm screws per shelf through the shelf bracket into the stud — minimum two studs per shelf (for a 45cm shelf, this is achievable at standard 400mm or 600mm stud centres). Use shelf brackets rated for minimum 20kg each — cat landing impact force significantly exceeds resting cat weight.
Making time: 4–6 hours for a five-shelf system.
How to make it: Cut five shelf boards from 18mm solid pine or oak at 45×25cm. Sand all surfaces to 120 grit then 240 grit. Apply carpet squares (cut to the shelf’s top surface dimensions) using contact adhesive, pressing flat and allowing 24 hours to cure. Locate wall studs using a stud finder. Install heavy-duty L-brackets or invisible floating shelf brackets at each stud position. Wrap two 60mm diameter timber post sections (25–30cm long) in sisal rope using contact adhesive to secure the rope’s start and end, fixing the wrapped posts vertically between adjacent shelf pairs.
Quick Win: A single shelf at 120cm height (too high for a cat to reach from the floor unaided, but accessible via the sofa or a lower shelf) provides an immediate elevated refuge for an anxious or multi-cat household cat for under $25 in materials.
Shop The Look
| Product |
|---|
| Pine board 18mm shelf set |
| Heavy duty L-bracket shelf set |
| Short pile carpet square oat |
| Sisal rope natural thick |
| Contact adhesive tube |
Also view: 12 DIY Coastal Crochet Ideas to Craft Florida Freshness at Home
2. Corner Cat Climbing Wall — Using Two Adjacent Walls
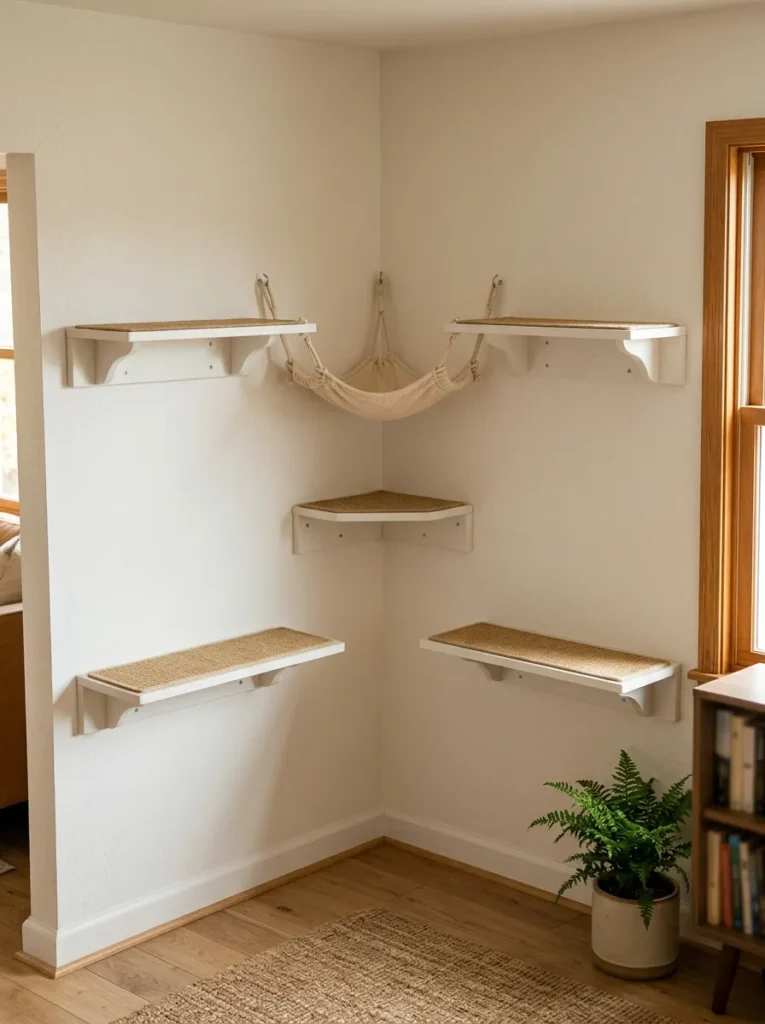
Vibe: The corner climbing system feels like the two walls collaborated to create a vertical space that neither could provide alone — the corner position enabling step-across transitions that a single-wall system cannot.
Why it works: A corner cat climbing system applies the transition architecture principle — a room corner provides a unique opportunity for a cat shelf system because the perpendicular walls at a corner allow a shelf on each wall at the same height to serve as stepping positions from one wall to the other without requiring a jump. This step-across capability makes the corner configuration more accessible for older cats, less agile cats, or cats recovering from injury than a single-wall jumping system. The small triangular corner shelf (a simple right-triangle shelf fitted directly into the angle between the two walls) provides a specific corner-position perching platform that cats particularly value as a three-sided enclosed resting position.
Making time: 3–4 hours for a four-shelf corner system.
How to make it: Cut two shelves for each wall at 40×22cm (maintaining the same depth dimension on both walls ensures a consistent aesthetic across the corner). Cut a triangular corner shelf from 18mm MDF with two 22cm sides forming the right angle and the hypotenuse as the front edge — this fits precisely into the corner angle. Paint all shelves in the wall paint color and apply sisal or carpet to the upper surface. Fix the corner shelf first (using two L-brackets, one on each wall), then install the wall shelves at heights that step up from the corner shelf on each side. Install a small cat hammock between the two same-height shelves on the adjacent walls — a simple rectangle of canvas or heavy cotton, hemmed and fitted with grommets at each corner, tied to screw hooks in the adjacent shelf undersides.
Shop The Look
| Product |
|---|
| MDF board 18mm cut to size |
| Triangular corner shelf bracket |
| Sisal mat corner shelf surface |
| Small canvas hammock cat |
| Screw hook set M4 eye hook |
3. IKEA Shelf Hack — LACK or MOSSLANDA Cat Highway
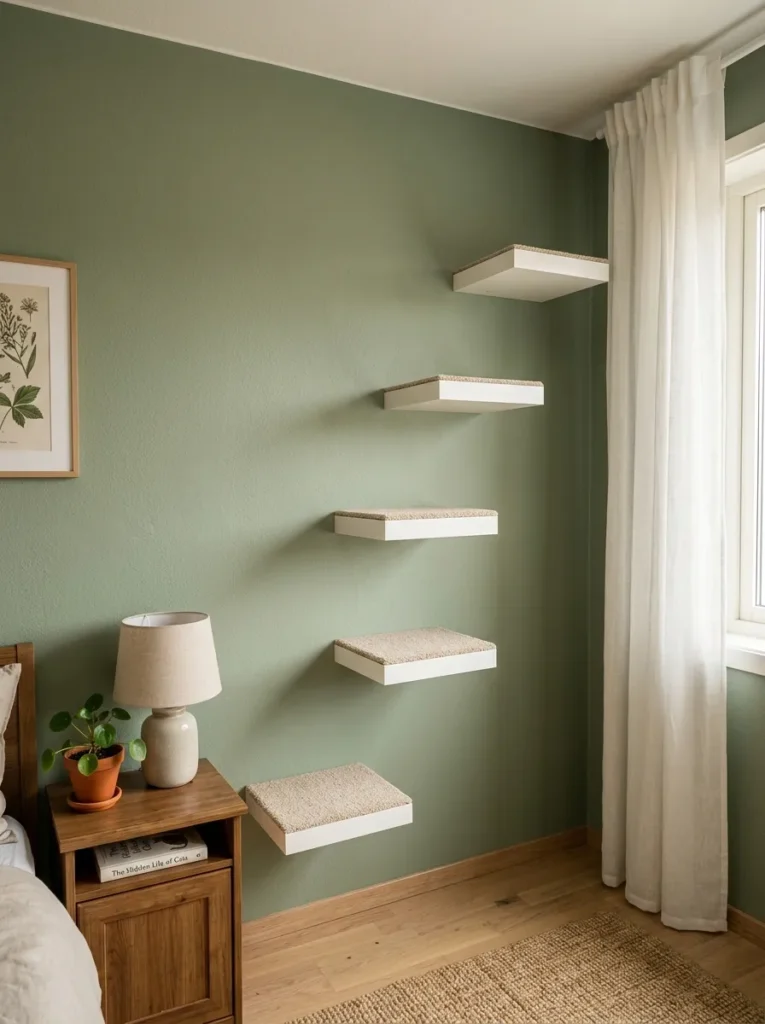
Vibe: The LACK shelf diagonal feels like the most affordable path to a complete cat climbing system — the staggered stepping-stone pattern transforming five $7 IKEA shelves into a designed wall feature.
Why it works: IKEA LACK shelves hacked into a cat highway apply the maximum value from minimum cost principle — the LACK shelf ($7–12 per shelf depending on market) is among the most widely available, most dimensionally appropriate (30cm wide provides adequate landing space for most domestic cats), and most immediately installable shelving products globally. The LACK’s limitation for cat use in its standard configuration is its smooth, painted surface — which provides inadequate grip for a landing cat. The carpet surface addition (a 28×24cm piece of short-pile carpet adhered to the shelf top) resolves this limitation completely at minimal additional cost. Five LACK shelves with carpet surfaces installed in a diagonal stagger create a complete cat climbing highway for approximately $50–80 in total materials.
Safety note: IKEA LACK shelves are rated at 10kg static load in standard installation (two fixing points per shelf into plasterboard). For cat use — which involves dynamic landing impact — the LACK must be fixed into wall studs, not plasterboard anchors alone. If studs are not at the correct spacing for the LACK’s two fixing holes, use a supplementary timber batten fixed through the wall to studs, and fix the LACK to the batten.
Making time: 2–3 hours for five shelves including surface prep.
Shop The Look
| Product |
|---|
| IKEA LACK wall shelf white 30cm |
| Short pile carpet tile oat cut-down |
| Contact adhesive carpet shelf |
| Stud finder wall location |
| 80mm timber screw stud fixing |
4. Pallet Wood Cat Climbing Frame
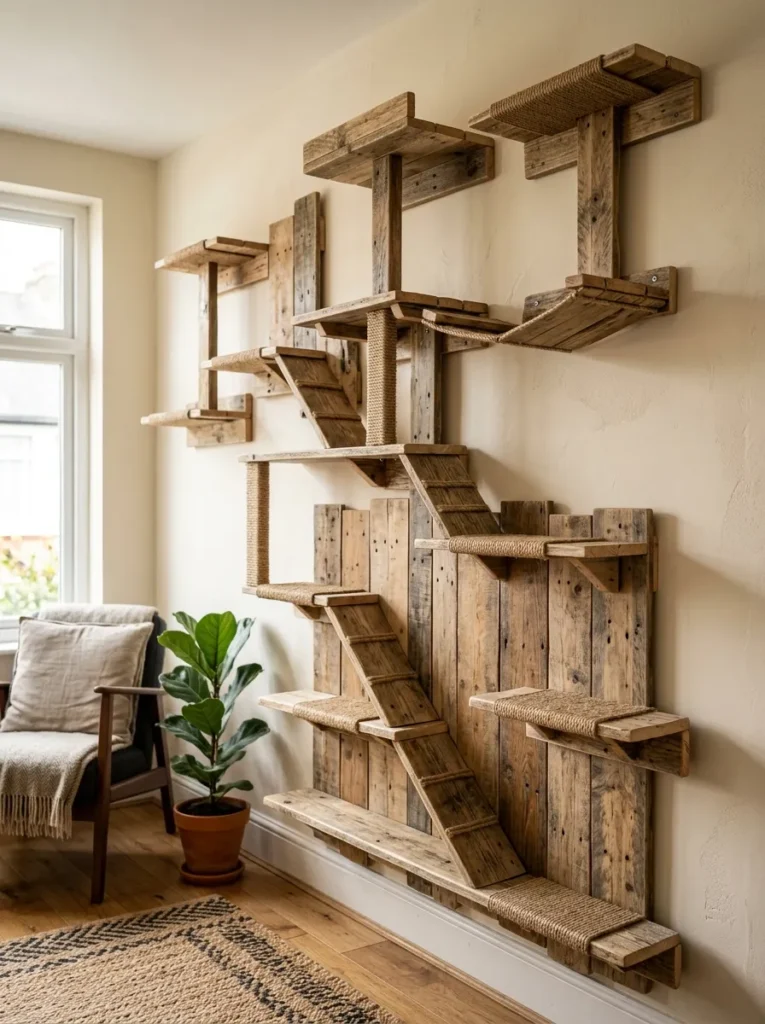
Vibe: The pallet wood climbing frame feels resourceful in the most appealing sense — the reclaimed material bringing genuine warmth and character that no purchased shelf product replicates.
Why it works: Pallet wood cat shelves apply the zero-cost material premium aesthetic principle — EPAL heat-treated pallets (free from most garden centres, construction sites, and logistics facilities) provide an unlimited supply of 95mm wide × 22mm thick solid timber boards in varied lengths. Disassembled and individually mounted, these boards create cat shelves with the genuine material quality of reclaimed solid timber at essentially zero material cost. The varied widths, grain patterns, and slight color differences between individual pallet boards create the visual richness of a genuine reclaimed wood installation that manufactured boards of consistent appearance cannot replicate.
Making time: 4–6 hours including pallet disassembly and surface preparation.
How to make it: Disassemble EPAL heat-treated pallets (not chemically treated — HT marked only) using a pallet buster or pry bar. Sand all boards lightly to remove splinters (80 grit) and then 120 grit to smooth. Do not heavily sand or seal the surface — the natural grain and slight variation is the material’s aesthetic value. Tack or staple sisal rope to each board’s upper surface in parallel rows 2–3cm apart for a grip surface. Mount each board individually using two 80mm screws per board into wall studs or masonry — the board’s structural integrity is the shelf’s load-bearing element.
Shop The Look
| Product |
|---|
| EPAL pallet free source heat treated |
| Pallet buster tool disassembly |
| Sandpaper 80 and 120 grit |
| Sisal rope natural thin 6mm |
| Staple gun tack sisal surface |
5. Window Observation Perch at Cat Eye Height
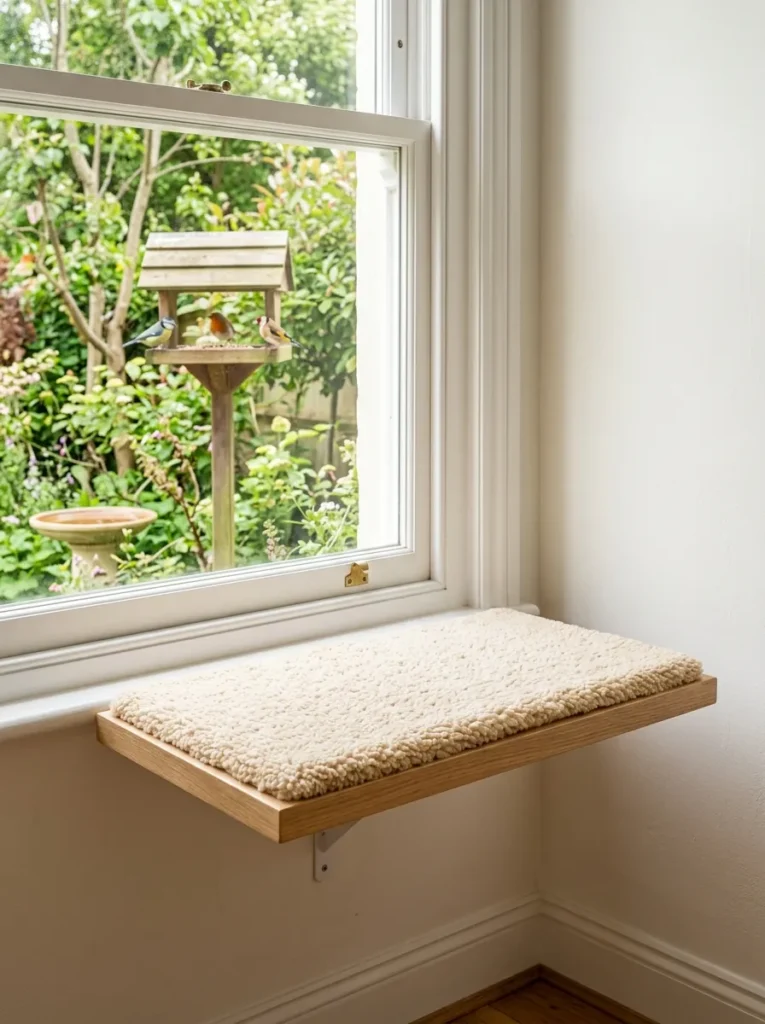
Vibe: The window observation perch feels like a birdwatching station designed for a species that is professionally invested in birds — the specific placement creating a dedicated observatory with the garden as the programme.
Why it works: A window observation perch applies the environmental enrichment specificity principle — the most powerful single enrichment addition to an indoor cat’s environment is a stable, comfortable perch at a window overlooking a garden with bird or wildlife activity. Cats spend hours in voluntary, engaged observation at windows with active wildlife views — an activity that behavioral researchers categorize as genuine cognitive enrichment (tracking moving targets, processing varied olfactory and auditory inputs through the window) rather than passive time-passing. The shelf’s specific width (60cm, wider than a standard window sill) and the soft, removable surface pad are the details that convert a window perch from a briefly used narrow ledge to a primary resting position that the cat returns to voluntarily throughout the day.
Making time: 1–2 hours.
How to make it: Install a 60×35cm shelf at window sill height (typically 85–95cm from the floor, adjustable to the specific window) using two heavy-duty L-brackets fixed into studs. The shelf must be positioned close enough to the window that the cat can reach the window glass from the shelf — within 15cm of the glass is ideal. Cover with a removable sherpa or faux sheepskin pad (machine washable — washability is the critical specification for any fabric used on a cat surface). Install a bird feeder on the exterior of the window (a suction-cup or window-clip feeder positioned at the same height as the shelf to attract birds to the window where the cat can observe them closely).
Shop The Look
| Product |
|---|
| Pine or oak shelf 60x35cm |
| Heavy duty L-bracket pair |
| Sherpa pad removable washable |
| Suction cup window bird feeder |
| Bird seed mixed feeder |
6. Cat Hammock Between Two Shelves
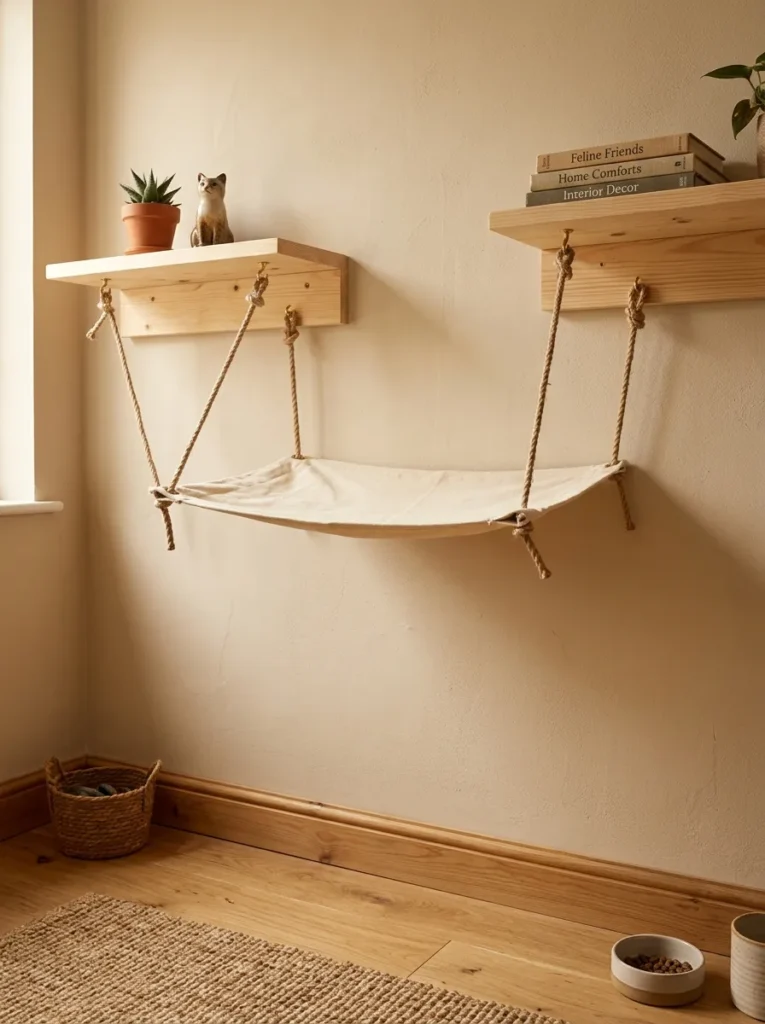
Vibe: The between-shelf hammock feels like the most logical possible answer to the question of what goes between two shelves — converting dead wall space into the resting position that most cats specifically seek.
Why it works: A cat hammock suspended between two wall shelves applies the dead zone activation principle — the wall space between two shelves at the same height is typically unused negative space in a shelf system. Converting this space into a hammock provides an additional resting position with a specific physical character that cats particularly value: the slight hammock give (as the cat’s weight depresses the hammock center), the enclosed quality (the cat’s body is slightly below the shelf height on each side), and the height above the floor (the hammock position at 120cm provides the elevated territory that cats seek). The hammock is significantly lower construction effort than an additional shelf while providing a distinct resting environment.
Making time: 30–45 minutes.
How to make it: Cut heavy canvas (minimum 350gsm weight — lighter canvas will stretch excessively under the cat’s weight) to 52×37cm. Fold and hem all four edges to 2cm, creating a clean edge. Fit a metal grommet at each of the four corners using a grommet tool. Cut four 25cm lengths of cotton or natural rope and knot through each grommet to create four hanging loops. Install a strong screw hook (rated for 15kg) in the underside of each shelf at the position corresponding to the intended hammock position. Hang the four rope loops from the appropriate shelf hooks — two from each shelf. Adjust the rope length at each corner so the hammock hangs approximately level when unloaded.
Shop The Look
| Product |
|---|
| Heavy canvas fabric 350gsm natural |
| Metal grommet set tool |
| Cotton rope natural 6mm |
| Screw hook M6 set |
| Grommet setting hammer tool |
7. Painted Geometric Cat Shelf Arrangement
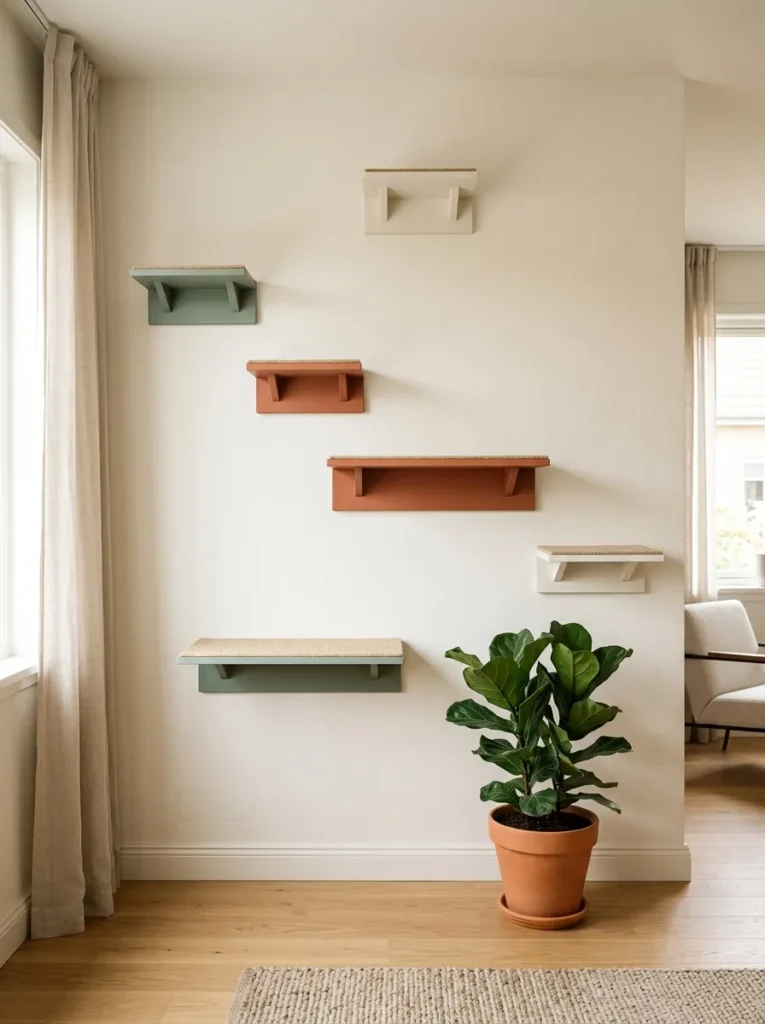
Vibe: The geometric painted shelf arrangement feels like abstract wall art that a cat can climb — the color composition providing the room’s decorative focal point while the functional purpose is entirely serious.
Why it works: A geometric painted cat shelf arrangement applies the design-forward disguise principle — when cat shelves are painted in colors from the room’s existing palette and arranged in a composed geometric pattern, they cease to read as pet furniture and begin to read as architectural wall features. This transformation is achieved through two decisions: the paint color (shelves painted in the room’s own palette dissolve visually into the wall composition rather than standing out as additions) and the arrangement geometry (a considered asymmetric arrangement of varied sizes creates compositional interest that a random or equally-spaced arrangement lacks). The cat’s welfare needs (varied heights, multiple resting positions) and the human’s aesthetic needs (a composed, beautiful wall feature) are served simultaneously by the same design decisions.
Making time: 3–4 hours including painting drying time.
How to make it: Cut four shelves at 35×22cm and two shelves at 55×22cm from 18mm MDF. Sand all surfaces smooth. Paint each shelf in the chosen color (warm white, dusty sage, or terracotta chalk paint works directly on MDF without primer if sanded to 120 grit). Apply carpet squares to the shelf tops after the paint is fully cured (minimum 24 hours). Arrange the shelf positions on the floor before committing to the wall — photograph the arrangement and assess the visual composition from a standing distance. Install using hidden floating brackets in color-matched or stud-fixed positions.
Shop The Look
| Product |
|---|
| MDF board 18mm cut to size |
| Chalk paint warm white set |
| Chalk paint dusty sage |
| Chalk paint warm terracotta |
| Hidden floating shelf bracket |
8. Under-Stair Cat Nook with Integrated Shelf
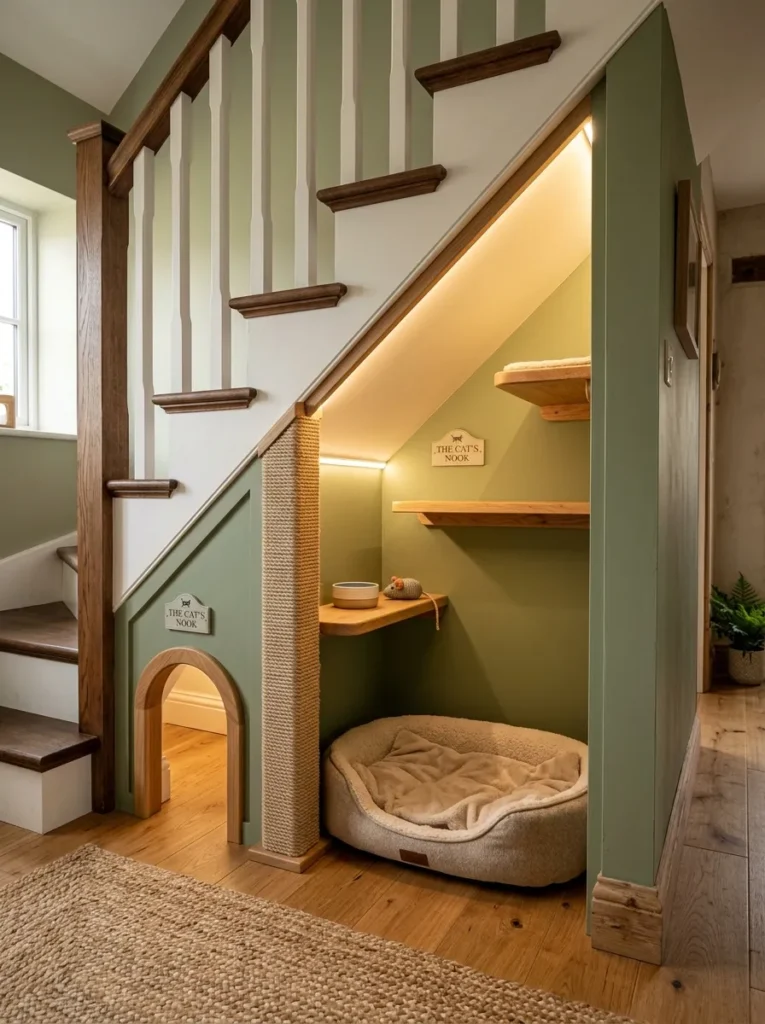
Vibe: The under-stair cat nook feels like the house was designed from the beginning with the cat as an occupant — the alcove space that is structurally necessary but architecturally awkward converted into the most beloved part of the home for the cat.
Why it works: An under-stair cat nook applies the spatial dead zone conversion principle — the triangular under-stair space is frequently the home’s most underutilized structural zone, often used for shoe storage or cleaning equipment. Its conversion to a cat habitat simultaneously solves two design problems (the awkward triangular dead zone and the cat’s need for elevated territory and private space). The stair’s own geometry — each tread providing a natural step up — provides the foundation for a climbing system within the alcove without requiring separate freestanding structures. The arched entry cut through the lower stair wall provides cat access from the adjacent hallway while maintaining the alcove’s enclosed quality.
Making time: 4–8 hours including painting, shelf installation, and sisal wrapping.
How to make it: Paint the under-stair alcove interior walls and ceiling in the chosen accent color. Install shelves within the alcove at heights that follow the stair geometry (position each shelf at a height that corresponds to approximately two stair rises, creating a continuous stair-parallel climbing route). Cut the arched cat entry in the lowest accessible stair wall section using a jigsaw — the arch should be approximately 25cm wide and 30cm tall. Finish the arch entry with a painted or tiled surround. Wrap any structural post within the alcove in sisal rope. Install an LED strip light at the alcove ceiling for interior illumination.
Shop The Look
| Product |
|---|
| Sage green wall paint interior |
| Small shelf board under-stair |
| Jigsaw tool arch entry cut |
| Sisal rope structural post |
| LED strip warm amber alcove |
9. Rope Bridge Between Two Wall Shelves
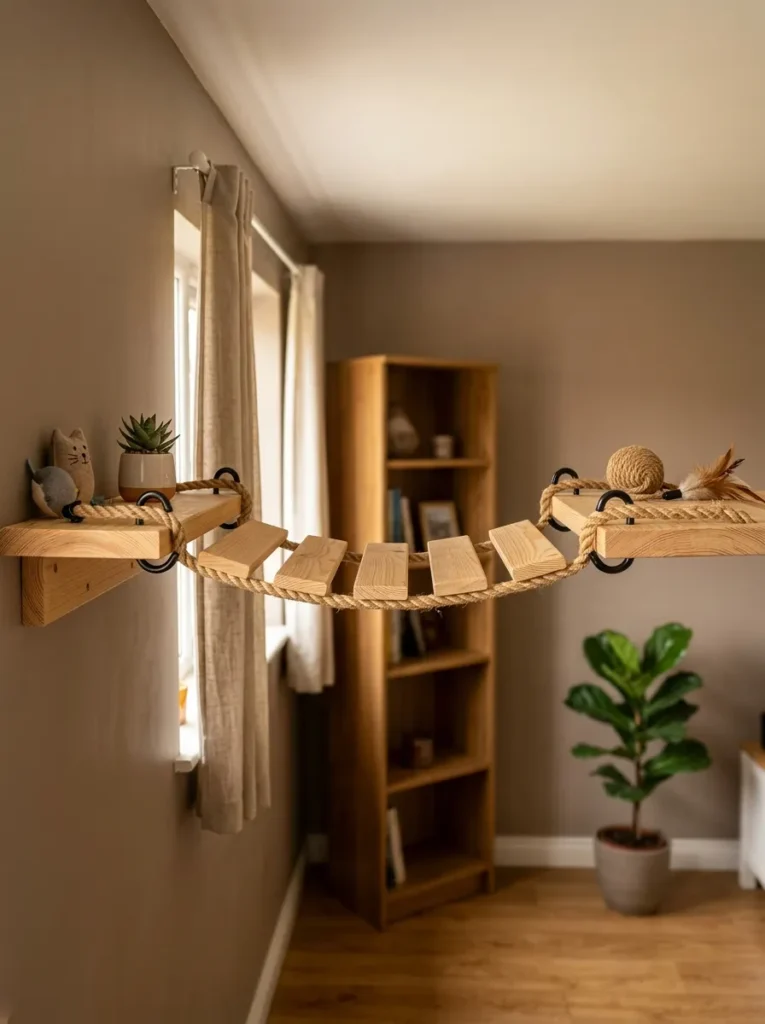
Vibe: The rope bridge feels like adventure infrastructure built to a cat’s specification — the rope and wood construction creating genuine physical engagement rather than a passive perch.
Why it works: A rope bridge between wall shelves applies the physical enrichment principle — a rigid rope bridge (as opposed to a freely swinging bridge, which many cats find unsettling) provides a crossing route between two shelves that requires balance and proprioceptive engagement, activating the core stabilizing muscles and balance systems that flat-floor movement does not. The wooden slat construction (slats wide enough to provide a firm foothold, spaced to require a small step between each) creates a physical challenge within the cat’s comfort range — engaging without being intimidating. The two-shelf configuration (one landing shelf at each end) provides resting positions before and after the crossing, making the bridge a route between destinations rather than a destination in itself.
Making time: 2–3 hours.
How to make it: Cut five wooden slats from 18mm pine at 25×5cm each. Drill two holes at each end of every slat, 18cm apart, for the rope to thread through. Cut two lengths of 10mm manila rope at 100cm each. Thread both ropes through the holes of all five slats, spacing the slats 6cm apart. Tie a loop knot at each rope end creating hanging loops approximately 8cm long. At each shelf, install two heavy screw hooks in the shelf’s outer face at the rope hanging positions. Hook the rope loops over the screw hooks, adjusting the rope length so the bridge hangs level and taut between the two shelves.
Shop The Look
| Product |
|---|
| Manila rope 10mm natural |
| Pine slat board 18mm cut |
| Heavy screw hook set M8 |
| Drill bit set wood |
| Hanging loop knot guide |
10. Cat Shelf with Integrated Planter — Biophilic Design
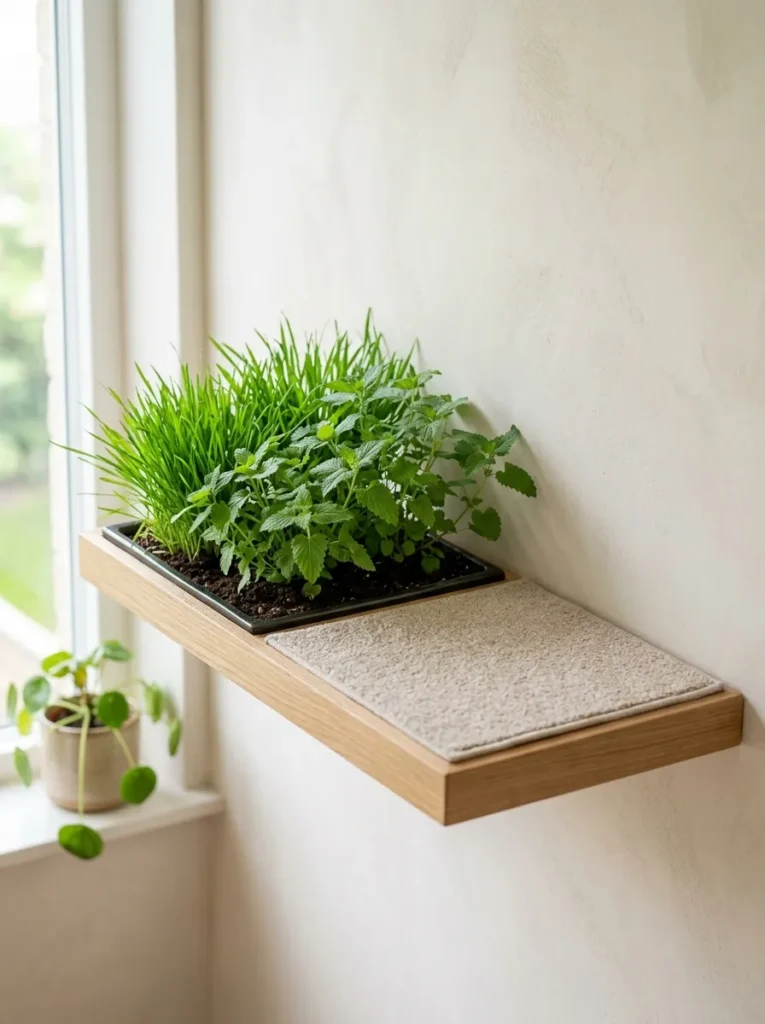
Vibe: The planter-integrated shelf feels like the most thoughtful possible piece of cat furniture — the growing catnip and cat grass providing olfactory enrichment and chewing substrate at the exact perch height where the cat will use them.
Why it works: A cat shelf with an integrated planter applies the biophilic enrichment principle — cat grass (typically wheat grass or barley grass) and catnip (Nepeta cataria) provide two of the most powerful sensory enrichments available to an indoor cat: a physical fiber supplement (chewing cat grass satisfies the grass-eating behavior that cats engage in naturally in outdoor environments) and a neurological reward stimulus (catnip’s nepetalactone compounds stimulate feline reward pathways in the approximately 50–70% of cats that carry the genetic receptor sensitivity). Providing these botanicals at the cat’s primary resting height (on the shelf surface where the cat spends significant time) maximizes voluntary botanical contact without requiring the cat to descend to a floor-level plant.
Making time: 3–4 hours including the planter inset construction.
How to make it: Cut a 70×22cm shelf from 18mm pine, then cut a 22×22cm rectangular opening from one-third of the shelf width using a jigsaw. Frame this opening with a 22mm deep timber border (to create the planter box walls) and add a base to the planter section with drainage holes. Apply carpet to the remaining two-thirds of the shelf surface. Line the planter section with a waterproof insert (a cut-down plastic container or a purpose-made pot insert). Plant cat grass seed in a fast-draining potting mix and sow catnip seeds beside it. Install the shelf on the wall using appropriate fixings.
Shop The Look
| Product |
|---|
| Pine board 18mm shelf |
| Cat grass seed wheat or barley |
| Catnip plant or seed Nepeta cataria |
| Waterproof planter insert liner |
| Oat carpet shelf surface |
11. Cat Shelf with Dangling Toy Attachments
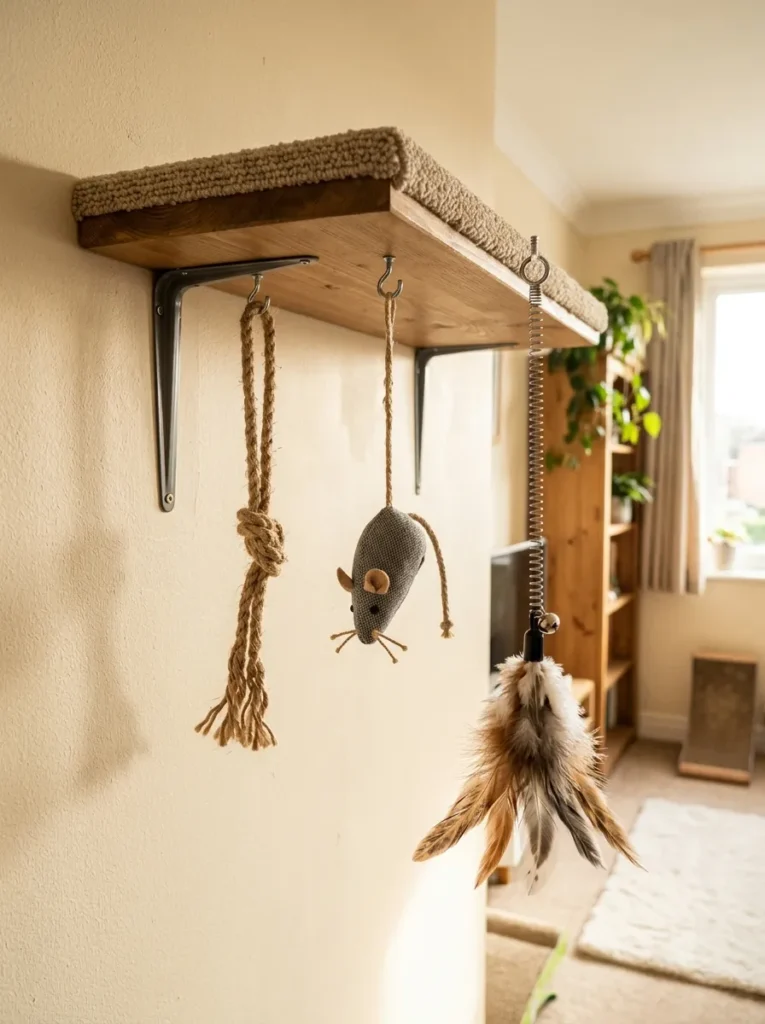
Vibe: The toy-equipped shelf feels like the most engaged version of a cat shelf — the hanging toys converting a passive perch into an active hunting station that the cat can reach from the shelf above.
Why it works: A cat shelf with dangling toy attachments applies the hunting simulation principle — cats are obligate predators with a strong instinctive motivation to engage in predatory sequence behaviors (stalk, pounce, bat, bite, and carry) even when food provision makes hunting unnecessary. Dangling toys attached to a shelf’s underside convert the shelf from a resting station into a hunting station where the cat can initiate play behavior spontaneously and independently, without requiring human engagement. The varied attachment lengths (15, 20, and 25cm) create varied target heights that the cat must reach for at different angles, providing the motor variety that a uniform target height does not. The spring attachment specifically creates unpredictable movement (the spring rebounds differently with each bat) that mimics the behavioral unpredictability of live prey.
Making time: 30 minutes for the toy attachment installation.
How to make it: Install three small screw hooks (M4 eye hooks, rated for 2kg each) in the underside of an existing or new shelf at 15, 25, and 35cm from one end of the shelf — the clustered placement within one shelf section creates a defined play zone beneath one end of the shelf. Attach toy elements to each hook using varied lengths of natural cord or light chain: a length of knotted sisal rope, a small fabric mouse tied to natural cord, and a small feather cluster on a short stainless compression spring (available from DIY retailers in the door spring category). Inspect and replace worn toys monthly.
Shop The Look
| Product |
|---|
| Screw hook M4 eye set |
| Sisal rope toy natural |
| Small fabric mouse cat toy |
| Feather cluster toy natural |
| Small stainless compression spring |
12. Cat Shelf System with Enclosed Cat House at Top
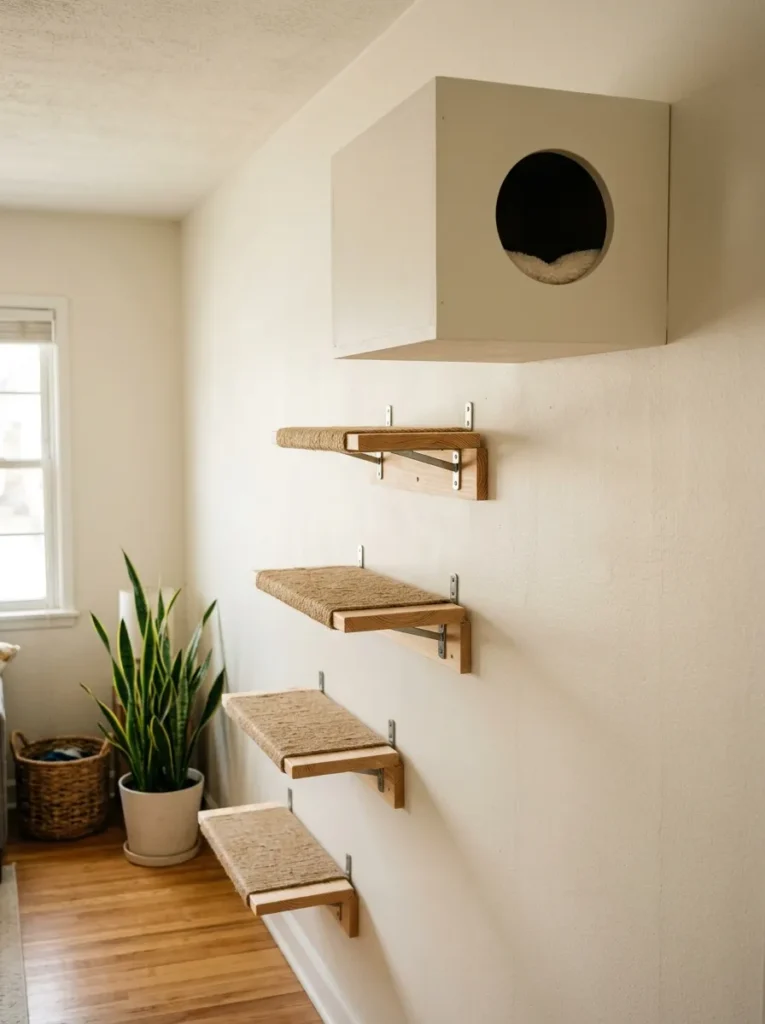
Vibe: The shelf system with cat house feels like a complete vertical world with its own private apartment at the top — the ascending route and the enclosed house together satisfying every behavioral need from exercise to territory to den.
Why it works: A cat shelf system with an enclosed cat house at the highest point applies the den-within-territory principle — cats instinctively seek both elevated territory (height for security and visibility) and an enclosed, small-aperture den space (for undisturbed sleep and hiding from perceived threats). Most cat shelf systems provide elevated territory without the enclosed den quality; most cat beds provide the enclosed den quality without elevation. A cat house at the highest point of a shelf system provides both simultaneously — the cat climbs to its highest accessible territory and within that territory has an enclosed den with a small entry hole that it can enter, secure, and rest undisturbed. The small circular entry hole (15cm diameter) is a critical specification — it provides access for the cat but creates a visual barrier that prevents the cat’s resting position from being disturbed by other animals or visual stimuli from the room.
Making time: 5–7 hours for the full system including the cat house build.
How to make it: Build the cat house from 12mm plywood — four walls, a base, and a roof, assembled with wood glue and 40mm screws. Cut the circular entry hole using a 150mm hole saw. Paint the exterior in the wall paint color. Line the interior with a removable fleece pad (25×28cm). Install the cat house on the wall at approximately 190cm height using three 80mm screws through the back wall of the house into studs — this is the highest and most loaded fixing in the system and must reach studs. Install the ascending shelf system below, with each step approximately 35cm below the next.
Shop The Look
| Product |
|---|
| Plywood 12mm sheet |
| 150mm hole saw cat entry |
| Wood glue and 40mm screw |
| Fleece pad removable washable |
| Wall paint color match shelf |
13. Floating Bookshelf Cat Highway — Books and Cats Together
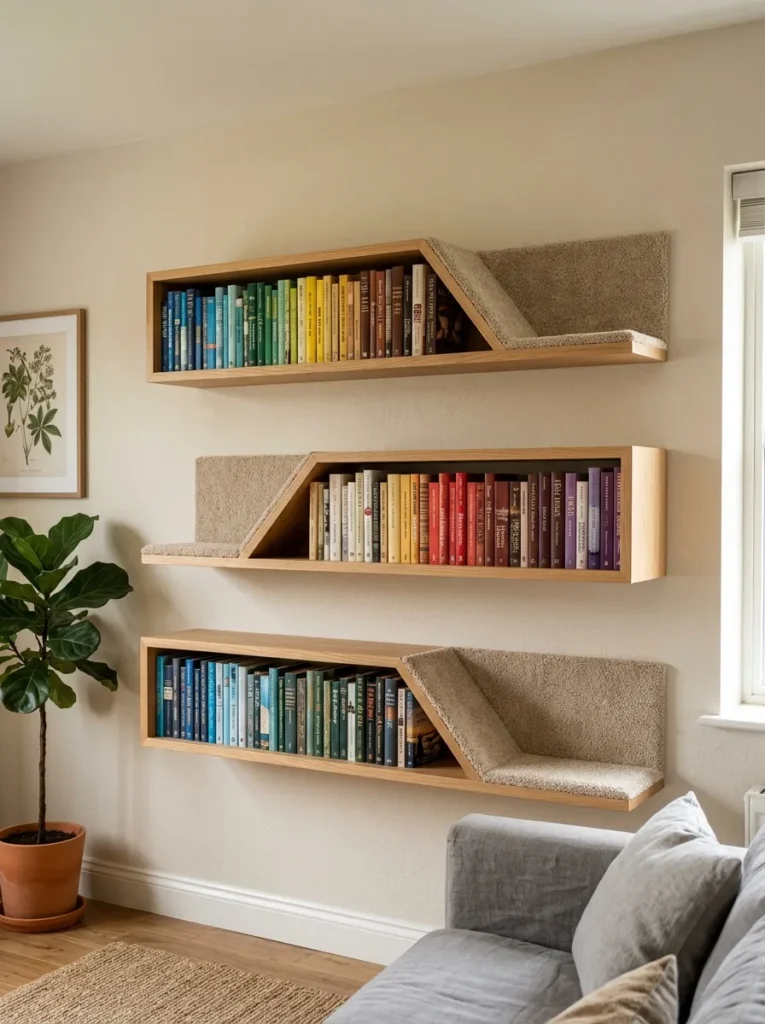
Vibe: The book and cat shelf feels like the discovery that bookshelves were already cat shelves and only needed one small addition to acknowledge this — the carpet section converting an existing feature into a designed cat route.
Why it works: A floating bookshelf with integrated cat landing sections applies the dual-use design principle — the bookshelf is already the room’s primary wall feature and its shelves already provide elevated surfaces at multiple heights. Converting one-third of each shelf width into a designated cat landing zone (distinguished by the carpet surface that the book section lacks) converts the existing furniture into a cat highway without adding any separate cat-specific structure to the room. The staggered carpet sections (on the left end of the lower shelf, the right end of the middle shelf, and the left end of the upper shelf) create a diagonal path across the three shelves that the cat follows, entering at one side and crossing to the other at each level.
Making time: 1–2 hours of modification to existing shelves.
How to make it: Identify the outer one-third of each existing bookshelf as the designated cat zone. Clear this section of books permanently. Cut a piece of short-pile carpet to the exact dimensions of the cat zone section and adhere with contact adhesive, creating a clearly defined carpet platform. Ensure the carpet section is at a shelf end position (not centered) and alternate which end on each shelf level. Verify that the existing shelf fixings are into wall studs — the increased dynamic load from cat use may require supplementary stud fixings if the original installation used plasterboard anchors.
Shop The Look
| Product |
|---|
| Existing floating bookshelf 100cm |
| Short pile carpet tile cut-down |
| Contact adhesive shelf |
| Book collection color organized |
| Supplementary stud fixing screw |
14. Full Cat Gallery Wall — Complete Room Installation
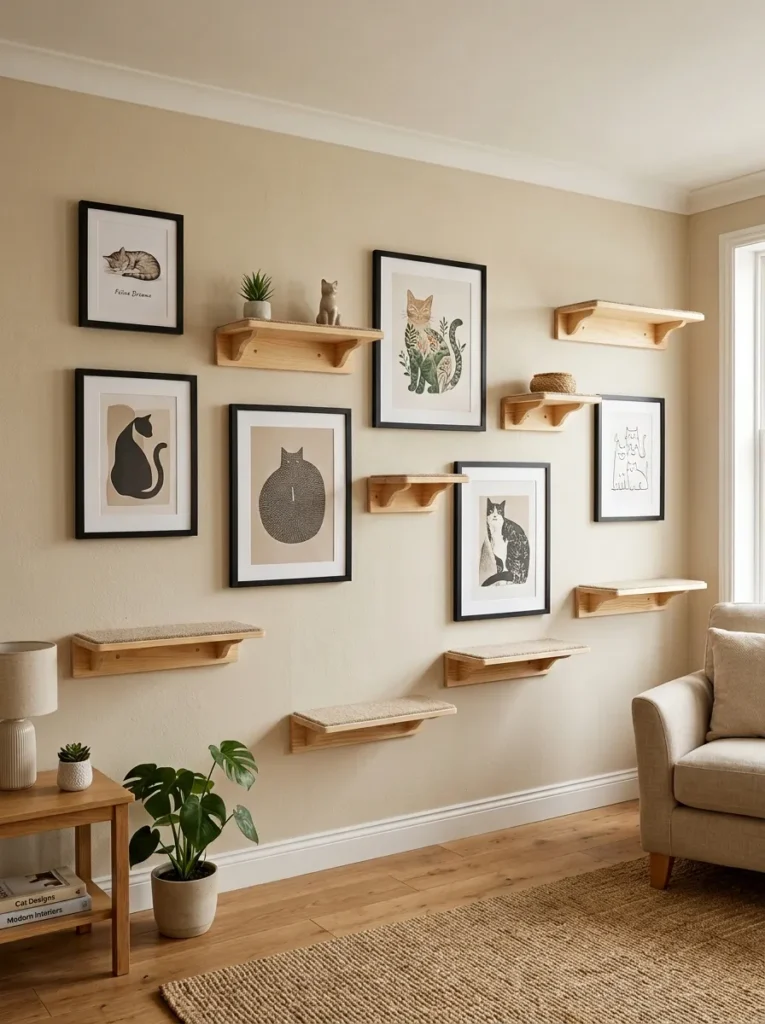
Vibe: The full gallery wall installation feels like the most complete answer to the question of whether a cat shelf can be genuinely beautiful — the shelves and the art forming a single wall composition where neither subordinates the other.
Why it works: A full cat gallery wall installation applies the compositional equality principle — the most successful cat shelf wall installations are those where the cat shelves are designed as compositional peers to the wall’s other decorative elements (art prints, plants, decorative objects) rather than as additions that the decorative elements must accommodate. When the shelf sizes, finishes, and positions are chosen with the same compositional attention as the framed artworks between them — ensuring that the visual weight of the shelves and the visual weight of the frames creates balance across the full wall — the result reads as a single designed installation rather than a mix of pet furniture and home decor.
Making time: 6–10 hours for planning, picture hanging, and shelf installation.
How to make it: Begin with the wall plan — use paper templates (cut to the size of each shelf and each frame) to arrange the full composition on the floor before committing any positions to the wall. The compositional goals are: no two identical objects at the same height (alternate shelf and frame at each height position), visual balance between the left and right halves of the wall, and a clear navigable path that a cat can use to ascend and descend. Transfer the template arrangement to the wall using painter’s tape outlines for each element. Install all elements in the planned positions, beginning with the cat shelves (which require stud fixings) and then adding the art frames.
Shop The Look
| Product |
|---|
| Natural pine shelf set varied size |
| Short pile carpet surface set |
| Simple black frame set four |
| Art print set gallery wall |
| Painter’s tape planning layout |
How to Start Your Cat Shelf DIY Project
The single best first move before cutting any timber or purchasing any brackets is observing your specific cat’s existing vertical behavior for one week — noting which elevated positions the cat currently seeks (the top of the bookshelf, the refrigerator, the back of the sofa), which direction the cat faces when in its highest resting position (this indicates the view or sightline the cat most values), and whether the cat jumps to elevated positions directly (indicating good athletic capability and a preference for high maximum heights) or takes intermediate steps (indicating a preference for a stepped route with intermediate positions). This behavioral observation specifically informs three critical design decisions: the maximum shelf height the system should reach (match or slightly exceed the cat’s current highest voluntarily occupied position), the horizontal offset between adjacent shelves (match the cat’s observed step-distance preference), and the shelf’s orientation (face the shelf toward the sightline the cat currently seeks from its existing elevated positions).
The most common mistake in DIY cat shelf building is under-specifying the wall fixings. The dynamic load created by a cat jumping onto a shelf — a 5kg cat landing from a 35cm jump generates a momentary impact force of approximately 25–40kg — is significantly higher than any static load calculation based on the cat’s resting weight. This means that a bracket rated at 15kg static load is actually marginal for a 5kg cat’s landing impact. The correct specification for any cat shelf bracket is minimum 20kg static rating, fixed into wall studs or masonry (not plasterboard anchors, which have significantly lower dynamic load resistance than their static ratings suggest). The two-screw-per-bracket, stud-fixed specification is non-negotiable for any shelf that will receive a cat.
Three specific materials under $20 that immediately improve the quality of any cat shelf: a roll of 6mm sisal rope ($5–8 from a garden or craft retailer, which can be used to wrap posts, add texture to shelf edges, or create scratch surfaces at any shelf — sisal is more durable and more attractive to cats as a scratch material than carpet); a 50×50cm piece of short-pile carpet ($3–6 from a remnant or tile supplier, which provides the grip surface that makes the critical difference between a shelf a cat uses voluntarily and one it avoids because it is slippery); and a removable fleece square ($4–8, which provides a washable, replaceable soft surface layer at the primary resting shelf — washability is the specific property that makes it appropriate for a surface where a cat will spend significant time). These three materials combined for under $20 improve the safety, appeal, and hygiene of any cat shelf in the list.
Frequently Asked Questions About DIY Cat Shelves
How high should cat shelves be mounted?
Cat shelf systems should provide a range of heights from approximately 45cm (accessible from the floor for cats with mobility limitations or short legs) to 180–200cm (the maximum height that provides genuine territorial security for most cats, approaching the ceiling of standard rooms). The most important height is the highest accessible shelf — this is the position the cat will use most for long-term resting and territorial observation. As a general principle, the higher the maximum accessible shelf, the more welfare benefit the system provides — but the highest shelf must be accessible from the second-highest shelf via a jump that does not exceed the specific cat’s comfortable jump distance (typically 40–50cm for an athletic adult cat, 25–30cm for a senior or less athletic cat).
What shelf dimensions are safe and comfortable for cats?
The minimum comfortable shelf dimensions for a domestic cat resting position are 30cm wide by 22cm deep — sufficient for most cats to sit and observe but insufficient for comfortable lying. For a shelf intended as a primary resting position (where the cat will spend extended periods), 45cm wide by 25cm deep is the minimum for a small-to-medium cat and 55cm wide by 30cm deep is more comfortable for large breeds. The width of the shelf (the horizontal dimension) is more important for comfort than the depth (the wall-to-front distance), because cats rest along their body length rather than across it. Always specify wider rather than longer shelves for primary resting positions.
How do you get a cat to use a new shelf system?
Introducing a new cat shelf system requires active encouragement for most cats, particularly older cats or cats with no prior elevated-surface experience. The most effective introduction technique is food-based positive association: place a small quantity of the cat’s favourite food or treat on the lowest shelf immediately after installation. When the cat approaches and eats from the lowest shelf, move subsequent treat placements to the second shelf, then progressively higher. This graduated positive association typically produces comfortable voluntary use of the full system within two to four weeks. For cats that remain reluctant, applying a small amount of catnip to the shelf surface provides an additional olfactory attractant that encourages initial contact and investigation.
Are carpet-covered cat shelves hygienic?
Carpet-covered cat shelves require regular maintenance for hygiene — weekly vacuuming to remove shed hair, monthly deep-cleaning with an enzyme-based pet odor eliminator spray applied and allowed to dry completely. Carpet on cat shelves will typically require replacement every 12–18 months of regular use, depending on the number of cats, the frequency of shelf use, and whether the shelves are within reach of the litter box. The hygiene case for removable, machine-washable surface covers (fleece squares, washable fabric pads) rather than adhered carpet is compelling for primary resting shelves — the ability to machine wash the surface on a regular cycle is significantly more hygienic than a non-removable carpet surface. Use adhered carpet for structural climbing shelves that receive less resting contact and removable fabric pads for primary perching and resting positions.
Can cat shelves damage walls?
Cat shelf brackets correctly installed into wall studs or masonry do not damage walls beyond the fixing holes, which are repairable with standard wall filler at end of tenancy or system removal. The risks to walls from incorrectly installed cat shelves are: plasterboard damage from brackets that pull out under dynamic load (prevented by stud-fixing), paint damage from shelf movement against the wall surface (prevented by ensuring brackets are secure), and staining from the carpet or sisal surface touching the wall surface (prevented by ensuring the shelf’s back edge does not contact the painted wall surface). For rental properties, all fixing holes must be repaired before the tenancy ends — the standard picture hook repair technique (filler, sand, and spot paint) is appropriate for cat shelf fixing holes. Always document the wall condition before installation.
Ready to Build Your Cat’s Vertical World?
These 14 ideas move through every dimension of what makes a cat shelf system genuinely enriching for the cat and genuinely beautiful for the home — from the simple elegance of a staggered floating shelf system in natural timber, to the spatial intelligence of a corner two-wall climbing route, to the playful engineering of rope bridges and dangling toys, to the complete integration of a gallery wall where cat shelves and art frames form a single composed installation. Starting with the one-week behavioral observation — watching which elevated positions the cat already seeks, how high it reaches, and which direction it looks from its highest current position — is the beginning that makes every subsequent design decision purposeful rather than generic. It costs nothing and takes a week. From that knowledge, the shelf heights, the surface specifications, the maximum elevation, and the optimal wall position all become clear choices rather than guesses. Build the test shelf first — one carpet-covered pine board on two stud-fixed L-brackets at the height you observed the cat most seeking — and watch whether the cat uses it within the first 72 hours. If it does, the full system has earned its wall space. Everything else in this list follows from that first confident step.