A small space kitchen remodel is a deliberate design approach that maximizes storage capacity, workflow efficiency, and visual openness within a constrained footprint — using strategic material choices, multi-functional fixtures, and spatial techniques that make a compact kitchen feel and function like a significantly larger one. This article gives you 15 genuinely smart, buildable small kitchen remodel ideas that deliver the storage, function, and visual quality of a full-size kitchen renovation within the real square footage most homes actually have.
The myth of the small kitchen is that it is fundamentally limited — that good design can only soften the constraint, never overcome it. The kitchens in this list prove otherwise: a small kitchen designed with genuine intention, using every cubic inch of its volume rather than just its floor plan, regularly outperforms a larger kitchen designed without that same discipline. Constraint produces better decisions. Here are 15 ideas worth saving — and building.
Why Smart Small Kitchen Remodels Work So Well
The small kitchen design discipline draws directly from the galley kitchen tradition of mid-century apartment architecture, refined through the Japanese principle of mottainai — the cultural conviction that waste, including wasted space, is a form of disrespect toward the resources available. Both traditions converge on the same design logic: in a constrained footprint, every surface must justify its existence by serving at least one function, and the best small kitchens make every surface serve two or three. This is fundamentally different from large kitchen design, where surfaces and storage can be allocated generously without the same rigor — small kitchen design is, at its core, an exercise in disciplined prioritization rather than simple miniaturization.
The materials that define a well-executed small kitchen remodel are those that maximize light reflection and minimize visual weight. Light-reflective surfaces — high-gloss cabinet fronts, polished or honed light stone benchtops, and glossy subway or zellige tile backsplashes — bounce available light around the room rather than absorbing it, which is critical in kitchens that frequently have limited natural light or a single window. Slimline hardware, integrated appliances, and handleless cabinet systems reduce the visual clutter that makes a small kitchen feel busier and smaller than its actual dimensions. Open shelving in select zones — rather than wall-to-wall upper cabinetry — creates visual breathing room and sightlines through the space that closed cabinetry blocks entirely. The colour palette leans toward warm white, soft greige, and pale natural timber tones, with a single saturated accent colour (deep sage, navy, or terracotta) used sparingly to add character without adding visual weight.
The trend has accelerated as housing density increases globally and average home and apartment sizes contract in major cities. Houzz’s 2024 Kitchen Trends Study found that 38% of kitchen renovations in the past two years occurred in spaces under 10 square meters, up from 24% in 2019 — a direct reflection of smaller new-build apartment footprints and the growing renovation market in older, smaller urban housing stock. Simultaneously, the design and architecture community has elevated small kitchen design from a budget-constrained afterthought to a genuine design specialty, with architects including Studio McGee, Norm Architects, and Australian firm YSG Studio publishing dedicated small kitchen portfolios that demonstrate the category’s design legitimacy.
Genuinely tiny kitchens — under 6 square meters, including many studio apartment and tiny house kitchens — can achieve full functional richness using the principles in this list, though the prioritization becomes more acute. In the smallest kitchens, vertical storage and multi-functional fixtures are not optional enhancements but structural necessities: every idea involving ceiling-height cabinetry, fold-down surfaces, and appliance integration in this list scales down to apply even in a 4-square-meter galley kitchen, with the only adjustment being a stricter ranking of which functions take priority when not every idea can be implemented simultaneously.
Style at a Glance
| Element | Detail |
|---|---|
| Philosophy | Every surface earns its place by serving more than one function — constraint produces better decisions than abundance |
| Key Materials | High-gloss cabinetry, honed light stone, zellige or subway tile, integrated appliances, light natural timber, slimline hardware |
| Color Palette | Warm white, soft greige, pale natural oak, deep sage or navy accent, brushed brass or matte black hardware |
15 Smart Kitchen Remodel Ideas
1. Floor-to-Ceiling Cabinetry with a Concealed Ladder Rail
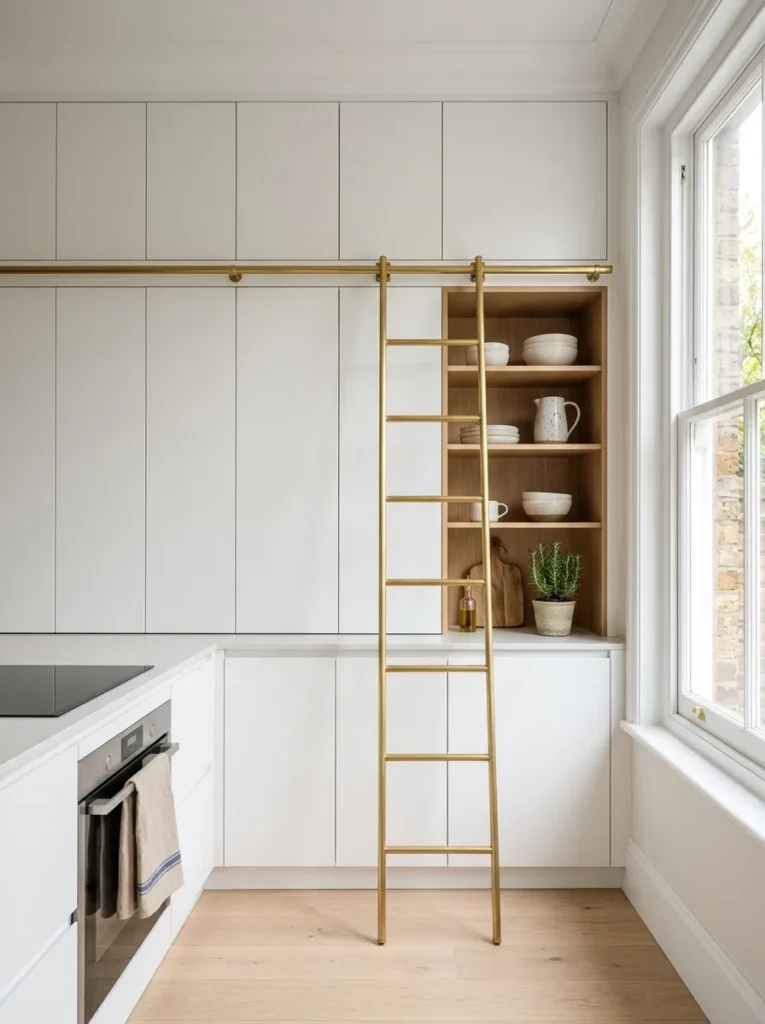
Vibe: Clean and resolved — a kitchen that uses every centimeter of height it has been given.
Why it works: The single most common small kitchen design failure is cabinetry that stops 300–450mm short of the ceiling, leaving a dead zone that collects dust and visually shortens the room. Running cabinetry to full ceiling height eliminates this dead zone entirely and can increase total storage capacity by 20–30% in a standard kitchen without adding a single centimeter of floor footprint. The concealed library ladder on a brass rail solves the access problem that typically prevents homeowners from using top-shelf storage in tall cabinetry — rather than keeping a step stool in a closet, the ladder is a permanent, elegant fixture that makes the highest shelves as accessible as the lowest. The visual effect of floor-to-ceiling cabinetry also makes the room appear taller: the unbroken vertical line draws the eye upward, which is one of the most reliable optical techniques for making a small room feel more generous than its actual dimensions.
How to get it: Specify cabinetry to the exact ceiling height during the design phase — this requires coordination with your cabinet maker before installation, as retrofitting additional height to standard cabinets after installation is rarely cost-effective. Use the top two shelves (those above 1.8 meters) for low-frequency items — seasonal serveware, appliances used only a few times a year, bulk dry goods storage — and reserve the ladder access for genuine occasional use rather than daily retrieval, which keeps the ladder a design feature rather than a daily friction point.
Quick Win: Adding a single 300–450mm shelf above existing standard-height cabinetry — even without a ladder, accessed via a small step stool — recovers the most commonly wasted vertical storage zone in any kitchen for a fraction of the cost of full cabinetry replacement.
Shop the Look
| Product |
|---|
| Brass library ladder rail kit |
| Floor to ceiling cabinet doors handleless |
| Open shelf bracket white floating |
| Ceramic bowl set warm white |
| Linen tea towel set natural |
Also view: 17 Smart Dog Supplies Storage Ideas for Any Home
2. Galley Kitchen Pull-Out Pantry Tower
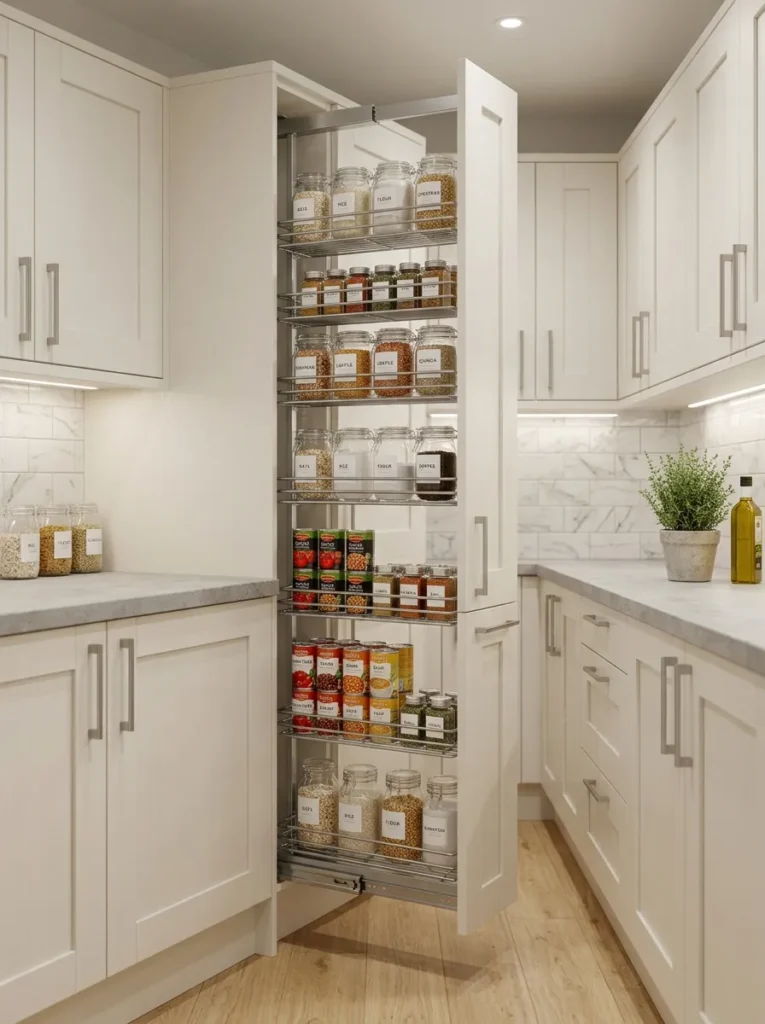
Vibe: Organized and efficient — pantry storage that appears from nowhere and disappears just as completely.
Why it works: The pull-out pantry tower is the single highest-density storage solution available for small kitchens because it converts a gap as narrow as 300mm — too slim for a standard cabinet, typically left as wasted filler space beside an appliance or at the end of a cabinet run — into a fully functional pantry with 8–12 tiered shelves. A fully extended 300mm tower provides equivalent storage volume to a standard 600mm base cabinet because the tiered shelf design accesses the full depth of the cabinet on both sides simultaneously, rather than the single-depth access of a standard cabinet shelf. This is the small kitchen design principle of dimensional efficiency: the tower does not create more space, but it accesses the space that exists far more completely than conventional storage.
How to get it: Specify a 150–300mm pull-out pantry unit on full-extension soft-close runners rated for the combined weight of a fully stocked pantry (often exceeding 40kg). Position adjacent to the oven or refrigerator, where a narrow gap commonly exists for appliance clearance — this is typically wasted space that a pull-out tower converts to active storage without requiring any reconfiguration of the surrounding cabinet layout. Use adjustable wire shelving rather than fixed shelves to accommodate items of varying heights.
Shop the Look
| Product |
|---|
| Pull out pantry tower unit 300mm |
| Full extension soft close drawer runner |
| Adjustable wire pantry shelf set |
| Glass storage jar set labeled |
| Kraft label tags pantry set |
3. Light-Reflective Zellige Tile Backsplash to the Ceiling
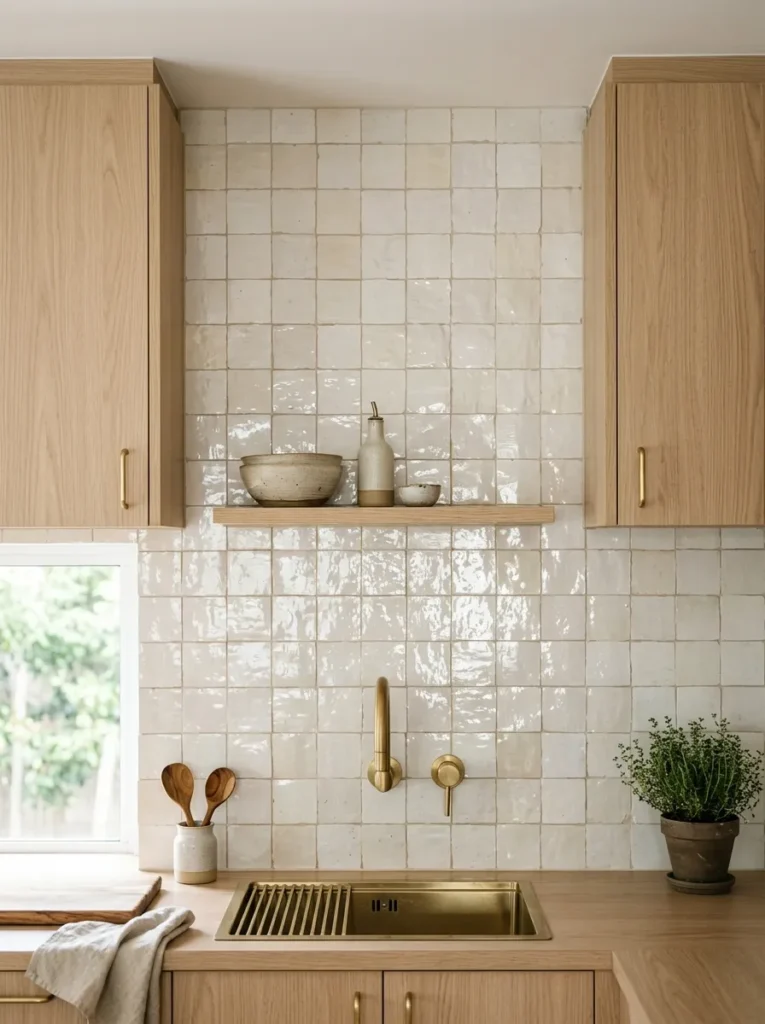
Vibe: Luminous and textured — a backsplash that makes the whole kitchen feel brighter just by being there.
Why it works: Extending a glossy, light-reflective tile backsplash to the full height between upper and lower cabinetry — rather than the standard 150–600mm splashback that most kitchens use — performs a critical optical function in small kitchens with limited natural light: every square centimeter of glossy tile surface bounces available light deeper into the room rather than absorbing it as a matte painted wall would. Zellige tile specifically is the premium material choice for this application because its hand-glazed surface produces subtle variations in glaze thickness and color that catch and scatter light at multiple angles simultaneously, producing a more dynamic and luminous wall surface than a uniform manufactured tile. The full-height application also eliminates the visual break of painted wall above a standard splashback, creating one continuous material plane that reads as more spacious than two visually distinct wall treatments stacked on top of each other.
How to get it: Source genuine handmade zellige tile from Moroccan tile suppliers (Zellige Gallery, Mosaic House, or Clé Tile all stock genuine handmade product) rather than manufactured “zellige-look” ceramic tile — the handmade glaze variation is the specific quality that produces the light-catching effect, and manufactured alternatives with uniform glaze do not achieve the same luminosity. Install with a narrow 2–3mm grout joint in a matching warm white grout — wide or contrasting grout joints break up the light-reflective continuity that makes the full-height application effective.
Shop the Look
| Product |
|---|
| Handmade zellige tile warm white |
| Tile grout warm white narrow joint |
| Brushed brass kitchen tap mixer |
| Floating shelf bracket small white |
| Ceramic vase small set |
4. Fold-Down Breakfast Bar on a Concealed Bracket System
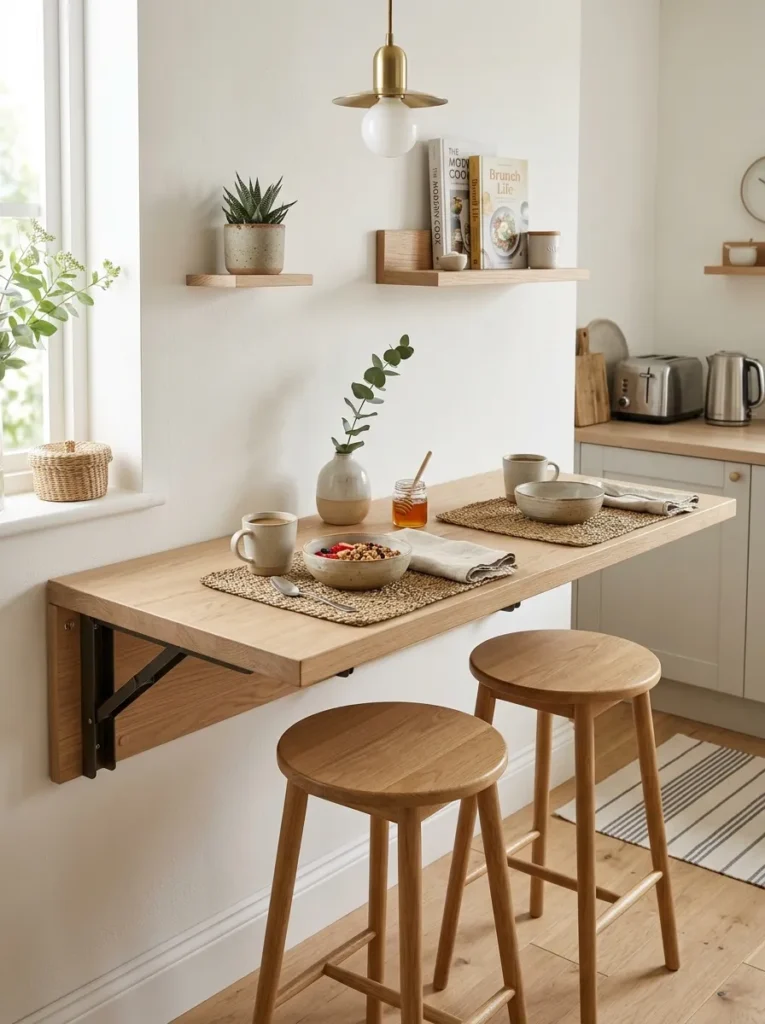
Vibe: Bright and functional — a breakfast bar that exists exactly when you need it and disappears completely when you don’t.
Why it works: The fold-down breakfast bar is the definitive small kitchen solution for the eating-space problem that most compact kitchens cannot otherwise solve — there is rarely floor area available for a permanent table and chairs, but the wall plane is almost always available. A fold-down surface on a concealed folding bracket system (rated for 40–60kg working load) provides full dining or food-prep surface area when extended and folds flush to the wall, recovering the floor space entirely, when not in use. This is the small kitchen design principle of temporal zoning: rather than permanently allocating floor area to a function used for perhaps two hours a day, the space serves as open floor for the remaining 22 hours and as a dining surface only when actively needed.
How to get it: Mount the fold-down bracket system at standard counter height (900mm) for a working surface, or at standard dining table height (750mm) if the primary use is seated dining rather than food preparation. Specify brackets rated for at least 50kg working load — the surface needs to support not just place settings but the weight of leaning or light cooking activity. Use stools that fully tuck beneath the folded-down position, with a seat height 250–300mm below the counter surface for comfortable knee clearance.
Quick Win: A pre-made fold-down table bracket kit ($35–60 at any hardware store) paired with a single cut piece of timber or laminate board ($40–80 depending on material) creates a complete fold-down breakfast bar for under $150 in materials, installable in a single afternoon without specialist carpentry skills.
Shop the Look
| Product |
|---|
| Folding table bracket set heavy duty |
| Pale oak timber board cut to size |
| Bar stool stackable wood |
| Pendant light small brass |
| Woven placemat set natural |
5. Integrated Appliance Wall with Flush Panel Fronts
Vibe: Clean and seamless — a kitchen wall that reads as architecture rather than appliances.
Why it works: Integrated appliances — refrigerators, dishwashers, and sometimes ovens fitted with matching cabinet panel fronts that conceal the appliance behind continuous cabinetry — are the single most effective technique for reducing the visual clutter that makes small kitchens feel busier and more cramped than their actual dimensions. A kitchen with three or four different appliance finishes (stainless steel refrigerator, black oven, white dishwasher) creates visual noise that fragments the room into separate competing elements; a kitchen with every appliance concealed behind matching panels reads as one continuous, calm material plane. This technique is disproportionately valuable in small kitchens specifically because visual fragmentation has a more significant negative impact in a compact room where every surface is within close visual range, compared to a large kitchen where appliance variety has more room to visually disperse.
How to get it: Specify integrated (panel-ready) appliance models during the appliance selection phase — these are a distinct product category from standard appliances and require panel fronts to be ordered and fitted by your cabinet maker to match. Budget for the panel-ready premium: integrated appliances typically cost 20–40% more than their standard equivalents, but the visual continuity they create is one of the most reliable ways to make a small kitchen feel larger and more considered.
Shop the Look
| Product |
|---|
| Panel ready integrated refrigerator |
| Panel ready integrated dishwasher |
| Matching cabinet panel front custom |
| Brushed brass cabinet handle single |
| Pale oak engineered flooring |
6. Corner Carousel Cabinet with Full 360-Degree Access
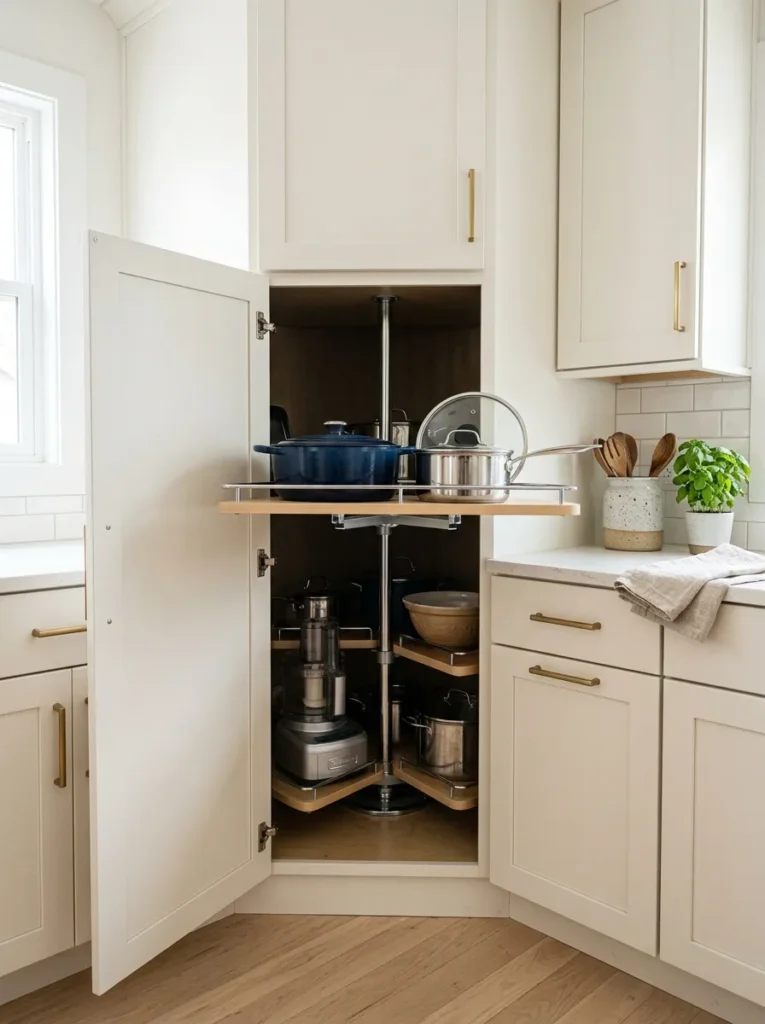
Vibe: Organized and efficient — the corner that finally stops swallowing everything you put into it.
Why it works: Corner base cabinets are the single most consistently underutilized storage zone in any kitchen, small or large, because the depth of a standard corner cabinet places items at the back of the corner beyond comfortable reach — items get pushed in and forgotten, and the corner becomes a storage dead zone despite its substantial volume. A full carousel system — a rotating shelf mechanism that brings stored items around to the cabinet opening rather than requiring the user to reach into the depth of the corner — recovers 100% of the corner cabinet’s volume as genuinely accessible storage. In a small kitchen, where corner cabinets often represent 15–20% of total base cabinet volume, converting this previously near-useless space into fully accessible storage is one of the highest-impact single interventions available.
How to get it: Specify a full 360-degree carousel system (rather than the partial “lazy susan” half-circle systems, which still leave a dead zone at the rear of the corner) when planning corner cabinet hardware. Le Mans corner systems and full carousel kidney-shaped shelving are the two most effective full-access mechanisms — both bring stored items completely around to the door opening with no fixed dead zone remaining in the cabinet.
Shop the Look
| Product |
|---|
| Full carousel corner cabinet mechanism |
| Le Mans corner pull out system |
| Ceramic kitchen canister set |
| Brass cabinet handle bar pull |
| Cookware set nesting space saving |
7. Open Shelving Zone with Integrated Plate Rail Storage
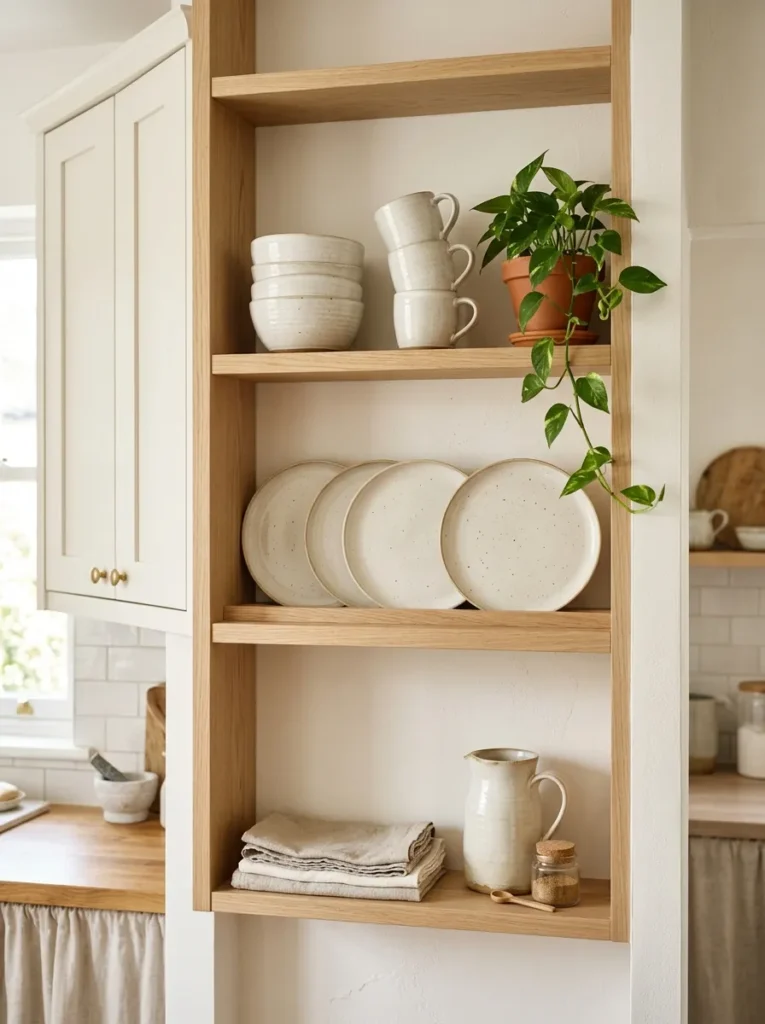
Vibe: Warm and curated — open shelving that makes everyday dishware look like a styled collection.
Why it works: Open shelving in a small kitchen performs a function that closed cabinetry cannot: it creates visual breathing room and unobstructed sightlines through the kitchen, which is one of the most effective techniques for making a compact room feel larger than its floor area suggests. A kitchen with upper cabinetry on every wall reads as a box; a kitchen with even one section of open shelving creates a moment of visual permeability that breaks the boxed feeling. The integrated plate rail — a routed groove that holds plates upright on display rather than stacked flat — adds genuine storage density (vertical plate storage uses less depth than stacked storage while displaying the full plate face) while creating the kind of considered, styled detail that distinguishes a designed kitchen from a purely functional one.
How to get it: Limit open shelving to one or two sections of the total upper cabinet run — full open shelving throughout a small kitchen removes too much enclosed storage and creates a maintenance burden, as every item on open shelving requires consistent styling and dust management. Rout the plate rail groove at 12mm depth and 8mm width into a 40mm thick timber shelf, sized to the specific plate diameter in regular use — most standard dinner plates require a groove spaced at 15–20mm from the shelf’s rear edge for stable vertical support.
Quick Win: Removing a single existing upper cabinet door and leaving the cabinet box as open shelving — rather than building new open shelving from scratch — achieves the visual breathing room effect at zero material cost, using cabinetry that is already installed.
Shop the Look
| Product |
|---|
| Pale oak timber shelf with plate groove |
| Floating shelf bracket concealed |
| Stoneware dinner plate set warm white |
| Ceramic mug set natural tone |
| Linen napkin stack natural |
8. Slimline Drawer Dishwasher Beneath the Sink
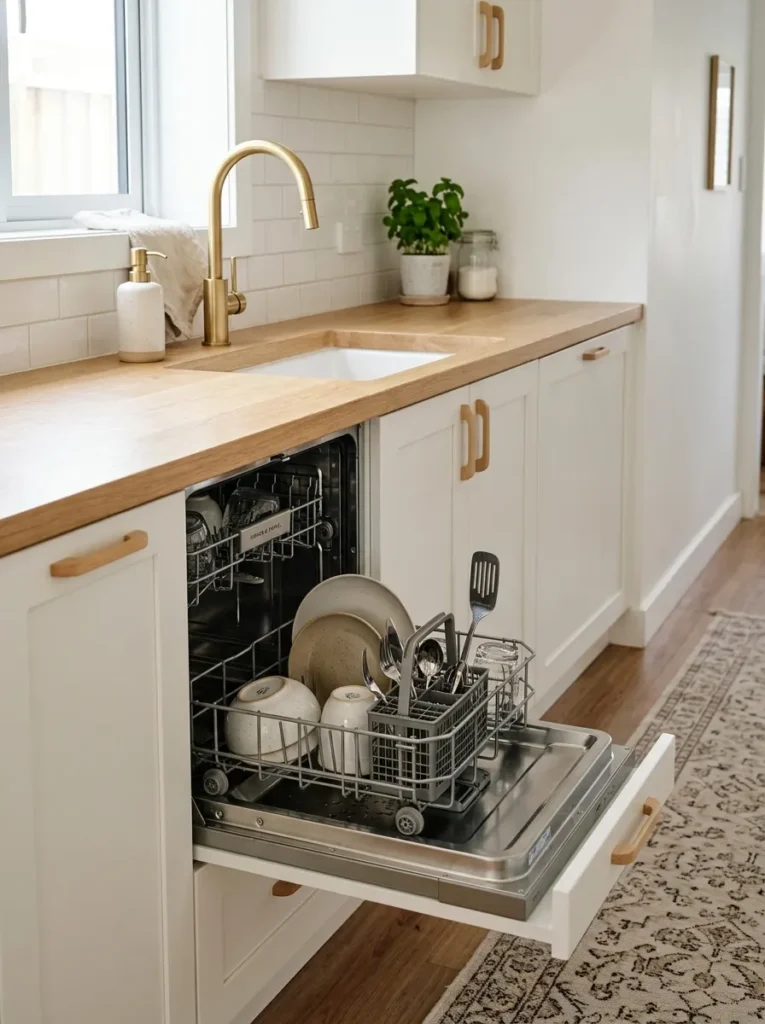
Vibe: Efficient and considered — proof that a small kitchen does not have to sacrifice a dishwasher to fit everything else in.
Why it works: Standard full-width dishwashers (600mm) consume a significant proportion of available base cabinet run in a small kitchen, often forcing a tradeoff between dishwasher inclusion and adequate food preparation or storage cabinetry. A slimline single-drawer dishwasher (typically 450mm wide, sometimes available in narrower 300mm formats) reduces this footprint significantly while still providing genuine dishwashing capacity for one or two-person households — the most common occupancy for small kitchen spaces. Positioning the drawer dishwasher directly beneath the sink, rather than requiring a separate cabinet run, consolidates the kitchen’s water-use zone into a single compact area, which is a meaningful plumbing simplification that can reduce both installation cost and the footprint required for water supply and drainage runs.
How to get it: Specify a single-drawer dishwasher model (Fisher & Paykel and Miele both offer well-regarded slimline drawer dishwasher ranges) sized to fit beneath a standard sink cabinet without requiring the sink itself to be relocated. Confirm with your cabinet maker that the drawer dishwasher’s water and drainage connections can share the existing sink plumbing run, which typically reduces installation labor compared to a separate dishwasher plumbing connection elsewhere in the kitchen.
Shop the Look
| Product |
|---|
| Single drawer dishwasher compact |
| Undermount kitchen sink narrow |
| Brushed brass kitchen tap mixer |
| Ceramic soap dispenser pump |
| Pale oak benchtop offcut |
9. Magnetic Knife Strip and Utensil Rail on the Splashback

Vibe: Clean and efficient — tools at hand exactly where the hand needs them.
Why it works: The magnetic knife strip and utensil rail combination recovers two of the most consistently cluttered storage zones in any small kitchen — the knife block, which occupies 150–250mm of valuable counter depth, and the utensil crock, which occupies similar counter real estate while making frequently needed tools harder to locate at a glance. Moving both functions to the vertical splashback plane above the counter — rather than the horizontal counter surface — frees counter depth for actual food preparation, which is disproportionately valuable in small kitchens where counter space is the most contested resource in the room. The visual display of knives and utensils on the wall also creates a kind of functional styling: well-chosen kitchen tools arranged cleanly on a rail read as a considered design detail rather than visible clutter.
How to get it: Mount the magnetic knife strip at a height that places the blade edge at a safe working level — typically 1.4–1.5 meters from the floor, high enough to be out of reach of small children but accessible without a stretch for an adult. Use a strong rare-earth magnet strip rated to hold the combined weight of a full knife set securely — budget magnetic strips with weak magnets are a genuine safety hazard if a knife slips during removal.
Quick Win: A single magnetic knife strip ($25–45) mounted on the splashback directly above the primary food prep zone immediately frees 150–200mm of counter depth that a freestanding knife block previously occupied — measurable, immediate counter space recovery for one of the simplest installations in this entire list.
Shop the Look
| Product |
|---|
| Magnetic knife strip brass 40cm |
| Brass utensil rail with hooks |
| S-hook set stainless small |
| Wooden cutting board set |
| Kitchen knife set quality |
10. Toe-Kick Drawer Storage at Cabinet Base Level
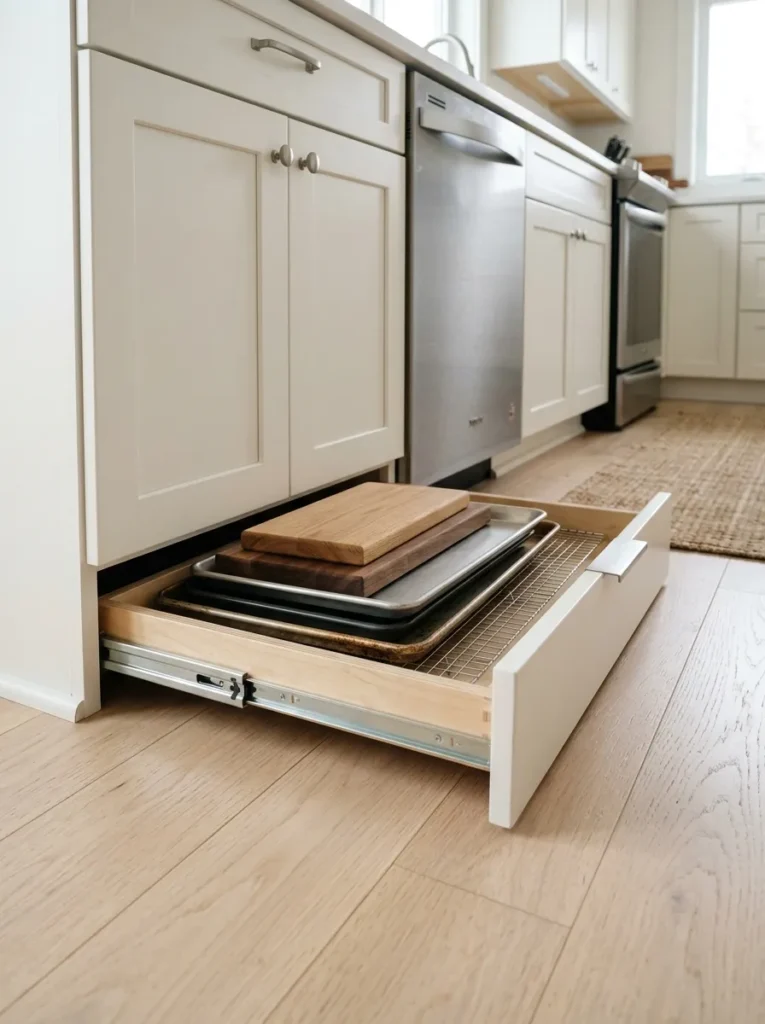
Vibe: Clever and efficient — storage from the one zone of every kitchen that nobody else thinks to use.
Why it works: The toe-kick recess — the 100mm tall, full-depth gap at the base of standard kitchen cabinetry, present in every kitchen regardless of size — is storage volume that exists in literally every kitchen and is used in almost none. Converting one or more toe-kick sections to shallow pull-out drawers recovers this space specifically for the flat, awkward-to-store items that cause the most storage frustration in small kitchens: baking trays, cooling racks, cutting boards, and platters, all of which are too thin and too large in footprint to store efficiently in standard cabinet shelving but fit perfectly in a shallow, full-width toe-kick drawer. Because this storage exists below the sightline and outside the normal cabinet volume calculation, it is genuinely additive storage rather than storage that competes with other functions for the same cabinet space.
How to get it: Specify toe-kick drawers on low-profile drawer runners (rated specifically for the reduced 90–100mm height of a toe-kick cavity) during the cabinet design phase — retrofitting toe-kick drawers into existing cabinetry is possible but requires the existing toe-kick panel to be removed and a drawer box built to the specific cavity dimensions, which is more easily executed during a full remodel than as a standalone addition. Fit a small recessed pull or a kick-plate-style finger groove rather than a protruding handle, which would create a trip hazard at floor level.
Shop the Look
| Product |
|---|
| Low profile toe kick drawer runner |
| Recessed drawer pull kick plate style |
| Baking tray set nesting |
| Wooden cutting board set flat |
| Cooling rack stackable |
11. Mirrored or Glass Upper Cabinet Backing for Visual Depth
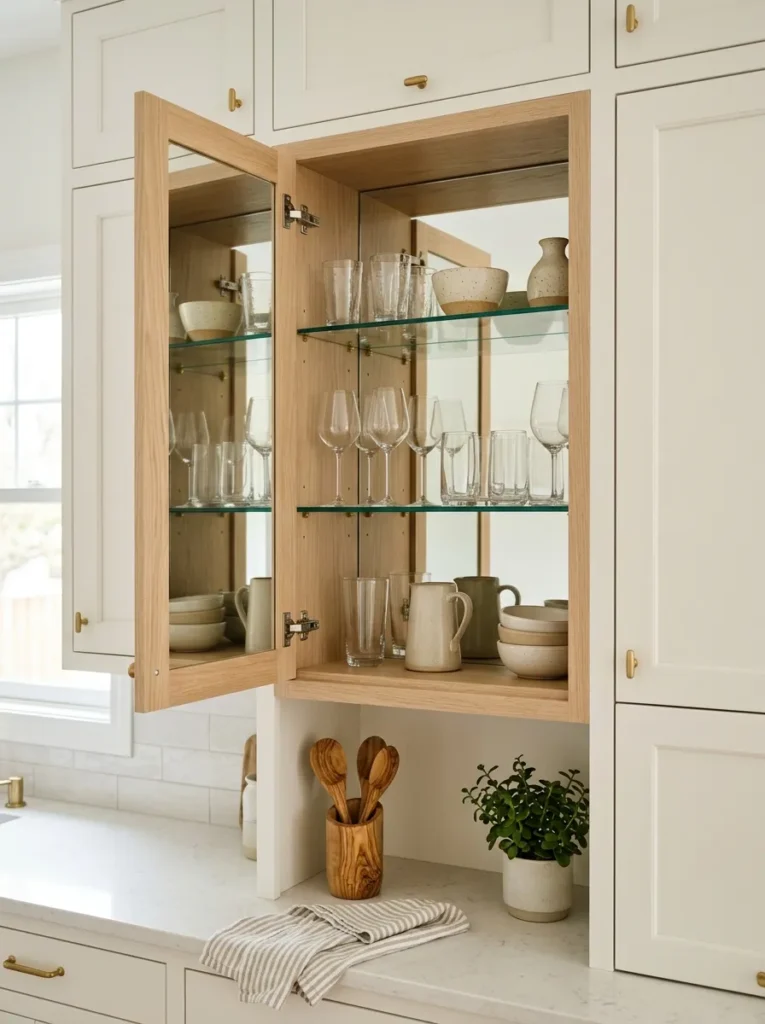
Vibe: Luminous and clever — a cabinet that appears to hold twice what it actually does.
Why it works: Mirrored cabinet backing is an optical technique borrowed from small bar and restaurant design, where the same constraint of limited footprint and the same goal of perceived spaciousness apply directly. A glass-fronted cabinet with a mirrored rear panel, rather than a solid timber or laminate back panel, reflects both the stored glassware or ceramics and the ambient light of the room, creating a genuine perception of doubled depth and significantly increased brightness in the specific zone where the cabinet is installed. This technique works most effectively in glass-fronted display cabinets used for glassware, white ceramics, and other items with reflective or light-coloured surfaces — the mirror effect is most convincing when the displayed items themselves catch and bounce light, rather than with opaque dark-coloured storage that absorbs rather than reflects.
How to get it: Specify mirrored MDF or a cut mirror panel (4–6mm thickness) as the rear panel material for one or two glass-fronted upper cabinets during the cabinet design phase. Position these mirrored cabinets in the kitchen’s primary sightline from the main entry point or adjacent living space — the optical depth effect provides the most value when it is visible from the angle most commonly experienced when first entering or viewing the kitchen.
Quick Win: Applying a sheet of adhesive mirror film ($15–25 per roll) to the interior back panel of an existing glass-fronted cabinet achieves a meaningful portion of the visual depth effect without replacing the cabinet itself, at a fraction of the cost and installation time of custom mirrored panels.
Shop the Look
| Product |
|---|
| Mirrored MDF panel sheet |
| Glass front cabinet door custom |
| Adhesive mirror film roll |
| Glassware set clear |
| Brass cabinet pull small |
12. Induction Cooktop with Integrated Pull-Out Extraction
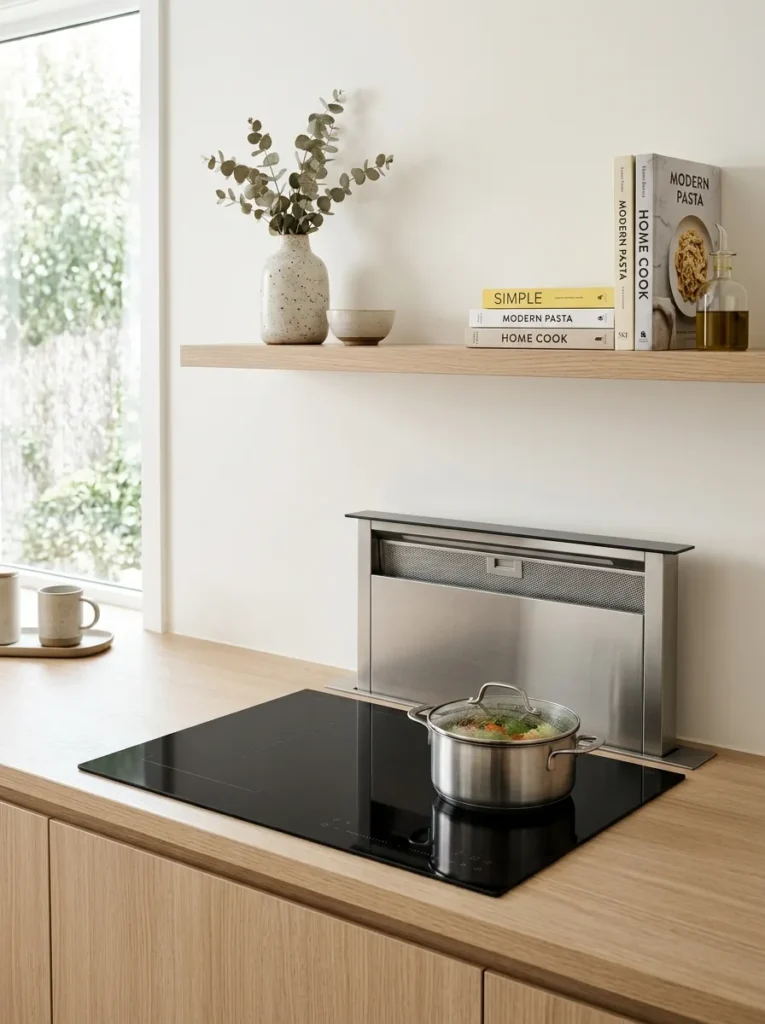
Vibe: Clean and minimal — a cooking zone that disappears when it is not in use.
Why it works: A standard overhead range hood is one of the most visually dominant and spatially demanding fixtures in any kitchen, typically requiring 600–900mm of dedicated wall space directly above the cooktop and creating a hard visual boundary that breaks up the kitchen’s upper cabinet sightlines. Replacing the overhead range hood with an induction cooktop paired with an integrated downdraft or pull-out extraction system — a slimline fan unit that rises from behind the cooktop only when activated and retracts flush when not in use — eliminates this dominant fixture entirely, freeing the wall space above the cooktop for open shelving, additional cabinetry, or simply an unbroken visual plane. Induction cooking itself contributes to the small kitchen advantage independently: induction cooktops produce significantly less ambient heat than gas or standard electric cooktops, which matters disproportionately in small kitchens where heat from cooking has fewer cubic meters of air volume to dissipate into.
How to get it: Specify a downdraft or pull-out extraction system rated for the cooktop’s maximum BTU/wattage output — these systems require sufficient extraction power to compensate for their lower mounting position relative to a standard overhead hood, and underpowered downdraft systems are a common installation regret. Confirm ducting requirements with your installer before committing to this layout, as downdraft systems typically require ducting to run beneath the floor or through a rear wall, which is a more significant structural consideration than the vertical ducting run of an overhead hood.
Shop the Look
| Product |
|---|
| Induction cooktop flush black glass |
| Pull out downdraft extraction system |
| Pale oak benchtop engineered |
| Floating shelf set above cooktop |
| Cookware set induction compatible |
13. Narrow Rolling Kitchen Cart for Flexible Extra Counter Space
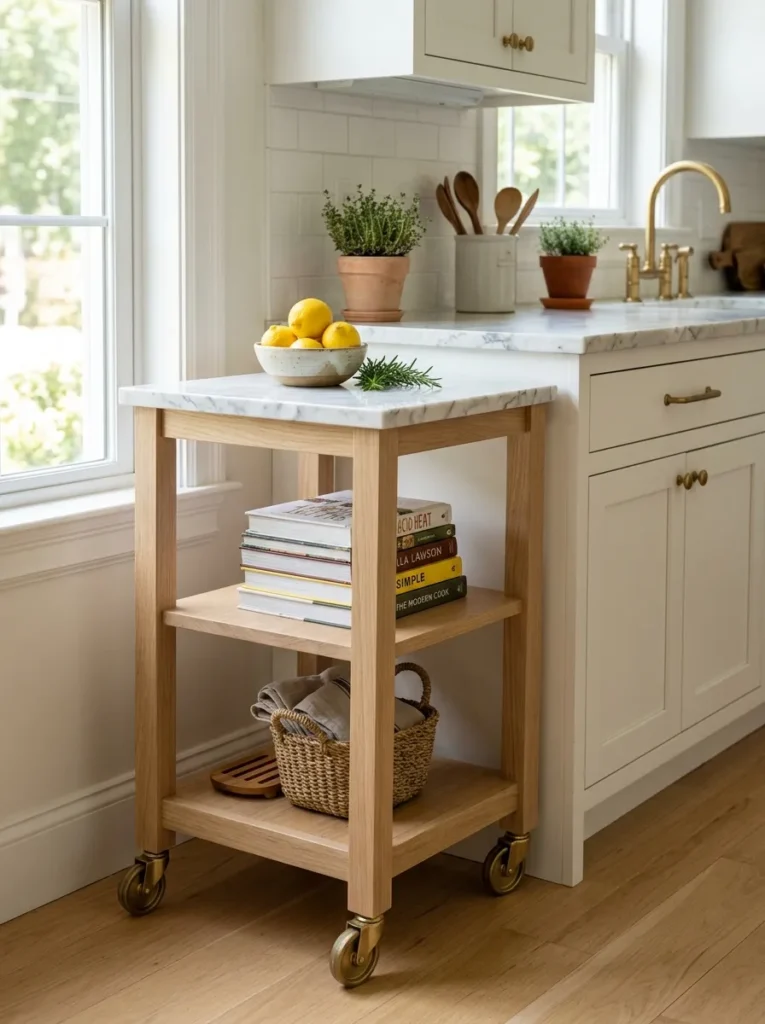
Vibe: Flexible and warm — extra counter space that shows up exactly when you need it and rolls away when you don’t.
Why it works: A narrow rolling kitchen cart is the most flexible single furniture solution available for small kitchens because it provides genuine additional counter surface and storage on demand, without permanently committing any floor area to that function. Positioned flush against the main counter run during food preparation, the cart effectively extends the working surface by 300–450mm; rolled aside or into an adjacent dining or living space during a dinner party, the same cart becomes a serving station or bar cart. This temporal flexibility — the same object serving different functions at different times of day — is one of the defining design principles of effective small space design, and a kitchen cart is among the easiest and lowest-cost ways to apply that principle without any structural modification to the kitchen itself.
How to get it: Choose a cart with a width that matches a useful fraction of your standard counter depth — a 350–450mm wide cart provides genuinely useful additional prep space, while narrower carts mainly serve a storage rather than working-surface function. Prioritize a stone or solid timber top over laminate for a cart intended for active food preparation use — the top surface needs to withstand the same use demands as the primary counter when the cart is functioning as an extension of it.
Quick Win: A simple IKEA RÅSKOG or similar metal-frame rolling cart ($40–90) provides the same flexible extra-surface benefit as a custom timber and stone cart at a fraction of the cost, and the metal wire shelving below offers highly visible, easily accessed storage for items used daily.
Shop the Look
| Product |
|---|
| Rolling kitchen cart marble top |
| Brass caster wheel set lockable |
| Open wire shelf storage cart |
| Ceramic fruit bowl medium |
| Woven storage basket small |
14. Pegboard Cookware Wall with Removable Hook System
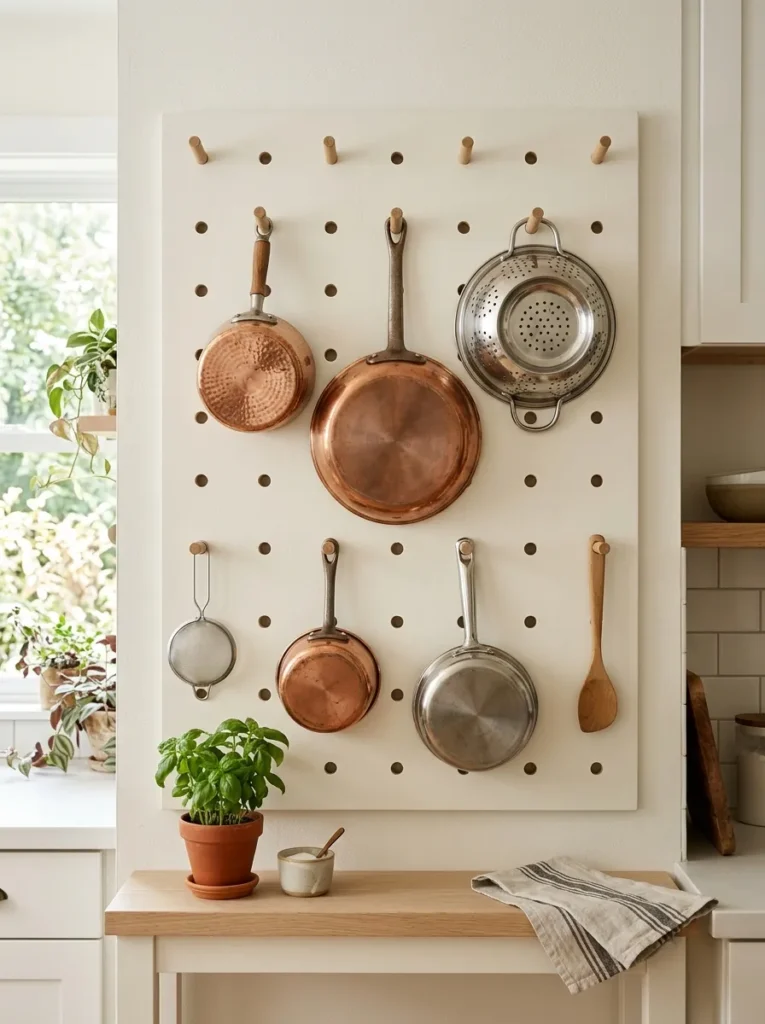
Vibe: Organized and warm — a kitchen wall that turns cookware storage into a design feature.
Why it works: A pegboard cookware wall converts the wall plane into fully flexible vertical storage that adapts to a changing cookware collection without requiring any cabinetry modification — when a new pot is purchased or a pan is retired, the peg configuration is rearranged in minutes rather than requiring a cabinet shelf to be re-measured or adjusted. In a small kitchen, dedicating a base cabinet to pot and pan storage is a significant allocation of the kitchen’s most valuable resource — the pots and pans that fit in a single 600mm cabinet typically consume the equivalent storage volume of two to three other functional zones. Moving this storage to an underused wall plane recovers that base cabinet entirely for other functions while keeping frequently used cookware genuinely more accessible than it would be stacked in a cabinet, where the bottom pot in a stack requires unstacking the pots above it to access.
How to get it: Mount painted MDF pegboard (6mm thickness, painted to match the surrounding wall colour for visual continuity) using 25mm standoff spacers for hook clearance. Use wooden pegs rather than metal hooks for pots and pans specifically — wooden pegs distribute weight across a wider contact surface and are less likely to scratch non-stick or enamel cookware finishes than a metal hook’s narrower contact point.
Shop the Look
| Product |
|---|
| Painted pegboard panel white |
| Pegboard standoff spacer kit |
| Wooden peg hook set cookware |
| Cookware set copper stainless |
| Colander stainless steel |
15. Under-Cabinet LED Lighting with Motion Sensor Activation
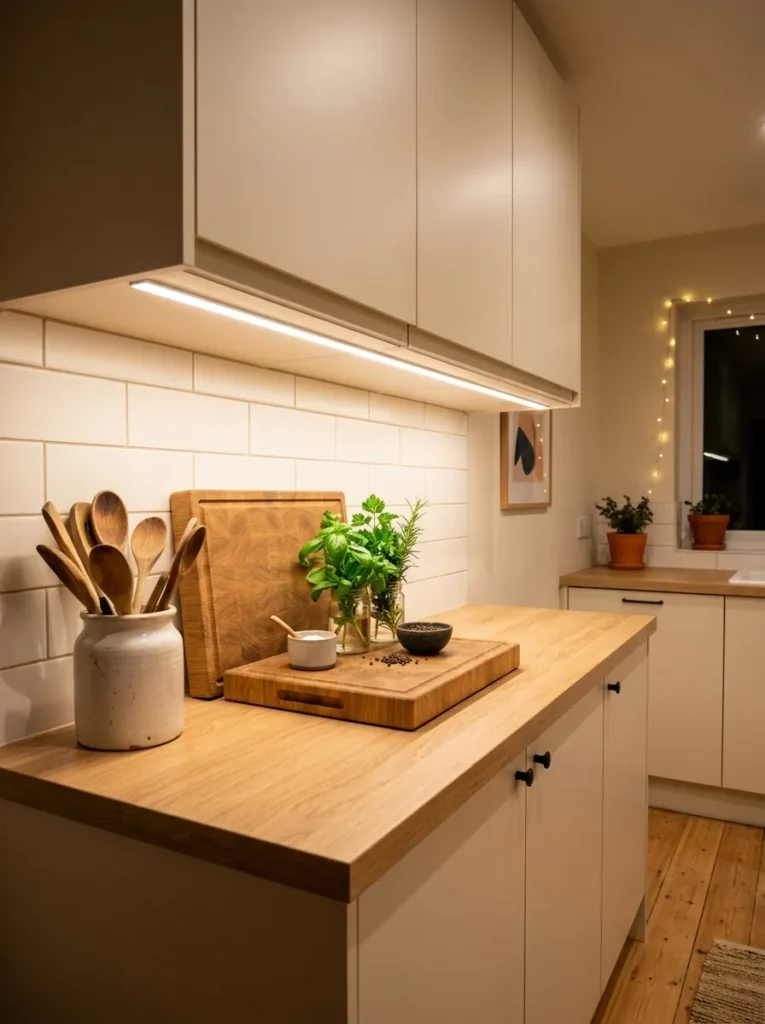
Vibe: Warm and functional — a kitchen that looks and works as good at 7pm as it does at noon.
Why it works: Under-cabinet lighting is the single most functionally significant lighting upgrade available in any kitchen, and disproportionately valuable in small kitchens where overhead lighting alone frequently cannot reach the counter surface without the upper cabinetry casting a shadow directly onto the primary food preparation zone. A continuous LED strip mounted to the underside of the upper cabinets illuminates the counter evenly without shadow interference, which is both a genuine safety improvement (visibility while using knives and hot cookware) and a significant atmospheric upgrade that makes the kitchen feel finished and considered during evening use, when most kitchens otherwise rely on a single inadequate overhead fixture. Motion sensor activation adds a further functional refinement specifically suited to small kitchens, where the counter is often used briefly and repeatedly throughout the day — automatic activation removes the friction of a manual switch for quick tasks like making a coffee or grabbing a snack.
How to get it: Install a continuous LED strip (rather than puck-style spot lights, which create alternating bright and shadowed zones along the counter) at 4000K colour temperature for accurate food colour rendering — warmer 2700K light, while cozy in living spaces, renders food colours inaccurately, which matters specifically in a food preparation context. Position the strip toward the front edge of the cabinet underside, closer to the user, rather than at the rear against the splashback, which produces more even, shadow-free illumination across the full counter depth.
Quick Win: A battery-operated, motion-sensor LED strip light kit ($25–40) requires no wiring or electrician and installs with adhesive backing in under 20 minutes, delivering the full functional benefit of hardwired under-cabinet lighting at a fraction of the cost and installation complexity.
Shop the Look
| Product |
|---|
| LED strip light under cabinet 4000K |
| Motion sensor LED controller |
| Adhesive mounting clips strip light |
| Ceramic utensil holder counter |
| Wooden cutting board medium |
How to Start Your Small Kitchen Remodel
Your single first move is to commission or create a precise scaled floor plan of your existing kitchen — measured to the centimeter, including every door swing, window position, and existing plumbing and electrical point — before selecting a single material, appliance, or layout idea. Small kitchen remodels fail more often from spatial miscalculation than from any other single cause: a refrigerator door that cannot fully open because it was specified 50mm too close to an adjacent wall, a dishwasher that conflicts with a drawer below it, a walkway that measures 900mm on paper but 850mm once skirting boards and door architraves are accounted for. In a small kitchen, these margins of error that a larger kitchen could absorb without consequence become genuine functional failures. The floor plan is not a formality before the design begins — it is the foundation that determines which of the 15 ideas in this list are physically achievable in your specific space.
The most common mistake in small kitchen remodels is prioritizing the visually exciting decisions — the tile, the cabinet colour, the hardware finish — before resolving the functional layout and storage strategy. A beautifully tiled small kitchen with inadequate storage and a workflow that requires crossing the room three times to plate a single meal will frustrate its owner daily regardless of how it photographs. The correct sequence is: resolve the work triangle (the relationship between sink, refrigerator, and cooktop) and the storage strategy first, confirm that every appliance and storage zone has a logical, efficient relationship to the others, and only then move to the material and finish decisions that determine the kitchen’s visual character.
Three specific upgrades under $150 that create immediate small kitchen impact: (1) A motion-sensor battery LED under-cabinet light strip ($25–40) installed in under 20 minutes immediately improves both the functional usability and the evening atmosphere of any existing kitchen counter without any electrical work. (2) A magnetic knife strip mounted on the splashback ($25–45) recovers 150–200mm of counter depth previously occupied by a knife block, an immediate and measurable space gain. (3) A rolling kitchen cart from a flat-pack retailer ($40–90) provides genuinely flexible extra counter space and storage without any permanent commitment of floor area, and can be returned or repurposed if the kitchen’s needs change.
Realistically, a small kitchen remodel addressing the layout, storage, and finishes comprehensively — full cabinetry replacement, integrated appliances, tile backsplash, and lighting — costs $15,000–35,000 for a kitchen under 10 square meters, depending on appliance specification level and material choices. A more modest small kitchen refresh — retaining the existing cabinet boxes but replacing fronts and hardware, adding a tile backsplash, upgrading lighting, and introducing one or two of the storage solutions in this list (a pull-out pantry tower, a toe-kick drawer) — costs $4,000–9,000. A budget-focused small kitchen improvement using only the under-$150 upgrades and DIY-achievable ideas from this list — under-cabinet lighting, a magnetic knife strip, a rolling cart, a pegboard cookware wall — costs $300–600 and can be completed across a single weekend, delivering a meaningful functional and visual improvement without any structural or cabinetry work.
Frequently Asked Questions About Small Kitchen Remodel Ideas
What is the best layout for a very small kitchen?
The galley layout — two parallel runs of cabinetry facing each other with a walkway between them — is consistently the most space-efficient layout for very small kitchens, because it places every storage and appliance zone within the shortest possible reach of the work triangle (sink, refrigerator, cooktop) without the wasted circulation space that an L-shaped or U-shaped layout can introduce in a constrained footprint. The minimum functional walkway width for a galley kitchen is 1,070mm (42 inches) to allow two people to pass or for an appliance door to open while someone stands at the opposite counter; 1,200mm (47 inches) is preferable where the floor plan allows it. Single-wall layouts, where all cabinetry and appliances run along one wall, are the correct choice for the smallest kitchens — under 6 square meters — where even a galley layout’s two parallel runs would leave insufficient walkway width to function comfortably.
What colors make a small kitchen look bigger?
Warm white and soft greige are the two most reliably effective colour choices for making a small kitchen appear larger, because both reflect available light without the stark, clinical quality of pure white, and both create a continuous, unbroken colour field across cabinetry and walls that avoids the visual fragmentation that high-contrast colour schemes introduce. Extending the same or a closely related tone from the cabinetry to the walls and even the ceiling — rather than using a contrasting wall colour — removes the visual boundaries that make a room read as a collection of separate planes rather than one continuous volume. A single saturated accent colour (deep sage, navy, or terracotta) is best confined to a small proportion of the kitchen — an island, a single run of lower cabinetry, or a tile backsplash — rather than distributed evenly throughout, which preserves the spaciousness benefit of the dominant light palette while still introducing character.
How much does a small kitchen remodel typically cost?
A comprehensive small kitchen remodel — under 10 square meters, including full cabinetry, integrated appliances, stone benchtops, tile backsplash, and lighting — typically costs $15,000–35,000 depending on appliance specification and material quality, with the lower end reflecting laminate benchtops and mid-range appliances and the upper end reflecting stone benchtops, premium integrated appliances, and custom cabinetry. A mid-range refresh that retains existing cabinet boxes while replacing fronts, hardware, backsplash, and lighting typically costs $4,000–9,000. The cost-per-square-meter for small kitchen remodels is generally higher than for large kitchen remodels, because fixed costs — appliance delivery, plumbing and electrical rough-in, demolition — do not scale down proportionally with kitchen size, meaning a small kitchen often pays a similar baseline cost to a larger kitchen for these fixed elements while having less square footage of finishes to spread that cost across.
What appliances are best for a small kitchen?
The appliance specifications that consistently perform best in small kitchens are: a single-drawer or compact dishwasher (450mm or narrower) rather than a full 600mm unit where counter and cabinet space is genuinely constrained; an induction cooktop, which produces less ambient heat and pairs with slimline downdraft extraction rather than a space-demanding overhead range hood; a counter-depth or slimline refrigerator (600–700mm depth rather than the 750–800mm depth of standard full-size refrigerators) that sits flush with surrounding cabinetry rather than protruding into the walkway; and panel-ready integrated models for refrigerator and dishwasher specifically, which allow these appliances to be finished in matching cabinetry fronts that preserve visual continuity. Multi-function appliances — a combination microwave-convection oven, or an induction cooktop with an integrated griddle zone — also reduce the total appliance count and corresponding footprint required in a small kitchen layout.
How do I add more storage to a small kitchen without a full remodel?
Five specific interventions add meaningful storage to a small kitchen without requiring a full cabinetry replacement: installing a pull-out pantry tower in any gap of 150mm or wider beside an appliance or at the end of a cabinet run; converting toe-kick recesses to shallow pull-out drawers for flat item storage; adding a full carousel mechanism to an existing corner cabinet to recover its previously inaccessible rear volume; mounting a pegboard or magnetic strip system on any available wall or splashback space to move cookware and tools off the counter and out of cabinets entirely; and extending existing cabinetry to the ceiling with one or two additional shelves above the standard cabinet height, accessed with a step stool, for low-frequency item storage. All five interventions can typically be completed by a cabinet maker or handy homeowner without requiring a full kitchen renovation, plumbing relocation, or extended construction timeline.
Ready to Build Your Smart Small Kitchen?
These 15 ideas span the full range of what a small kitchen remodel can achieve — from floor-to-ceiling cabinetry with a concealed brass ladder and a full carousel corner system, to a fold-down breakfast bar, an integrated appliance wall that reads as continuous architecture, and a pegboard cookware wall that turns storage into design — so whether you are planning a comprehensive renovation or a weekend-scale functional upgrade, there is a genuinely buildable approach here that respects your kitchen’s real dimensions rather than apologizing for them. The transformation works best when it follows the correct sequence: a precise floor plan first, the work triangle and storage strategy second, and the visual finishes — tile, hardware, paint colour — only once the functional layout is fully resolved. Today’s specific action: measure your kitchen’s exact dimensions, including every appliance, door swing, and walkway width, and write them down on paper before you look at a single tile sample or paint swatch — that measured plan is the document every other decision in this list depends on. When the remodel is complete and you can reach every shelf, store every pot, prepare a full meal without crossing your own walkway twice, and the room reads as considered and spacious rather than apologetically small, you will have proven the central argument of this entire list: that constraint, met with genuine design intention, produces a better kitchen than abundance ever could on its own. Save the ideas that solve your kitchen’s specific bottleneck — the corner that swallows everything, the counter that’s never quite enough, the appliance wall that feels chaotic — and start there.